24
Menu Operations
Settings for select buttons (assigning
sources/destinations to be selected)
For a button to be used as a select button, assign a source
and/or a destination to be selected when you press the
button.
To use a button as a phantom, set the phantom name on the
source side.
1
Select the number of the button to be set as a select
button using the cursor keys,.
You can switch source settings and destination settings
with [F1].
Normally you may select sources 1 through 32 and
reentry M/E1 through M/E3, and P/P1. If you press
[F2], you can select sources 33 through 64 and reentry
M/E4 through M/E6, and P/P2. To use source 33
through 64 or reentry M/E4 through M/E6, and P/P2,
use the button on which the SHIFT function has been
assigned.
2
Press [Enter].
The unit enters Name Input mode.
If you press [Enter] again before entering a name, the
current setting is erased.
Pressing [Ctrl]-[F] cancels an entry and restores the
original function of the button.
3
a) When the primary station menu item “J: NAME
STYLE” is set to “Type + Num”:
Specify the source name and destination name by
selecting the type name from the list in the lower
portion of the display using [0] to [V], and entering a
number.
b) When the primary station menu item “J: NAME
STYLE” is set to“DESCRIP.NAME”:
Two input modes (Description Input mode and Type +
Number Input mode) are available. Each time you
press [Ctrl]-[N], the input modes are toggled.
Description Input mode: Directly enter the first 7
characters of the description name using the alphabetic
and numeric keys.
Type + Number Input mode: Enter in the same
manner as in a) above.
4
Press [Enter].
The entered name is registered.
Note
When a description name has been specified for the
connector, the description name takes priority for
displaying the name even if you enter a Type +
Number name.
Notes
• Set the destination to be used as default when the power
is turned on in CONTROL DESTINATION. To use this
unit as a single-destination panel, enter the name of the
destination to be used here.
• If you want the button on which the phantom has been
set to light when executing the phantom, enter the same
name as that of the source selected for the destination set
for that phantom that corresponds to a destination that
can be controlled from this unit.
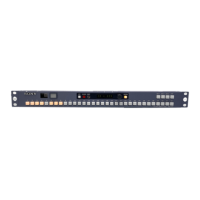
Setting a monitor function
You can specify the monitor function for a select button.
What is the monitor function?
This is a function to observe the status of a destination
specified with “MONITOR DESTINATION” of menu
item Z, and always selects the same source as that for the
destination.
For details on specifying the destination, see “MONITOR
DESTINATION (MKS-8082 only)” on page 32 of “Menu
item Z: SET PANEL STATUS.”
Setting procedure
1
Select the number of the button to be set as the monitor
button using the cursor keys.
2
Press [M].
“MONI” appears, and the monitor function is assigned
to the button selected in step 1 (hereinafter called the
Monitor button).
Setting the TAKE function
What is the TAKE function?
The name selected with the SELECTOR knob on the front
panel is taken.
In AUX mode
Maximum of 128 inputs and 128 outputs
In RTR mode
Maximum of 1024 inputs and 1024 outputs
Setting procedure
1
Select the number of the button to which the TAKE
function is to be set using the cursor keys.
2
Press [T].
“TAKE” appears, and the TAKE function is assigned
to the button selected in step 1 (hereinafter called the
TAKE button).
 Loading...