 Loading...
Do you have a question about the Sony PMW-EX1R and is the answer not in the manual?
| Sensor type | CMOS |
|---|---|
| Total megapixels | - MP |
| Filter size | 77 mm |
| Digital zoom | - x |
| Optical zoom | 14 x |
| Image stabilizer | Yes |
| Focal length range | 5.8 - 81.2 mm |
| Focal length (35mm film equivalent) | 31.4 - 439 mm |
| Camcorder media type | HDD, Memory card |
| Internal storage capacity | 32 GB |
| Focus adjustment | Auto/Manual |
| Camera shutter speed | 1/32 - 1/2000 s |
| Display diagonal | 3.5 \ |
| Display resolution | 640 x 480 pixels |
| Display resolution (numeric) | 921000 pixels |
| Viewfinder screen size | 0.45 \ |
| Product color | Black |
| Minimum illumination | 0.14 lx |
| Video formats supported | MPEG2 |
| Maximum video resolution | 1920 x 1080 pixels |
| Analog signal format system | NTSC, PAL |
| PCM digital audio | 16-bit/48 kHz |
| USB connector type | Mini-USB B |
| USB 2.0 ports quantity | 1 |
| Battery life (max) | 3 h |
| Video recording time | 1.6 h |
| Operating temperature (T-T) | 0 - 40 °C |
| Cables included | USB |
| Power requirements | 12 V DC |
| Depth | 199 mm |
|---|---|
| Width | 179 mm |
| Height | 308 mm |
| Weight | 2400 g |
Lists all items supplied with the camcorder and their quantities.
Details the camcorder's support for various HD and DVCAM recording formats.
Highlights nonlinear media and MPEG-2 Long GOP codec for HD recording.
Explains how efficient compression allows for extended HD recording durations.
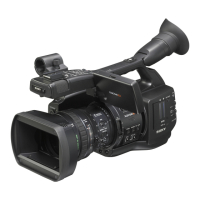
Describes advanced components like Exmor CMOS sensors and the 14x zoom lens.
Lists helpful functions for precise focus adjustments, including MF Assist and Peaking.
Introduces special modes like Slow & Quick Motion, Interval Recording, and Frame Recording.
Detailed diagram and list of camcorder components and their locations.
Identifies and explains the functions of controls on the camcorder's grip.
Details the buttons and functions of the included infrared remote control.
Explains status indicators displayed on the LCD/viewfinder in Camera mode.
Guides on using the Direct menu for quick settings adjustments via joystick or jog dial.
Covers using battery packs and AC adapters for powering the camcorder.
Guides users through setting the camcorder's internal clock and time zone.
Explains how to adjust the angle, brightness, and display settings of the LCD and EVF.
Details how the camcorder's grip can be rotated to support various shooting styles.
Details how to activate and use the remote control function for the camcorder.
Provides instructions and precautions for using SxS memory cards, including insertion and formatting.
Explains how to connect and use an optional hard disk unit for storage.
Describes using optional adaptors for Memory Stick or SDHC cards in the SxS slot.
Outlines the fundamental steps for performing basic recording operations.
Details how to choose various video formats for recording and playback.
Explains how to use the built-in ND filters to control aperture in varying light conditions.
Explains methods for adjusting white balance for accurate color reproduction.
Covers how to display on-screen markers for composition and zebra patterns for exposure.
Guides users on adjusting video gain levels based on subject brightness and shooting conditions.
Covers adjusting shutter speed and modes for controlling exposure and motion blur.
Describes how to control the lens aperture for exposure and depth of field.
Explains manual and servo zoom operations for changing focal length.
Details manual and auto focus modes for achieving sharp images.
Explains how to use the image stabilization feature to reduce camera shake.
Provides methods to minimize flickering issues caused by certain lighting types.
Covers setting timecode, user bits, and clock for accurate metadata.
Explains how to record audio using built-in or external microphones.
Describes how to output color bars and reference tones for calibration.
Explains how to add marks to clips for easier editing and scene identification.
Details how to add an OK mark to clips to prevent accidental deletion.
Explains how to quickly review the last recorded clip.
Guides users on customizing button functions for quick access.
Describes how to set up time-lapse recording at specified intervals.
Explains the frame recording function, useful for stop-motion animation.
Details the function to capture video before the REC button is pressed.
Explains how to achieve slow-motion and fast-motion effects by varying frame rates.
Describes superimposing a still image for alignment during next recording.
Explains how to create smooth scene transitions by registering camera settings.
Covers starting or ending recordings with fade-in and fade-out effects.
Explains how to customize and store picture quality settings as profiles.
Details how clips are displayed as thumbnails and the information shown.
Guides on playing back recorded clips using playback controls and joystick.
Explains various operations that can be performed on clips in Media mode.
Explains how to activate and switch between different status screens for monitoring.
Details the information displayed on the camera status screen in Camera mode.
Explains the audio-related information displayed on the status screen.
Covers the video format and output settings displayed on the status screen.
Details the status of assignable buttons and the IR remote commander.
Shows battery charge and memory card status information.
Introduces the different setup menu categories available on the camcorder.
Covers fundamental operations for navigating and using the setup menus.
Provides a comprehensive list of menu items, subitems, and their contents for CAMERA SET.
Explains how to connect external monitors for displaying video signals and menus.
Guides on connecting the camcorder to a computer for clip management via USB.
Details connecting external devices using the i.LINK (HDV/DV) interface for recording and editing.
Explains the specifications and features of the i.LINK digital interface.
Covers critical usage, storage, and care instructions for the camcorder.
Details video formats, output signals, and their limitations across different modes.
Explains the function, replacement, and service life of the backup battery.
Provides solutions for common operating power and recording/playback issues.
Lists and explains various error and warning messages displayed by the camcorder.