Section4: Operation
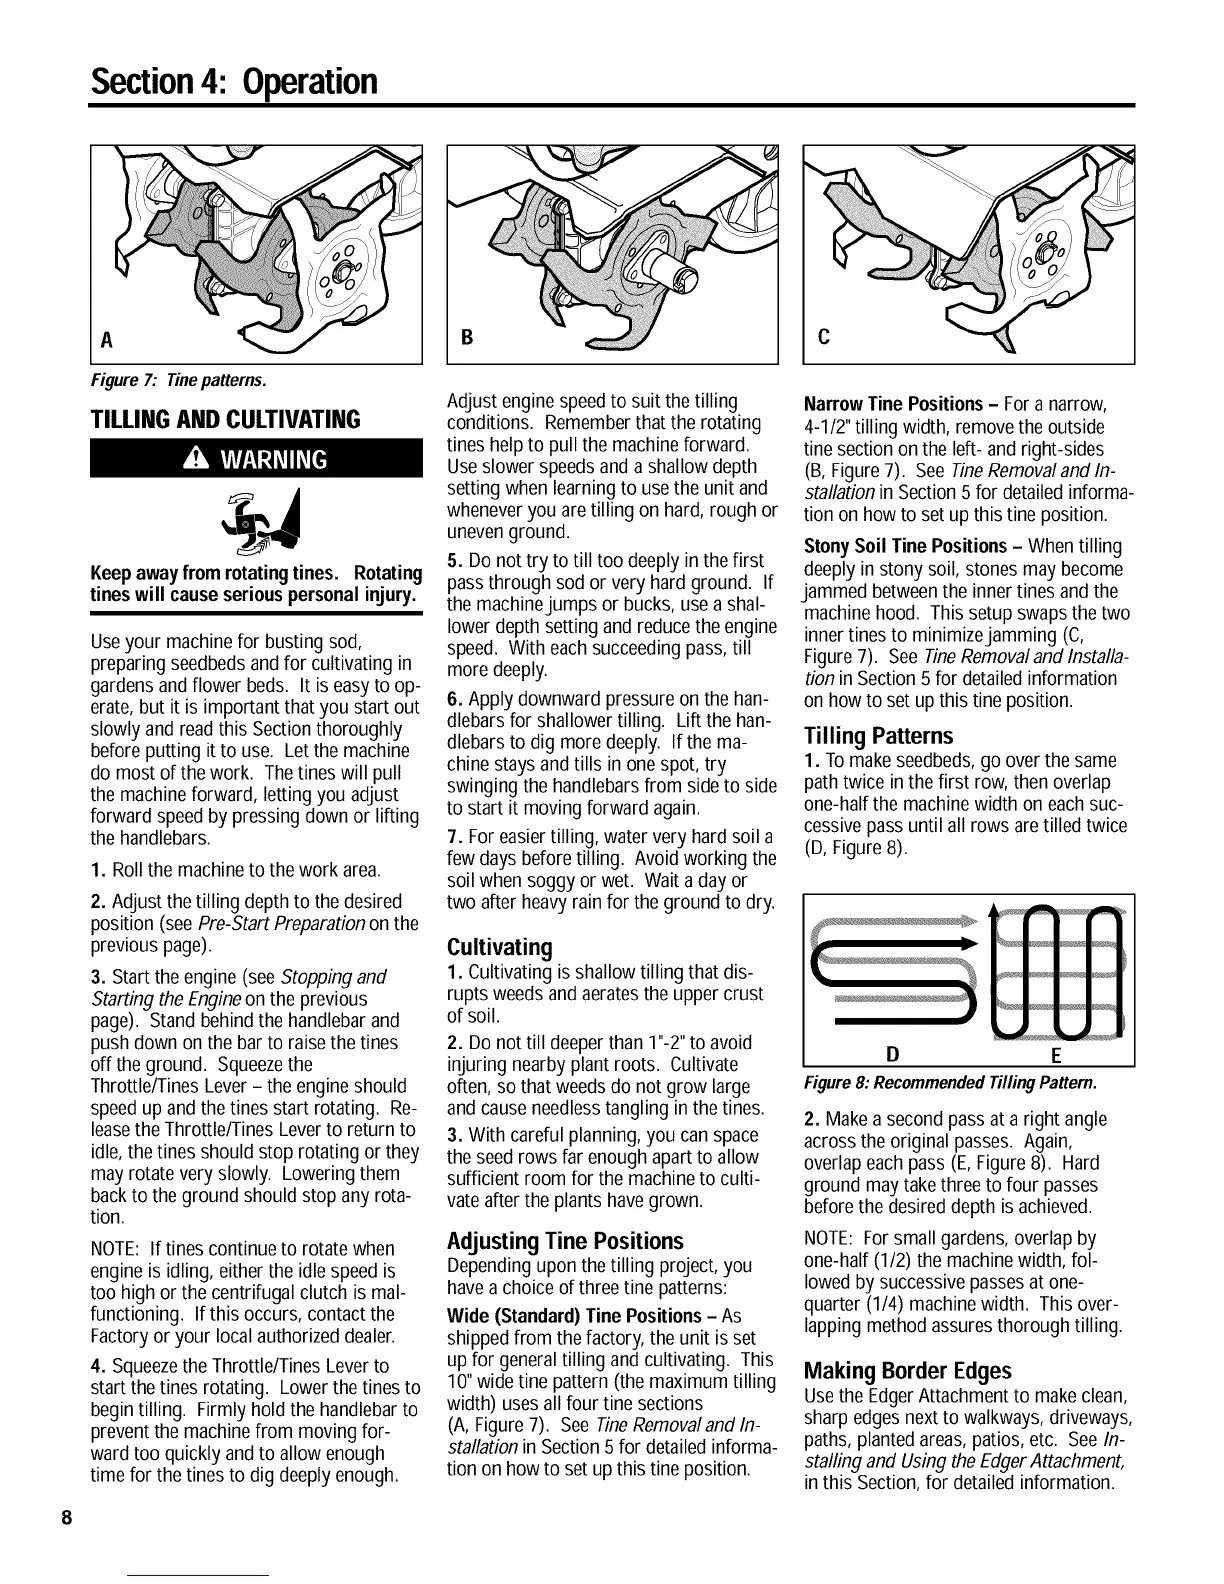
A
Figure7: Tinepatterns.
TILLING AND CULTIVATING
Keepawayfrom rotating tines. Rotating
tineswill causeseriouspersonalinjury.
Useyour machinefor busting sod,
preparing seedbedsandfor cultivating in
gardensand flower beds. It iseasyto op-
erate,but it is important that you start out
slowly and readthis Sectionthoroughly
beforeputting it to use. Letthe machine
do most of thework. Thetines will pull
the machineforward, letting you adjust
forward speedby pressing down or lifting
the handlebars.
1. Roll the machineto the work area.
2. AdJustthe tilling depth to the desired
position (see Pre-Start Preparationon the
previous page).
3. Start the engine (seeStopping and
Starting the Engineon the previous
page). Standbehind the handlebarand
push down on the bar to raisethe tines
off theground. Squeezethe
Throttle/Tines Lever- the engineshould
speedup and thetines start rotating. Re-
leasethe Throttle/Tines Leverto return to
idle,the tines should stop rotating or they
may rotate very slowly. Lowering them
backto theground should stop any rota-
tion.
NOTE: If tines continue to rotate when
engine is idling, either the idle speedis
too high or the centrifugal clutch is mal-
functioning. If this occurs, contact the
Factoryor your localauthorized dealer.
4. Squeezethe Throttle/Tines Leverto
start thetines rotating. Lowerthe tines to
begin tilling. Firmly hold the handlebarto
prevent the machinefrom moving for-
wardtoo quickly and to allow enough
time for the tines to dig deeplyenough.
AdJustenginespeedto suit the tilling
conditions. Rememberthat the rotating
tines helpto pull the machineforward.
Useslower speedsand a shallow depth
setting when learning to usethe unit and
wheneveryou are tilling on hard,rough or
unevenground.
5. Do not try to till too deeply in the first
pass through sod or very hard ground. If
the machinejumps or bucks, usea shal-
lower depth setting and reducethe engine
speed. With eachsucceedingpass, till
more deeply.
6. Apply downward pressure on the han-
dlebarsfor shallower tilling. Lift the han-
dlebarsto dig more deeply. If the ma-
chinestays andtills in one spot, try
swinging the handlebarsfrom sideto side
to start it moving forward again.
7. For easiertilling, water very hard soil a
few days before tilling. Avoid working the
soil when soggy or wet. Wait aday or
two after heavy rain for the ground to dry.
Cultivating
1. Cultivating is shallow tilling that dis-
rupts weeds andaeratesthe upper crust
of soil.
2. Do not till deeperthan 1"-2"to avoid
injuring nearbyplant roots. Cultivate
often, so that weeds do not grow large
and causeneedlesstangling in thetines.
3. With careful planning,you can space
the seedrows far enoughapart to allow
sufficient room for the machineto culti-
vate after the plants havegrown.
AdJustingTine Positions
Dependingupon the tilling project, you
havea choice of threetine patterns:
Wide (Standard) Tine Positions- As
shippedfrom thefactory, the unit is set
up for generaltilling and cultivating. This
10" widetine pattern (the maximum tilling
width) usesall four tine sections
(A, Figure7). See TineRemovaland In-
stallation in Section 5 for detailedinforma-
tion on howto set up this tine position.
C
Narrow Tine Positions- Fora narrow,
4-1/2"tilling width, removethe outside
tine sectionon the left- and right-sides
(B,Figure7). See TineRemovaland In-
stallationin Section5 for detailedinforma-
tion on how to set up this tine position.
StonySoil TinePositions- When tilling
deeply in stony soil, stones may become
jammed betweenthe inner tines and the
machinehood. This setup swapsthe two
innertines to minimizejamming (c,
Figure7). See TineRemovaland/nstalla-
tion in Section 5 for detailedinformation
on howto set up this tine position.
Tilling Patterns
1. Tomakeseedbeds,go over thesame
pathtwice in the first row, then overlap
one-half the machinewidth on eachsuc-
cessive pass until all rows are tilled twice
(D, Figure8).
D E
Figure8:RecommendedTillingPattern.
2. Make a second passat a right angle
across theoriginal passes. Again,
overlapeach pass (E,Figure8). Hard
ground may takethree to four passes
beforethe desired depth is achieved.
NOTE:Forsmall gardens,overlap by
one-half (1/2) the machinewidth, fol-
lowedby successivepassesat one-
quarter (1/4) machine width. This over-
lapping method assuresthorough tilling.
Making Border Edges
Usethe EdgerAttachmentto makeclean,
sharp edgesnext to walkways, driveways,
paths,plantedareas, patios,etc. SeeIn-
stalling and Using the EdgerAttachment,
in this Section,for detailed information.
 Loading...