Section4: Operation
INSTALLINGANDUSING
THEEDGERATTACHMENT
Contact with rotating tines or other
moving parts can cause serious per-
sonalinjury.
Before installing or removing attach-
ments,or adjustingor servicingthe ma-
chine, stop the engine, let all moving
parts come to a complete stop, discon-
nect the spark plug wire and move the
wire away from the sparkplug.
Tocreate borders or edgesnearwalks,
driveways,flower beds, etc., you must
remove thefour tine sections and install
the EdgerAttachment (this attachment
was supplied with the unit - see
Section 3).
Installing the Edger Attachment
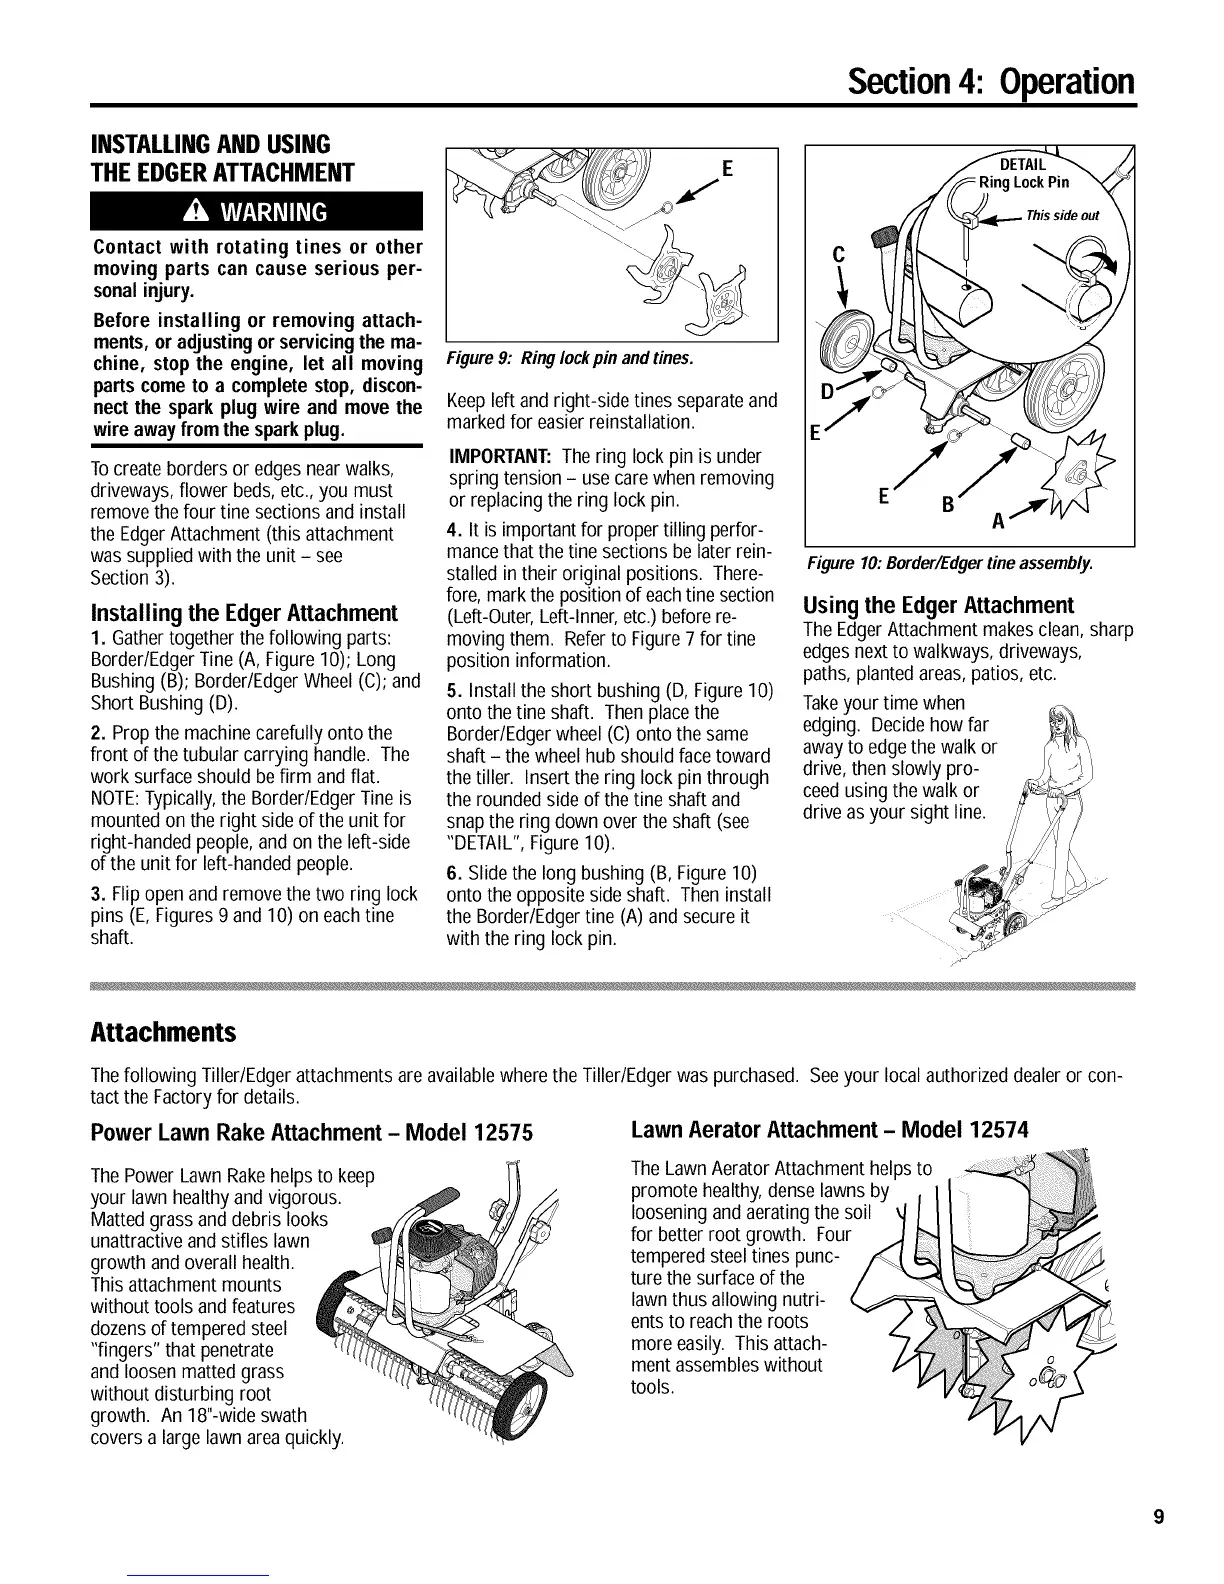
1. Gathertogether the following parts:
Border/EdgerTine (A,Figure 10); Long
Bushing (B); Border/EdgerWheel (C); and
Short Bushing (D).
2. Prop the machinecarefully onto the
front of the tubular carrying handle. The
work surfaceshould befirm and flat.
NOTE:Typically,the Border/EdgerTineis
mounted on the right side of the unit for
right-handed people,and on the left-side
of the unit for left-handed people.
3. Flip open and remove thetwo ring lock
pins (E, Figures9 and 10) on each tine
shaft.
Figure 9: Ring lockpin and tines.
Keepleft and right-side tines separateand
markedfor easierreinstallation.
IMPORTANT:Thering lock pin is under
spring tension - use care when removing
or replacingthe ring lock pin.
4. It is importantfor proper tilling perfor-
mancethat thetine sections be later rein-
stalled in their original positions. There-
fore, markthe position of eachtine section
(Left-Outer,Left-Inner,etc.)beforere-
moving them. Referto Figure7 for tine
position information.
5. Install the short bushing (D, Figure 10)
onto the tine shaft. Then placethe
Border/Edgerwheel (C) ontothe same
shaft - the wheelhub should facetoward
the tiller. Insert the ring lock pin through
the rounded sideof the tine shaft and
snapthe ring down over the shaft (see
"DETAIL", Figure 10).
6. Slidethe long bushing (B, Figure 10)
onto the opposite side shaft. Then install
the Border/Edgertine (A) and secure it
with the ring lock pin.
_This side out
Figure 10:Border/Edgertine assembly.
Using the Edger Attachment
TheEdgerAttachment makesclean, sharp
edgesnextto walkways, driveways,
paths, plantedareas,patios, etc.
Takeyour time when
edging. Decidehow far
awayto edge thewalk or
drive, then slowly pro-
ceedusingthe walk or
drive asyour sight line.
Attachments
Thefollowing Tiller/Edger attachmentsare availablewhere the Tiller/Edgerwas purchased. Seeyour local authorized dealeror con-
tactthe Factoryfor details.
Power Lawn Rake Attachment - Model 12575
Lawn Aerator Attachment - Model 12574
ThePower LawnRakehelpsto keep
your lawn healthy and vigorous.
Mattedgrass anddebris looks
unattractiveand stifles lawn
growth and overall health.
This attachment mounts
without tools andfeatures
dozensof tempered steel
"fingers" that penetrate
and loosenmatted grass
without disturbing root
growth. An 18"-wideswath
coversa large lawnareaquickly.
TheLawnAerator Attachmenthelps to
promote healthy,dense lawns by
loosening andaeratingthe soil
for better root growth. Four
temperedsteel tines punc-
ture the surfaceof the
lawnthus allowing nutri-
ents to reachthe roots
more easily. This attach-
ment assembleswithout
tools.
 Loading...