Disassembly and Assembly WM 80 Repair
118 wc_tx000523gb.fm
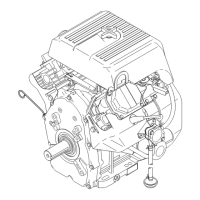
10.14 Vacuum Testing Cylinder
See Graphic: wc_gr002940
This procedure requires the use of test kit P/N 0155268, an 1/8 NPT
hose barb, new gaskets, and a vacuum pump.
Note: For clarity, the engine is shown removed from the machine.
10.14.1 Remove the air cleaner or air cleaner duct.
10.14.2 Remove the carburetor. See section Removing Carburetor.
10.14.3 Remove the muffler.
10.14.4 Using the existing nuts, attach a new exhaust gasket (a) and the
exhaust cover (b) over the exhaust port.
10.14.5 Using the existing nuts, attach a new intake gasket (c) and the intake
cover (d) over the intake port. Attach an 1/8-inch NPT hose barb (e) to
the intake cover.
10.14.6 Be sure that the spark plug and all the hardware securing the cylinder
to the crank case is tight.
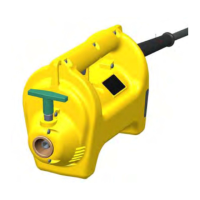
10.14.7 Attach the vacuum pump (f) to the hose barb. Operate the pump until
1.2–1.7 kPa (5–7 inches) of vacuum is reached. Observe the gauge for
any drop in pressure. A drop of more than 0.25 kPa (1 in.) of vacuum
per minute is considered unacceptable. All leaks should be located
and rectified.
10.14.8 To locate a leak, squirt small amounts of oil around all possible leak
areas. Reapply the vacuum and watch the gauge for a decrease in the
leak rate. Replace the cylinder, hardware, or gaskets as needed.
 Loading...