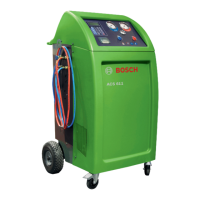
5. Initial commissioning
i All the operations described in Section 5 must be
performed prior to initial A/C service.
5.1 Removing transportation packaging
!
On removing the outer packaging of the refrigerant
cylinder, make sure the cylinder hoses do not come
into contact with the housing or the filter dryer.
1. Remove the cardboard box.
2. Remove the ACS 611 from the packaging pallet.
3. Check delivery contents.
4. Check oil level of vacuum pump (sight glass).
i Do not disconnect any electrical connections, and
only have internal components opened and repaired
by trained customer service personnel.
i Contact customer service in the event of any
transportation damage (e.g. oil leakage).
5.2 Switching on the ACS 611
!
The ACS 611 is designed for 230 volts, 50/60 Hz.
Observe the information on the ACS 611 rating
plate.
1. Stand the ACS 611 on a flat, vibration-proof surface.
2. Actuate the brake to stop the ACS 611 rolling.
3. Connect the power supply cord to the power supply.
4. Switch on the master switch.
Conducting display test.
"Date and time (start screen) are displayed.
i ACS 611 is set ex-works in such a way that only the
internal refrigerant cylinder, the fresh oil bottle and
the UV dye bottle need to be filled before beginning
servicing to vehicle air conditioning systems.
Factory setting Option
Service hose length 2.5m
Unit kg/ml
Fresh oil scale activated
Used oil scale activated
Flushing deactivated
5.3 Required settings
i
All further settings that can be adjusted for ACS 611
can be found in Section 10 (Settings).
5.3.1 Setting the language
! Observe the ACS 611 menu prompting.
1. Call up start screen.
2. Press <3> and <Flush> simultaneously and release.
The message
ENTER CODE 0000 is displayed.
3. Enter code
2222 and confirm with E.
4. Select "LANGUAGE" with o u and confirm with E.
Available languages are displayed.
5. Select language with o u and confirm with E.
"Language is set.
i Return with <Stop>.
5.3.2 Setting the date and time
! Observe the ACS 611 menu prompting.
1. Call up start screen.
2. Press <3> and <Flush> simultaneously and release.
The message
ENTER CODE 0000 is displayed.
3. Enter code
2222 and confirm with E.
4. Select "DATE/TIME" with o u and confirm with E.
Date and time are displayed.
i The cursor is automatically placed on the day's date.
5. Enter date and time using <0 – 9> and confirm
withE.
"Date and time are set.
i Return with <Stop>.
 Loading...