9
Commissioning the Unit
The commission procedure is as follows:
1. If the chiller has been stored outdoors, allow at least
24 hours room temperature stabilization prior to commis-
sioning. Ensure any condensation that occurs as a result of
the ambient temperature is allowed to evaporate.
2. Enter parameters in the VFD_CONF screen.
3. Install surge suppression devices if required.
4. Review the power wiring and grounding to ensure that it
has been properly connected.
5. Visually examine the inside of the drive enclosure to:
a. Look for signs of corrosion or moisture residue.
b. Remove any dirt or debris.
c. Make sure all vents are clear.
6. Apply power to the drive and take thermal measurements
of the capacitor bank and power connections. Do this
again before start-up.
7. Measure and record the incoming line voltage. Line-to-
line voltages should be balanced within 3% as calculated
by Rockwell’s procedure below:
Measure voltages phase-to-phase and phase-to-ground.
Vmax = Maximum measured phase-to-phase voltage
(A to B, B to C, C to A)
Vmin = Minimum measured phase-to-phase voltage
Imbalance Calculation Formula
8. Take a final thermal measurement of the capacitor bank
and power after finalizing the installation to ensure all
connections are good.
9. If a ground fault occurs, then do the following:
a. Check for a ground in the motor or motor wiring.
b. Check for damage to wiring insulation and that wiring
is dry.
c. Verify the motor wiring is separated from ground and
there is no connection between phases.
d. Check for failed IGBTs.
10. If an overcurrent fault occurs, then do the following:
a. Check for excessive load and verify load limit settings
on the HMI.
b. Check motor and wiring insulation.
c. Check parameter settings on VFD_CONF screen in
the HMI (PIC3) or UM VFD Configuration for PIC 6.
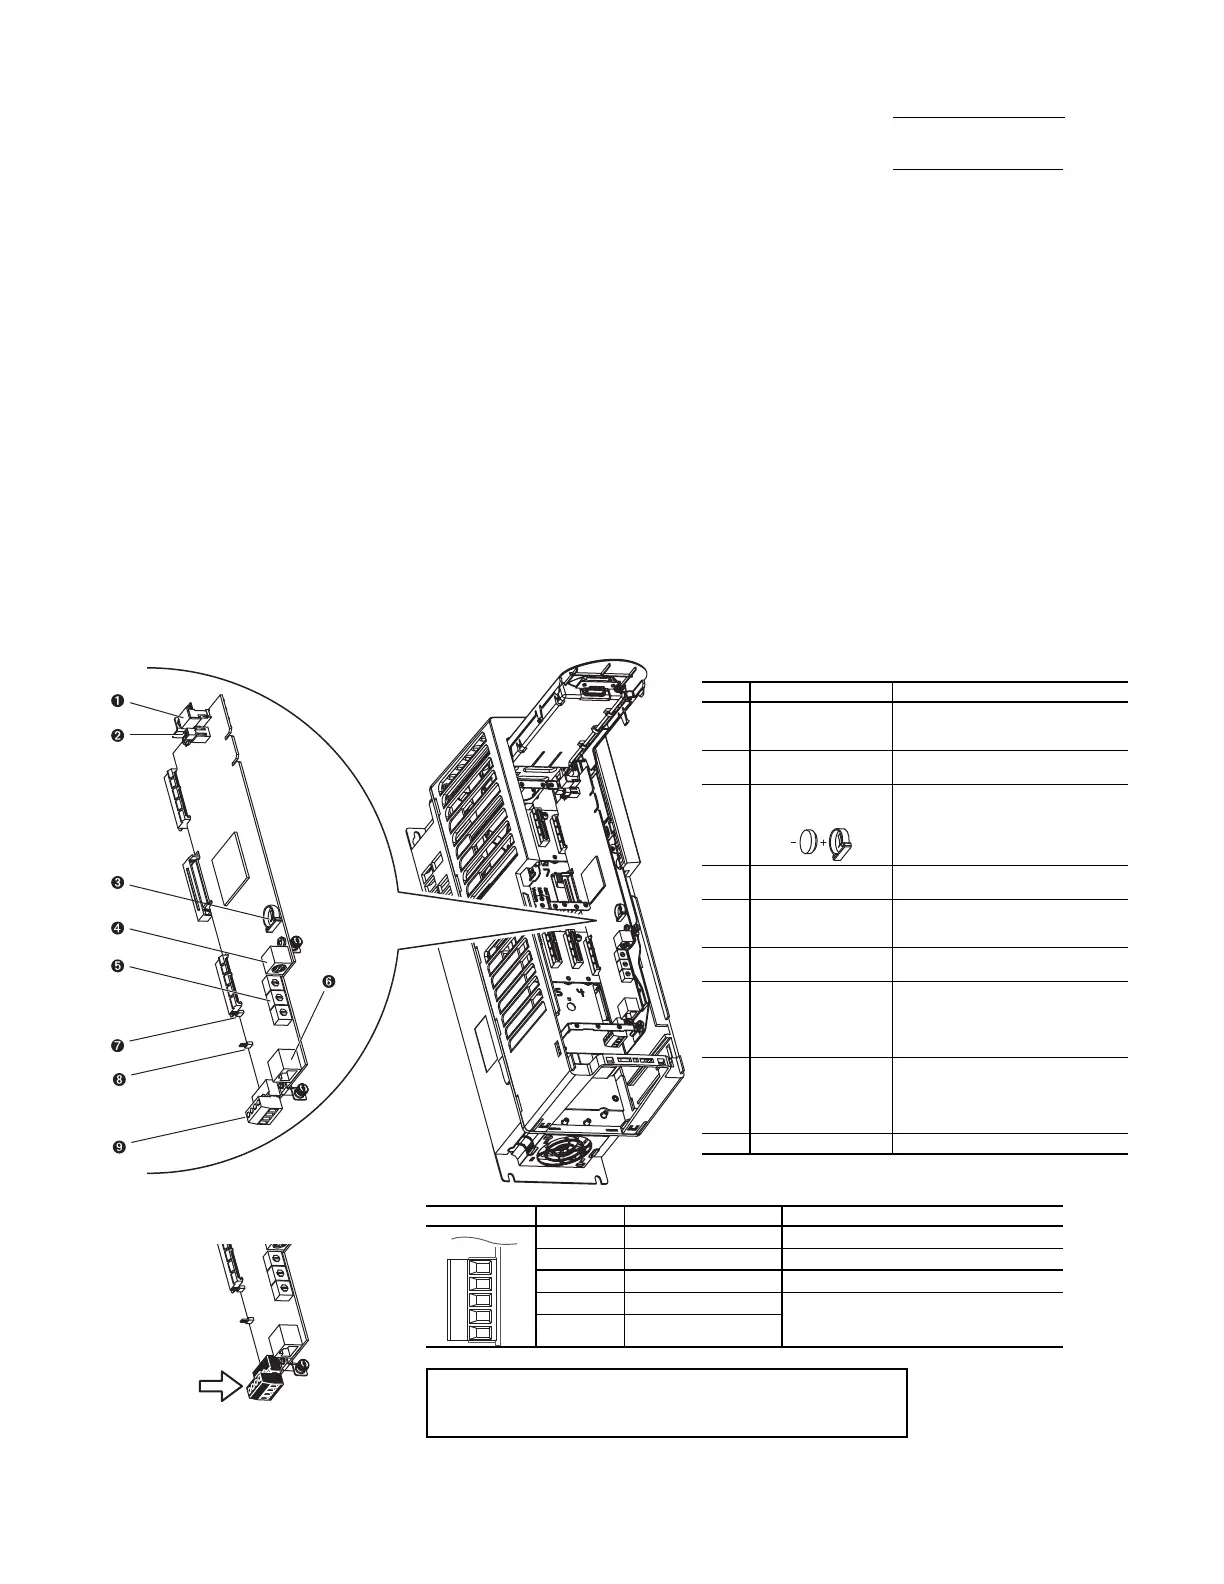
Check Internal Jumpers
On the Main VFD Control board there are 2 jumpers labeled J1
HARDWARE ENABLE and J2 SAFETY ENABLE. J1 should
be removed and J2 should be in place. See Fig. 12.
Fig. 12 — PF755 Main Control Board
Va v g =
(VAB + VBC + VCA)
3
Imbalance % =
(Vmax – Vmin) x 100
Va v g
TB1 I/O TERMINAL DESIGNATIONS
FIXED I/O TERMINAL NAME DESCRIPTION
Di 0ac
Digital Input 120V AC Connections for AC power supply.
Di C
Digital Input Common Digital input common
Di 0dc
Digital Input 24V DC Connections for DC power supply.
+24V
+24 Volt Power Connections for drive supplied 24V power.
24VC
24 Volt Common
IMPORTANT: Wiring to pluggable terminal block connectors
should be supported by wire ties or other means to help pre-
vent unintentional disconnection.
a19-1921
LEGEND
NO. NAME DESCRIPTION
1 HIM (Human
Interface Module)
Connector
DPI Port 1 (HIM Cradle) connection.
2
Fan Connector Power supply for internal cooling fan
(Frames 2 and 3).
3
Battery
Receptacle
User-installed CR1220 lithium coin
cell battery provides power to the
real-time clock (Optional, not
supplied).
4
DPI Port 2 Cable connection for handheld and
remote HIM options.
5
Embedded Ethernet/
IP Address Selectors
Rotary switches for setting lowest
octet of Ethernet address (forces
address to 192.168.1.xxx).
6
Embedded Ethernet/
IP Connector
Network cable connection.
7
Jumper J2 SAFETY
ENABLE
Safety enable jumper. Removed
when safety option is installed. For
additional information, refer to the
Check Internal Jumpers section on
page 9.
8
Jumper J1 HARD-
WARE ENABLE
Hardware enable jumper. Removed
when a hardware enable configura-
tion is utilized. For additional infor-
mation, refer to the Check Internal
Jumpers section on page 9.
9 TB1 I/O terminal block.
 Loading...