Do you have a question about the Craftsman 113.198110 and is the answer not in the manual?
Crucial steps and warnings before powering on the radial saw.
Safety precautions for handling and positioning the radial saw unit.
Pre-operation checks and procedures for safe radial saw operation.
Steps for safely unpacking and verifying all parts of the radial saw kit.
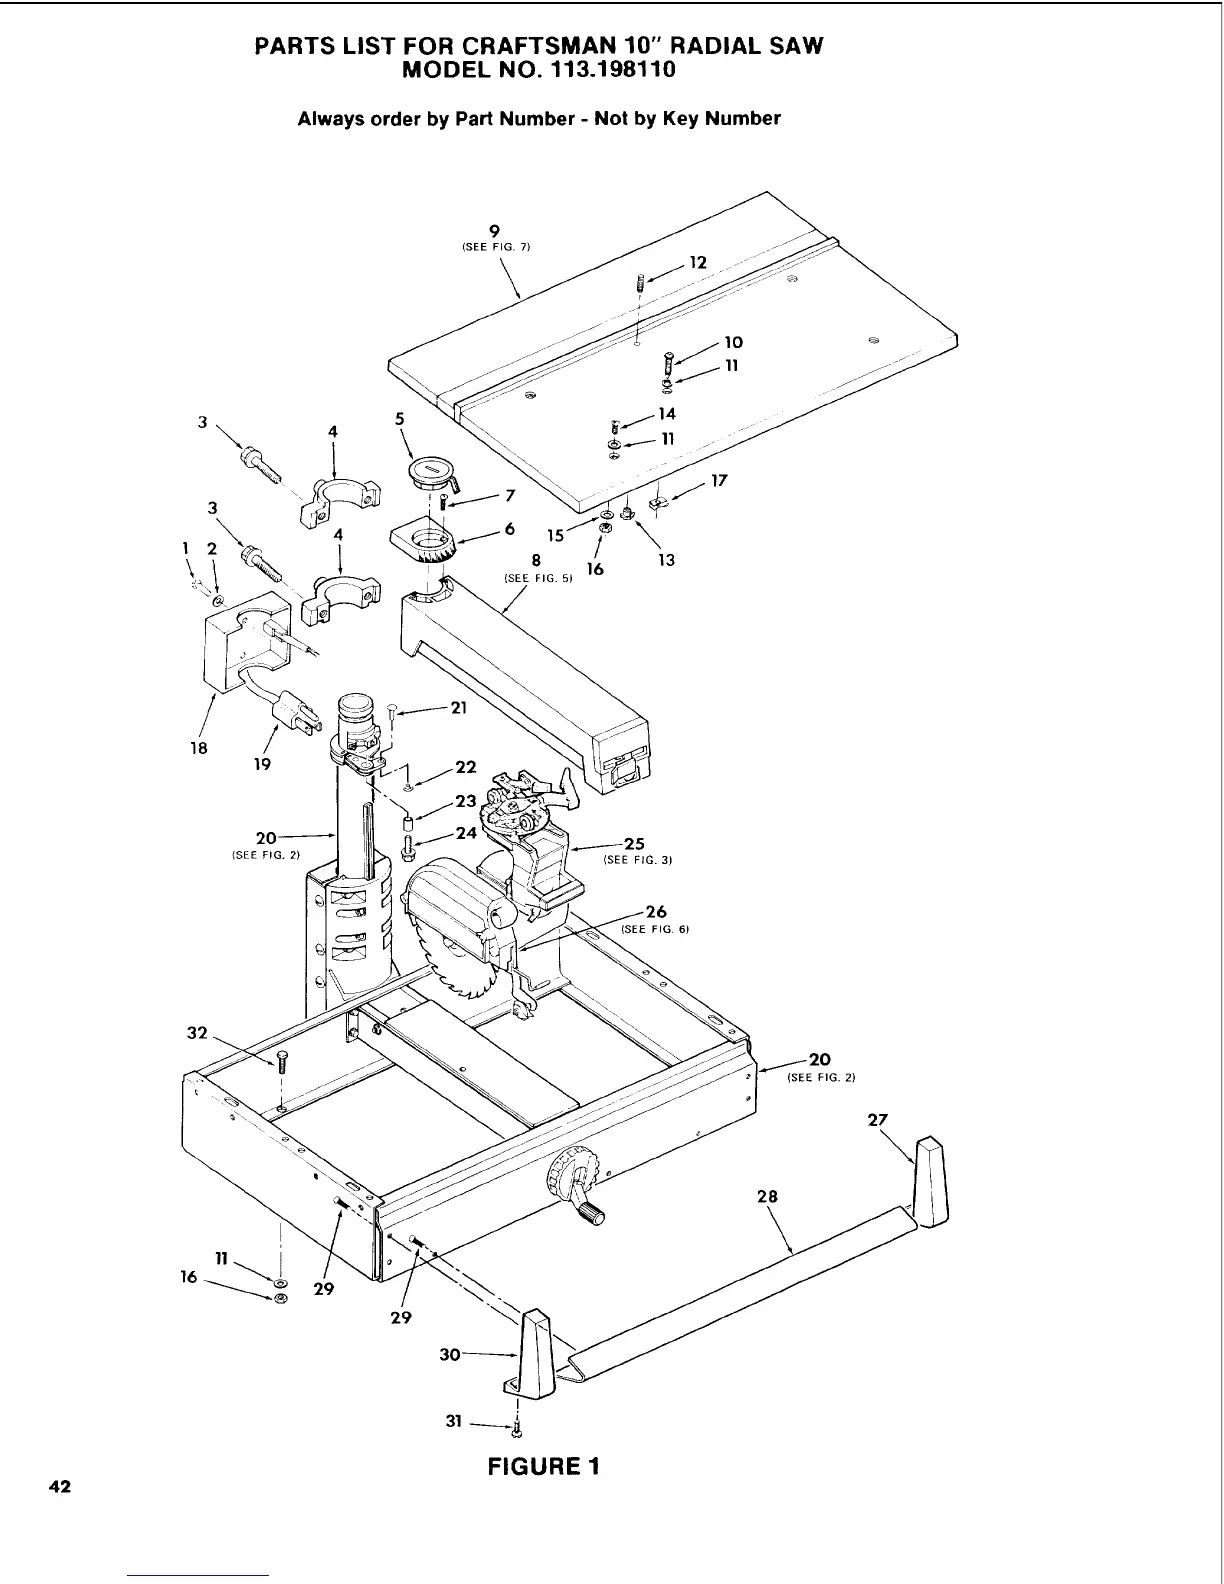
Instructions for assembling the radial saw's leg stand structure.
Guide on securing the radial saw unit onto its assembled leg set.
Procedure for attaching decorative trim pieces to the radial saw base.
Steps to install the handwheel for adjusting saw blade depth.
Instructions for correctly mounting the saw's motor assembly.
Aligning the column tube within its support for smooth operation.
Securing and leveling table support channels for accurate cuts.
Ensuring the saw blade travels square during crosscut operations.
Aligning the saw blade perpendicular to the work table surface.
Adjusting the blade to be parallel with the rip fence for accurate ripping.
Setting up the blade guard and anti-kickback for safety.
Installing and calibrating rip scale indicators for quick settings.
Explanation of the elevation crank for raising and lowering the saw blade.
Details on the miter lock handle for setting cutting angles.
How to use the swivel lock handle for yoke adjustments.
Operation of the rip lock handle for securing carriage position.
Using the bevel lock handle for motor angle adjustments.
Instructions for operating the power switch and safety key.
Information on using the accessory shaft for attachments.
How to position the guard and anti-kickback for ripping operations.
Essential prerequisites for performing crosscut operations safely.
Step-by-step guide for performing a standard crosscut.
How to perform crosscuts at a specific angle (miter).
Guide for performing crosscuts with the blade at a bevel angle.
Procedure for combined miter and bevel crosscuts.
Key safety instructions and requirements before ripping.
Instructions for out-ripping and in-ripping wood pieces.
Performing ripping operations with the blade at a bevel angle.
Instructions for operating the dado blade attachment.
How to use the molding head attachment.
Procedures for edging operations using the molding head.
How to adjust the bevel lock lever for proper motor locking.
Procedure to adjust the swivel lock handle for proper yoke locking.
How to adjust the arm for snug fit and no vertical movement.
Steps to adjust carriage bearings to eliminate looseness.
Adjusting the miter lock handle for secure arm locking.
How to adjust the rip lock handle for secure carriage locking.
Correcting rough kerf edges caused by blade "heel".
Troubleshooting motor issues during ripping operations.
Diagnosing and fixing issues with workpiece pulling from the fence.
Adjusting the spreader when the workpiece hits it during ripping.
Resolving issues with smooth movement of the saw on its track.
Addressing insufficient clamping force at non-45° miter angles.
Addressing insufficient clamping force at non-45° bevel angles.
Fixing inconsistent depth of cut across the workpiece.
Troubleshooting blade advancing too quickly through lumber.
Procedures for cleaning the radial saw to maintain performance.
Guide on periodic lubrication of specific points on the radial saw.