Table of Contents
Safety Instructions For Jointer/Planer .......................... 2
Safety Signal Words ....................... : ................... _......2
Before Using the JointedPlaner ................. ;.............. 2
When Installing Or Moving the Jointer/Planer. .......... 2
Before Each Use ....................................................... 3
: To Avoid Injury' From Jams, Slips Or Thrown Pieces
• (Kickbacks Or Throwbacks) ................................... 3
Plan Ahead To Protect Your Eyes, Hands, Face and
Ears ........................................................................ 3
Inspect your workpiece .............................................. 4
Whenever Jointer/Planer Is Running: ........................ 4
Before Leaving the Jointer/Planer ............................ 4
Glossary of Terms for Woodworking ........................... 4
Motor Specifications and Electrical Requirements ...5-7
Power Supply and Motor Specifications ..................... 5
Wire Sizes ................................................................. 5
General Electrical Connections ................................. 6
Changing Motor Voltage ............................................ 7
Motor Safety Protection ............................................. 7
Table of Contents ......................................................... 8
Unpacking and Checking Contents ....................... 8-11
Tools Needed ............................................................ 8
Unpacking ................................................................. 8
Table of Loose Parts ................................................. 9
List of Loose Parts ................................................... 10
List of Loose Parts (From Bag Assembly) ............... 11
Assembly .............................................................. 12-16
Assemble The Stand ............................................... 12
Install the Leveling Feet .......................................... 12
Installing Motor Brackets ......................................... 12
Assemble Motor To Stand ....................................... 13
Assemble Switchbox to Stand ................................. 14
Assemble Bed to Stand ........................................... 14
Assemble Fence To Bed ......................................... 15
Install Cutter Head Guard ........................................ 15
Cutter Head Guard Functional Check ..................... 15
Adjusting Guard Spring .......................................... 16
Attaching Pulley Guard ............................................ 16
Installing Rear Cutter Head Guard .......................... 16
Adjusting the Leveling Feet ..................................... 16
Getting to Know Your JointedPlaner .................... 17-18
Alignments ............................................................ 19-22
Cutter Knife Adjustments/Replacement .................. 19
Cutter Knife Sharpening .......................................... 20
Adjusting Table Extension ....................................... 20
Outfeed Table Adjustment ...................................... 21
Adjusting Table Gibs ............................................... 22
Fence Tilt (Bevel Stop) Alignment ........................... 22
Safety Instructionsfor Basic Jointer/Planer
Operation ........................................................ 23-24
To Avoid Injury From Jams, Slips Or Thrown Pieces
(Kickbacks Or Throwbacks): ................................ 23
Plan Ahead to Protect Your Eyes, Hands, Face and
Ears ..................................................................... 23
Whenever JointedPtaner Is Running: ..................... 24
Basic Jointer/Ptaner Cutting Operations .............. 24-28
Depth of Cut Handwhee! Operation ........................ 24
Stop Pin Operation .................................................. 24
Feedin g the Workpiece ........................................... 24
Planing .................................................................... 25
Jointing .................................................................... 26
Beveling/Chamfering ............................................... 26
Rabbeting ................................................................ 26
Stop Pin Operation .................................................. 26
Support Long Workpieces ....................................... 27
Using the Hold-Down/Push-Blocks ......................... 27
Sliding Fence Operation .......................................... 28
Fence Tilt Operation ................................................ 28
Maintenance and Lubrication ............................... 28-29
Maintenance ............................................................ 28
Lubrication ............................................................... 29
Sears Recommends the Following Accessories ........ 29
Recommended Accessories ................................... 29
Wiring Diagram ........................................................... 29
Troubleshooting Guide ......................................... 30-31
General ................................................................... 30
Motor ...................................................................... 31
Repair Parts ......................................................... 32-38
...... i ,i ii
Unpacking and Checking Contents
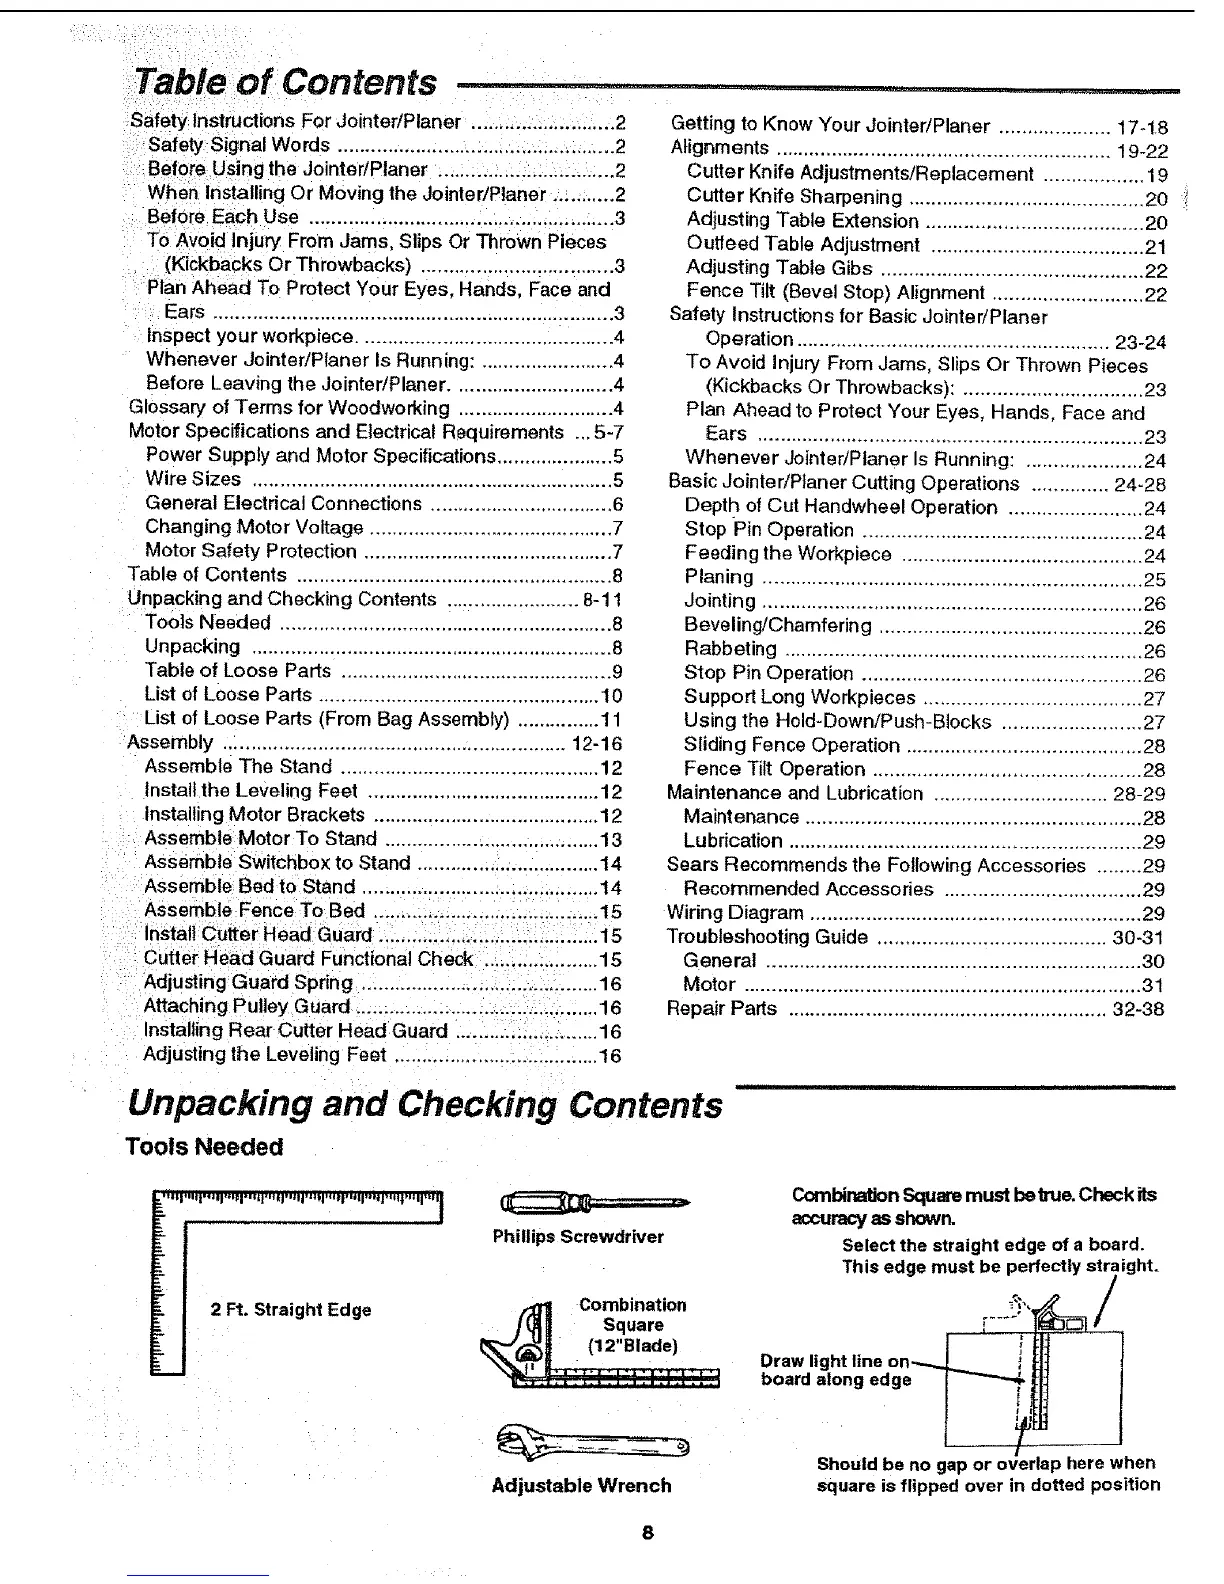
Tools Needed
2 Ft. Straight Edge
Phillips Screwdriver
Combination
Square
CombinationSquaremust betrue. Check its
accuracyasshown.
Selectthe straight edge of a board.
erfectly straight.
This edge must be _, _/
.... t
Draw light line on---. _ i
board along edge _ I
t
Adjustable Wrench
Should be no gap or overlap here when
square is flipped over in dotted position
 Loading...