To view information about the SSL certificate, press up or down on the Nav Pad to highlight
, and then press the center button of the Nav Pad. Information about the certificate
is shown on the front panel display.
Start Program Status
The PRO3 can be configured so that programs do not start until an Ethernet connection has
been made and is fully operational. To configure this feature, press up or down on the Nav
Pad to highlight
, and then press the center button of the Nav Pad to
switch between
and
. When set to
, programs cannot start until an Ethernet
connection has been made and is fully operational. When set to
, there is no restriction to
when a program can start.
To use the PRO3 with the MyCrestron.com dynamic DNS service, perform the following
procedure:
1. Use a PC with Internet Explorer to navigate to http://www.mycrestron.com,
and register the system with Crestron
®
. Use the information provided from the
MyCrestron website to complete the information on the “MyCrestron” screen
shown in step 2.
2. On the PRO3, press up or down on the Nav Pad to highlight
, and
then press the center button of the Nav Pad. To configure the settings for the
dynamic DNS server, follow the procedure below:
a. Press up or down on the Nav Pad to highlight
, and then press
the center button of the Nav Pad to enter the name that was chosen.
My Crestron Edit Domain Screen
i. Use the left and right buttons on the Nav Pad to select a character to
change.
ii. Use the up and down buttons on the Nav Pad to browse the list of
possible characters.
My Crestron
Domain:
Password:
Register this System
Status
My Crestron - Edit
Domain
[S]MITH HOME
Press ‘Select’ to Save or ‘BACK’ to Cancel.
Press and Hold ‘Left’ to Delete.
Press and Hold ‘Right’ to Insert.
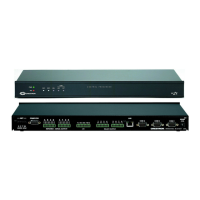
Supplemental Guide – DOC. 7330D PRO3: 3-Series Control System • 9
 Loading...