eTrex H Owner’s Manual 11
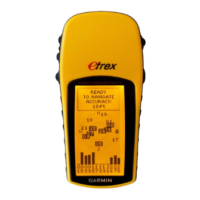
MaIn Menu
MaIn Menu
The Main Menu
Backlight
indicator
Menu options
Time and
date
Battery
capacity
indicator
Use the Menu page to access advanced features;
create and view waypoints, create a route, save and
view track logs, or access the system setup features.
To change the time zone:
1. Press PAGE to switch to the Menu page. Select
SETUP > ENTER.
2. Select TIME > ENTER.
3. Select TIME ZONE > ENTER.
4. Scroll through the selections. Press ENTER,
when you have found your correct time zone.
Use the Menu page to customize the display, transfer
information from a computer to the eTrex and back
again, manage, and organize your waypoints.
Mark Waypoint Page
Use the Mark Waypoint page to create a waypoint at
your current location or at a location you enter in the
position field.
To mark a waypoint:
Press PAGE to switch to the Menu page.
Press UP or DOWN to highlight MARK. Press
ENTER.
NOTE: The unit must state READY TO
NAVIGATE before you can mark a waypoint.
To change the symbol:
1. From the Mark Waypoint page, select the
waypoint symbol (above the waypoint name) >
ENTER.
2. Select a symbol > ENTER.
 Loading...