EasyManua.ls Logo

Honda crf250r 2012 User Manual

Honda crf250r 2012
177 pages
To Next Page IconTo Next Page
To Previous Page IconTo Previous Page
Page #66 background imageLoading...
Page #66 background image
Throttle
Servicing Your Honda 59
Refer to Safety Precautions on page 23.
Throttle Freeplay
(1) freeplay
Inspection
Check freeplay (1).
Freeplay:
1/8 3/16 in (3 5 mm)
If necessary, adjust to the specified range.
Upper
Adjustment
Minor adjustments are generally made with the
upper adjuster.
Lower
Adjustment
The lower adjuster is used for major freeplay
adjustment, such as after replacing the throttle
cables or removing the throttle body. It is also
used if you cannot get the proper adjustment with
the upper adjuster.
(1)
(2)
(4)
(3)
(+)
()
(5) lock nut (+) increase
(6) lower adjuster () decrease
1. Loosen the lock nut (5).
2. Turn the lower adjuster (6) in direction () to
decrease freeplay, and in direction (+) to
increase freeplay.
3. Tighten the lock nut to the specified torque:
3.0 lbf·ft (4 N·m, 0.4 kgf·m)
4. Operate the throttle grip to ensure that it
functions smoothly and returns completely.
If you cant get the freeplay within the specified
range, contact your dealer.
(5)
(6)
(+)
()
1. Pull the dust cover (2) back.
2. Loosen the lock nut (3).
3. Turn the upper adjuster (4).
Turning the adjuster in direction () will
decrease freeplay and turning it in direction
(+) will increase freeplay.
4. Tighten the lock nut to the specified torque:
3.0 lbf·ft (4 N·m, 0.4 kgf·m)
Return the dust cover to its normal position.
5. After adjustment, check for smooth rotation of
the throttle grip from fully closed to fully
open in all steering positions.
If the adjuster is threaded out near its limit or
the correct freeplay cannot be reached, turn
the adjuster all the way in and back out one
turn. Tighten the lock nut, install the dust
cover and make the adjustment with the
lower adjuster.
(2) dust cover (+) increase
(3) lock nut () decrease
(4) upper adjuster

Table of Contents

Question and Answer IconNeed help?

Do you have a question about the Honda crf250r 2012 and is the answer not in the manual?

Honda crf250r 2012 Specifications

General IconGeneral
Engine Type249cc liquid-cooled single-cylinder four-stroke
Bore x Stroke76.8mm x 53.8mm
TransmissionClose-ratio five-speed
Front Suspension Travel12.2 inches
Front BrakeSingle 240mm disc with twin-piston caliper
Rear BrakeSingle 240mm disc
Front Tire80/100-21
Rear Tire100/90-19
Seat Height37.6 inches
Ground Clearance13.2 inches
Fuel SystemPGM-FI
Final DriveChain
Rear SuspensionPro-Link Showa single shock with spring preload, rebound and compression damping adjustability

Summary

Motorcycle Safety

Before Riding

Servicing Your Honda

The Importance of Maintenance

Stresses the necessity of proper maintenance for safety and performance.

Maintenance Safety

Highlights crucial safety precautions for performing maintenance tasks.

Maintenance Schedule

Provides a schedule for regular inspection and service of the CRF.

Before & After Competition Maintenance

Fuel System

Engine Oil

Changing Engine Oil & Filter

Provides step-by-step instructions for changing engine oil and filter.

Transmission Oil

Oil Recommendation

Recommends specific transmission oil types and viscosity for the CRF.

Checking & Adding Oil

Explains how to check and add transmission oil to the CRF.

Replacing Transmission Oil

Guides the process of draining and replacing transmission oil.

Coolant

Coolant Recommendation

Specifies recommended coolant types and mixtures for the CRF.

Checking & Adding Coolant

Details how to check and add coolant to the CRF's cooling system.

Coolant Replacement

Provides instructions for replacing the CRF's coolant.

Air Cleaner

Cleaning

Guides the cleaning process for the CRF's air cleaner element.

Throttle

Engine Idle Speed

Clutch System

Spark Plug

Valve Clearance

Valve Clearance Inspection

Details how to measure intake and exhaust valve clearances.

Piston/Piston Rings/Piston Pin

Cylinder Head Removal

Details the steps for removing the cylinder head assembly.

Piston Removal

Guides the removal of the piston from the cylinder.

Piston Ring Removal

Explains how to remove piston rings from the piston.

Piston Installation

Provides instructions for installing the piston into the cylinder.

Cylinder Installation

Guides the installation of the cylinder onto the engine.

Suspension

Front Suspension Inspection

Outlines inspection procedures for the front suspension components.

Rear Suspension Inspection

Details inspection steps for the rear shock absorber and swingarm.

Recommended Fork Oil

Specifies the recommended fork oil type for the CRF.

Fork Oil Change

Guides the process of changing the fork oil.

Brakes

Front Brake Lever Adjustment

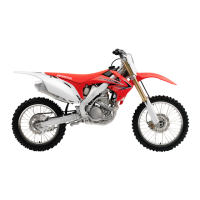
Explains how to adjust the front brake lever for optimal feel.

Rear Brake Pedal Height

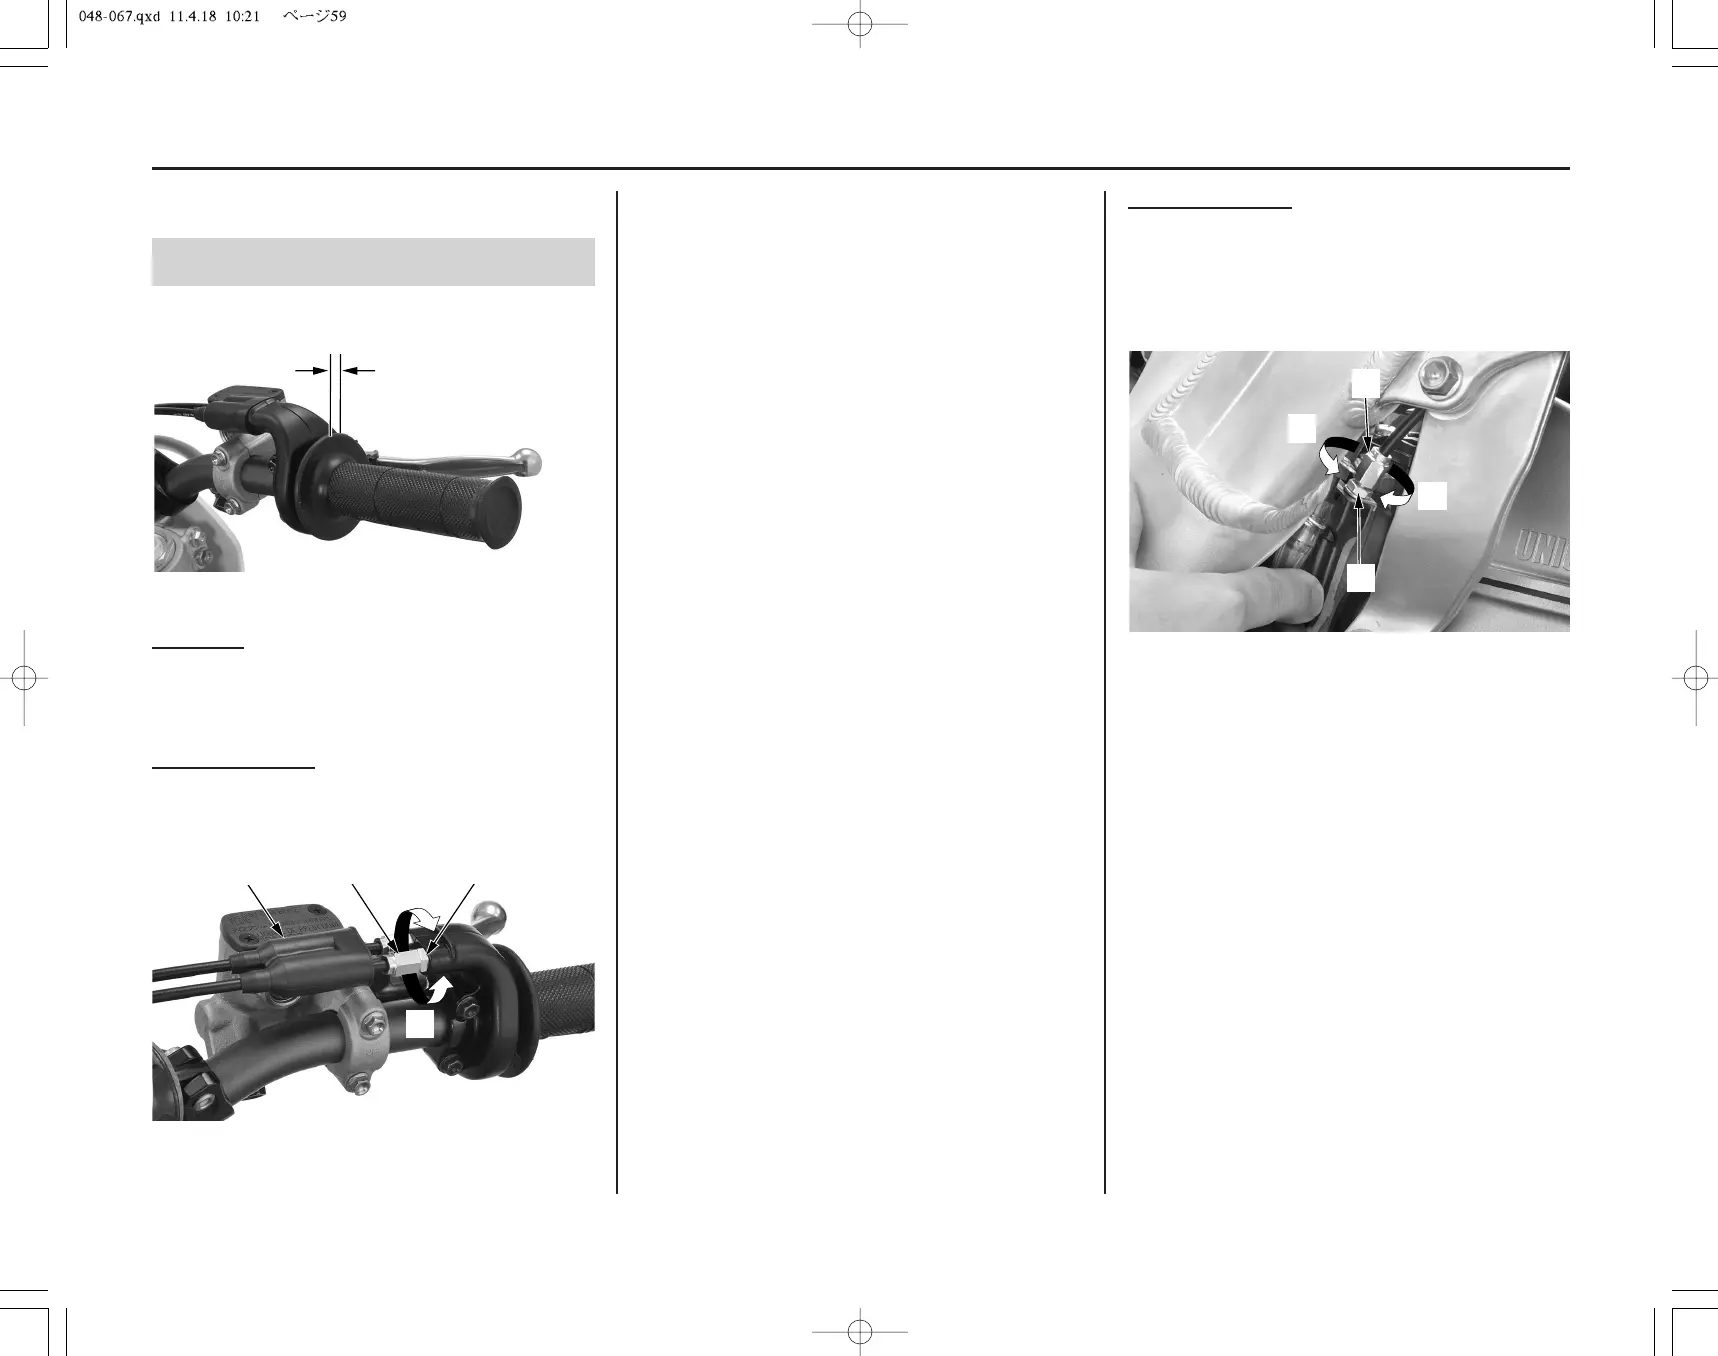
Guides the adjustment of the rear brake pedal height.

Fluid Level Inspection

Details how to inspect front and rear brake fluid levels.

Brake Pad Wear

Explains how to inspect brake pads for wear and when to replace them.

Wheels

Tires & Tubes

Drive Chain

Inspection

Outlines procedures for checking drive chain slack and condition.

Removal, Cleaning & Replacement

Explains how to remove, clean, and replace the drive chain.

Exhaust Pipe/Muffler

Steering Damper

Adjustments for Competition

Front Suspension Adjustments

Details how to adjust front suspension for rider weight and conditions.

Rear Suspension Adjustments

Explains how to adjust rear suspension for rider weight and conditions.

Suspension Adjustments for Track Conditions

Provides suspension tuning advice based on track surface conditions.

Suspension Adjustment Guidelines

Offers guidelines for adjusting suspension based on symptoms.

Technical Information

Torque Specifications

Provides a table of torque specifications for various fasteners.

Related product manuals