xvii
CONTENTS
!. SPECIFICATIONS ............................................................... 2
@. PREPARATION AND OPERATION .................................... 4
1. Checking the position of the work clamp check ....................................... 5
2. Checking the thread trimming action (NB type) ....................................... 5
3. Passing gimp through the machine head .................................................. 6
4. Starting the machine and lifting the work clamp check (NB type) .......... 7
5. Thread trimming (NV type) .......................................................................... 8
#. ADJUSTMENT .................................................................... 9
1. Adjusting the seam quality ......................................................................... 9
(1) Adjusting the thread tension ........................................................................................ 9
(2) Adjusting the thread take-up spring ............................................................................. 9
(3) Adjusting the gimp tension ......................................................................................... 10
(4) Needle-to-hook timing.................................................................................................11
2. Adjusting the thread trimming device (NB type) ................................... 11
(1) Adjusting the engagement between the guide plate
locking pin and the locking plate ................................................................................11
(2) Adjusting the operating depth of the pull-in plate ....................................................... 12
(3) Adjusting the forced returning mechanism................................................................. 13
3. Adjusting the gimp guide .......................................................................... 14
(1) Adjusting the height of gimp guide shaft actuating rod plate ..................................... 14
(2) Adjusting the position of the gimp guide finger .......................................................... 16
(3) Adjusting the position of the gimp guide finger at the time of stop motion ................. 18
4. Adjusting the timing to shift the gimp position between
the stitch base lines................................................................................... 18
5. Replacing the moving knife and the stationary knife (NB type) ............ 20
$. EMERGENCY STOP ......................................................... 20
%. WHEN OPERATING A MACHINE EQUIPPED
WITH AO-17 OR AO-32 .................................................... 21
^. TROUBLES AND CORRECTIVE MEASURES................. 25
−12−
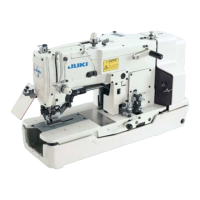
(2)たぐり板入り量の調整/Adjusting the operating depth of the pull-in plate
拉板進入量的調整
1)手動送りハンドルを回して、遮断の位置に押えを
持っていきます。
2)押え上げを行い、たぐり板1 が押え2の長穴より
0.5〜1mmほど入り込んでいるように、二又支え
板止めねじ3をゆるめて矢印方向に移動させ調整し
ます。
3)二又支え板止めねじ3を締めてください。
(注意)案内板固定ピンと固定板のかみ合いを調整
(P.11参照)した後に、上記調整を行ってくだ
さい。
1
2
3
0.5 – 1 mm
1)手動送りハンドルを回して、遮断の位置に押えを
持っていきます。
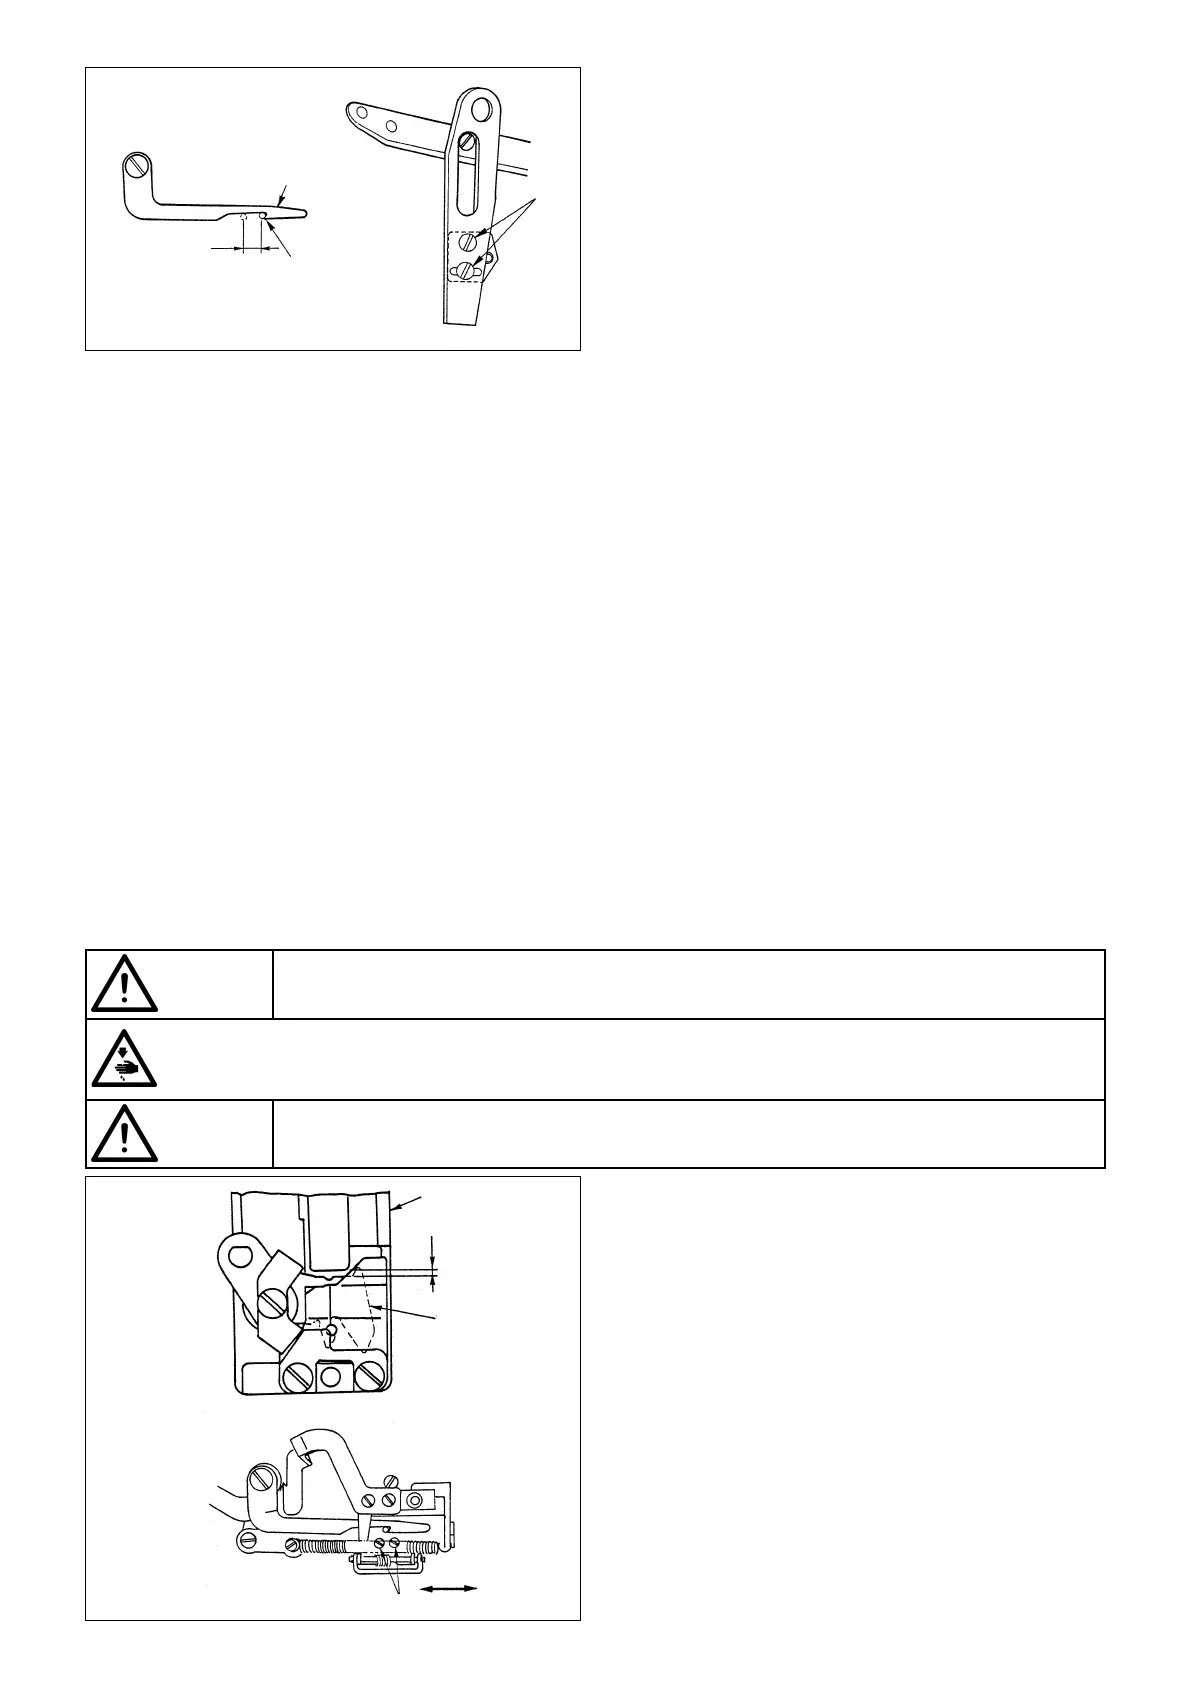
2)押え上げを行い、案内板固定ピン1が最大に動作し
た時と固定板2とかみ合った時の移動量が0.5〜1
mmとなるように、止めねじ3をゆるめて調整しま
す。
3)止めねじ3を締めてください。
(注意)
移動量が大きいと、押え上げができなかったり、た
ぐり板の上に針が落ちてメス等が破損し、針が折れ
てしまいます。
(「2.糸切り動作の確認」(P.5)を参照してくださ
い。)
1) Turn the manual feed handle to make the work clamp
check to travel to the stop-motion position.
2) Loosen screws 3 and lift the work clamp check to
make guide plate locking pin 1 to reach its travel end
and engage with locking plate 2. At this time, adjust
the amount the travel of the guide plate locking plate
to 0.5 to 1 mm.
3) Tighten screws 3.
(Caution)
If the traveling amount of the guide plate locking
pin is too large, the needle may drop on the pull-in
plate to cause the knife or the related components
and the needle to break.
(Refer to “2. Checking the thread trimming action”
on page 5.)
1)轉動手動送布手柄,把壓腳抬到分離的位置。
2)提昇壓腳,擰鬆固定螺絲3,在導向板固定銷1動作
最大時與固定板 2 咬合的移動量調整為 0.5 ∼ 1 mm 。
3)擰緊固定螺絲 3 。
(注意)移動量過大的話,壓腳不能提昇,機針落到拉板
上,弄壞切刀,弄斷機針。
(請參照「2. 切線動作的確認」(P.5)。)
注意
ミシンの不意の起動による事故を防ぐため、電源を切ってから行ってください。
WARNING :
Turn OFF the power before starting the work so as to prevent accidents caused by abrupt start of the sewing
machine.
注意
為了防止縫紉機的意外起動,請關掉電源之後再進行操作。
1
3
2
0.5 – 1 mm