Always switch off the power to each device before connecting it to your FC-18. After
connecting your FC-18, connect its power and then switch on the power to each device.
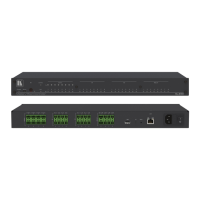
Figure 3: Connecting to FC-18
To connect the FC-18 as illustrated in the example in Figure 3:
1. Connect an HDMI source (for example, a laptop) to the HDMI™ IN connector on the
front panel.
2. Connect the HDMI™ OUT connector to an HDMI acceptor (for example, a
CEC-enabled display).
3. Connect the REMOTE 4-pin terminal block connector to contact closure switches
(for example, Kramer RC-20TB).
4. Connect the ETHERNET RJ-45 port to the Ethernet to control the FC-18 or to tunnel
RS-232 data to the display. Also use for firmware upgrade.
5. Connect the power adapter to the FC-18 and to the mains electricity (not shown in
Figure 3).
6. Press the ON and OFF buttons simultaneously to display the current device IP address
of the FC-18 on the HDMI acceptor.

 Loading...