14
Temperature
Press SET UP to lock the temperature and the
display will then show:
You have two seconds to carry out this procedure
in the correct sequence. The temperature of the
spa and the lock symbol are shown together in
the centre of the display. The buttons used to set
the temperature are deactivated. If you press on
these buttons, the set temperature is displayed
with a double arrow next to it.
Unlocking temperature function
(only 630/736 series)
To unlock the temperature, press SET UP or
SET DOWN, then TIME, then JETS 1 and
finally SET DOWN. In the unlocked display
you will now see:
The four buttons must be pressed in the
correct sequence within two seconds. Once
you have pressed the last button, the lock
symbol disappears and all the buttons become
active again.
Locking the operating panel
(only 630/736 series)
To avoid your spa being used without your
permission, the control system has a unique
locking system for the operating panel.
If you want to lock the panel, press TIME
and then JETS 1. (736 series: JETS 3)
You will now see the following text in the
central display:
1
0
1
0
LOC
Next, press SET UP. You will now see the fol-
lowing in the central locked display:
You have two seconds to carry out this procedure
in the correct sequence. The temperature of the
spa and the lock symbol are shown together in
the central display. All buttons on the operating
panel are now deactivated, except for the
TIME button, which is used for the unlocking
procedure.
Whenever the operating panel is locked, all auto-
matic spa functions operate normally. However,
they can not be adjusted.
Unlocking the operating panel
(only 630/736 series)
If you want to unlock the panel, press on TIME,
JETS 1, SET DOWN. In the unlocked display
you will now see:
The lock symbol goes out. All buttons can now
be used again.
NOTE:
The three buttons must be pressed in the
correct sequence within two seconds.
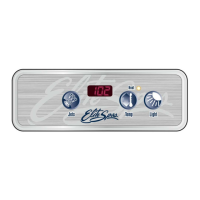
Lighting
Press on the LIGHT button to switch the
underwater lighting on and off. The lighting
automatically switches off after 60 minutes.
NOTE:
The LIGHT button is also used for the
optional DOL system (see page 12).
 Loading...