If the electronic level control compressor is in dan-
g
er of overheating, for example, due to repeated
raising or lowering within a short period, electronic
level control is deactivated. You can raise or lower
the vehicle level again aer a few minutes.
Raising and lowering the vehicle level
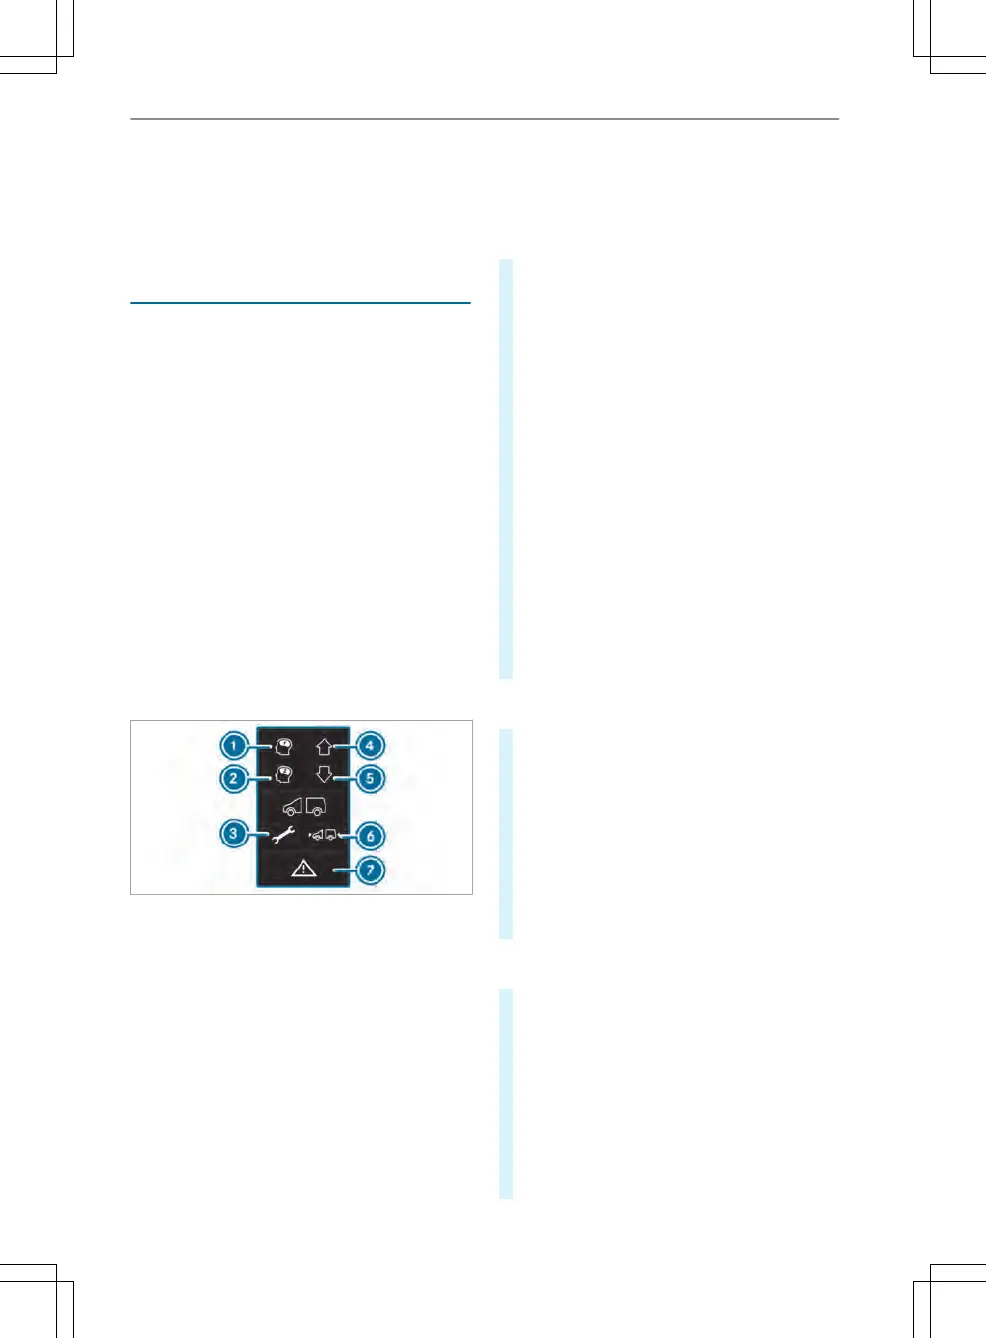
Using the remote control
%
Certain special equipment enables other oper-
ation op
tions:
R
Ambulance: raising the vehicle level above
the driving level (center position) is not
possible. Only the lowest position and the
driving level can be set.
R
Speed signal: in order to operate elec-
tronic level control, the parking brake must
not be applied. Electronic level control can
be operated manually up to 6.2 mph
(10 km/h). If this speed is exceeded, driv-
ing level will be set automatically.
R
30-minute run-on module: electronic level
control can be operated up to 30 minutes
aer switching o the vehicle.
The remote control is located in a holder on the
B‑pillar on t
he driver's side. Remove the remote
control from the holder before use.
Electronic level control starts automatically if the
v
ehicle is switched on. Operation is only possible
aer the parking brake has been applied.
Electronic level control performs a self-check regu-
larly when it is activated and while in use. Indicator
lamp 7 on the remote control lights up for about
one second when you switch on the vehicle.
There is a malfunction if indicator lamp 7
behaves in the following ways:
R
the indicator lamp does not light up when you
switch on the vehicle
or
R
the indicator lamp then lights up again or
ashes
In addition, a warning tone is emitted from the
r
emote control for approximately 30 seconds. The
malfunction that has been detected can be shown
using the indicator lamps (signaling of malfunction
codes).
#
Park the vehicle safely and leave it switched
on.
#
Apply the parking brake.
#
To raise or lower the vehicle level: pr
ess and
hold button 4 or 5 until the vehicle level
reaches the required height.
The indicator lamp on button 4 or 5 ashes
as long as the vehicle level is being changed.
When the vehicle level has been set, the indi-
cator lamp on button 4 or 5 lights up.
#
To lower automatically: br
iey press button 5.
Electronic level control automatically lowers
the vehicle to the next lower position:
R
From the highest position to driving level
R
From driving level to the lowest position
The indicator lamp on button 5 ashes as
long as the vehicle level is being changed.
When the vehicle level has been set, the indi-
cator lamp on button 5 lights up.
%
By pressing button 4 dur
ing the movement,
the original position will be reset.
#
To raise automatically: br
iey press button 4.
Electronic level control automatically raises the
vehicle to the next higher position:
R
From the lowest position to driving level
R
From driving level to the highest position
The indicator lamp on button 4 ashes as
long as the vehicle level is being changed.
When the vehicle level has been set, the indi-
cator lamp on button 4 lights up.
%
By pressing button 5 dur
ing the movement,
the original position will be reset.
#
To raise or lower automatically to driving level
(cent
er position): press and hold button 6.
Electronic level control automatically raises or
lowers the vehicle to driving level.
#
To save the set vehicle level: se
t the required
vehicle level.
#
Press and hold button 1 or 2 until y
ou hear
a warning tone.
The vehicle level set has been saved on corre-
sponding button 1 or 2.
Driving and parking
129

 Loading...