EasyManua.ls Logo

Miele K 851 iD User Manual

Miele K 851 iD
36 pages
To Next Page IconTo Next Page
To Previous Page IconTo Previous Page
Page #12 background imageLoading...
Page #12 background image
Natural air circulation gives rise to
different temperature zones inside the
appliance. Cold, heavy air sinks to the
lowest section of the appliance.
Make use of the different zones
when placing food in the appliance.
The coldest zones are against the
back wall and above the vegetable
containers. Use the area above the
vegetable containers for perishable
foods such as meat, sausage, fish etc.
The warmest zone is in the top section
of the door. Use this area for storing
butter and cheese.
Loading examples
^
When placing food in the appliance
load the top shelves first and work
your way down to the bottom starting
with baked goods, pre-cooked foods
and milk products and finishing with
meats, fish and sausages.
^
Use the vegetable containers for
storing vegetables, salad and fruit.
Not all fruit and vegetables should
be stored together in the same con
-
tainer as they give off natural gases
which affect the perishability of other
foods. (See section "Chilling and
storing food").
^ Fill the door shelves from the top to
the bottom.
Start with butter, cheese, small tins,
bottles and tubes in the upper
shelves, followed by large bottles,
juice containers and milk in the
bottom shelves.
Do not store cooking oil in the appli
-
ance door.
Traces of oil can cause stress
cracks to occur in the plastic
components in the door.
Storing food
12
Question and Answer IconNeed help?

Do you have a question about the Miele K 851 iD and is the answer not in the manual?
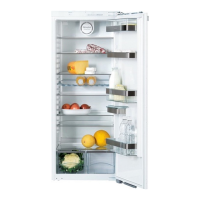
Miele K 851 iD Specifications

General IconGeneral
CategoryRefrigerator
ModelK 851 iD
Appliance placementBuilt-in
Energy Efficiency ClassA++
Noise Level38 dB
Door hingeRight
RefrigerantR600a
Climate classSN-T
Fridge interior lightYes
Lamp typeLED
Number of shelves/baskets4
Number of vegetable drawers2
Door balconies3
Egg balconyYes
Number of Doors1
Adjustable ShelvesYes
Door Open AlarmYes
ColorWhite
TypeBuilt-in
Fridge gross capacity279 liters
Defrost SystemAutomatic

Summary

Description of the appliance

Warning and safety instructions

Correct usage and technical safety

Covers the appliance's intended domestic use and critical technical safety aspects related to coolant and potential hazards.

Electrical safety and mains connection

Ensures safe electrical connection and operation, covering mains supply compatibility, earthing, and avoiding extension leads.

Appliance operation and maintenance safety

Details safety precautions for appliance operation and maintenance, including avoiding specific cleaning agents, ensuring ventilation, and climate range compliance.

The correct temperature

Temperature selection and display

Explains how to set and read the internal temperature using the dial and display, and factors affecting temperature.

Super cool and dynamic cooling

Super cool function details

Details the Super cool function for rapid temperature reduction, its recommended uses, and how to switch it on/off.

Dynamic cooling function details

Explains the Dynamic cooling feature for even temperature distribution and when it should be activated or deactivated.

Storing food

Chilling and storing food

Cleaning and care

Problem solving guide

Cooling performance issues

Diagnosing and fixing issues where the appliance is not cooling adequately or is too cold.

Frequent or long switching cycles

Troubleshooting reasons for the appliance switching on too frequently or running for extended periods.

Display and interior light issues

Resolving problems with the temperature display not showing or flashing, and the interior light not working.

Electrical connection

Mandatory earthing requirement

Crucial warning emphasizing that the appliance must be properly earthed for safety.

Installation

Building in dimensions

Building in the appliance

Fitting the furniture door

Instructions for attaching the furniture door to the appliance, including marking, hanging, and securing the bracket.

Securing the appliance to housing

Final steps to securely fix the appliance to the housing unit at the top and bottom, including cover strips.

Related product manuals