22
Avoiding false alarms
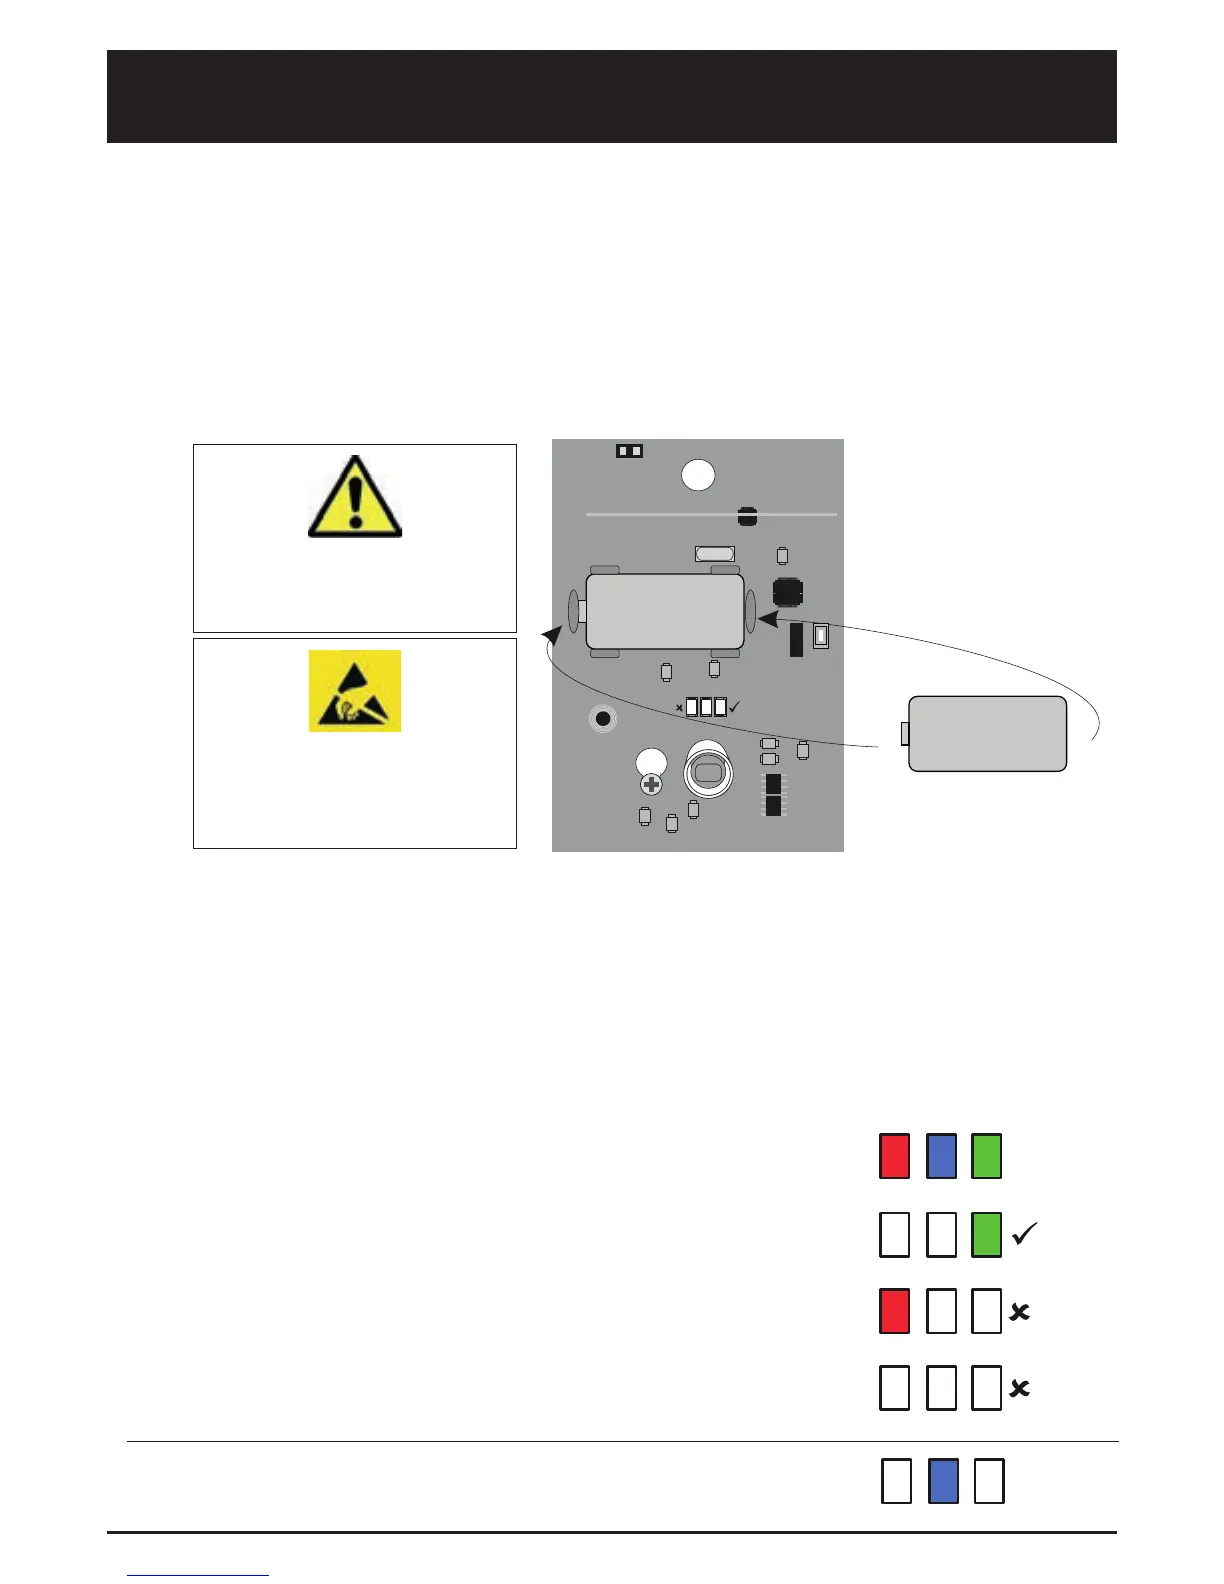
Changing the battery
1. Avoid placing the detector in direct sunlight.
2. Do not let pets and other animals wander freely whilst the alarm system is armed.
3. Do not mount the detector near heaters or radiators.
4. Do not mount the detector near open windows or air vents.
5. Mount the detector on a stable surface.
KX12DQ-WE
12m Wireless PIR Detector
RED BLUE GREEN
RED BLUE GREEN
RED BLUE GREEN
RED BLUE GREEN
RED BLUE GREEN
KX12DW 12m Internal detector
WHITE
3mmABS, 0.4mm HDPE in LensArea
868MHz, FMTransceiver Narrow Band
Fully Encrypted Rolling Code
300m Free Space
Low Noise Pyroelectric Sensor
High, Low
AdvancedAutomatic
12m
74
0.3 - 3.0 m/s
85
CR123A Lithium Battery
Greater than 2 years
1.8m to 2.4m
Front + Optional RearTamper
-20 C to 50 C
-10 C to 50 C
Wall and ceiling mounting brackets optional
EN55022 Class B
EN50130-4
Model:
Colour:
Casing:
Transmission Frequency:
Tranmission Method:
Transmission Range:
Detection Method:
Sensitivity:
Temperature Compensation:
Detection Range:
Detection Zones:
Detection Speed:
DetectionAngle:
Battery:
Battery Life:
Mounting Height:
Tamper Switch:
Storage Temperature:
Operating Temperature:
Accessories:
Emissions:
Immunity:
®
12m
11m
9m
8m
7m
6M
5m
4m
3m
2m
1m
2m
3m 4m
5m 6m 7m
8m
9m
11m
12m
m01m1
10m
85
74 zones
7 planes
O
2m
3m 4m
5m 6m 7m
8m
9m
11m
12m
2.4m
1m
10m
Part number: FPKXBRACKET
Wall Ceiling
CASE LID
SCREW FITTING
NOTE: When mounting the
detector, ensure that it is
not tilting backwards.
69mm
(2.72”)
3mm
(0.12")
50mm
(2.2”)
117mm
(4.61”)
Kg
= 105g (3.4 oz) without bracket
Header On
= HIGH)
Header Off
= LOW
SENSITIVITY
DIGITAL SIGNAL
PROCESSING SELECT
Tamper Spring
Sensitivity Settings
Piro Sensor
DO NOT TOUCH
Learn Button
Battery
Header for Rear Tamper
+
-
The batteries supplied have been chosen to
provide long service life whilst, for safety
reasons, having limited output current.
Replace only with approved batteries.
To prevent possible damage to components,
any static charge on your body needs to be
eliminated before touching the inside of the
unit. This can be accomplished by touching
some grounded/earthed metallic conductor
such as a radiator/pipework immediately
mralA
CR123A
LITHIUM
BATTERY
+
-
REAR TAMPER
NVM RESET
CR123A
LITHIUM
BATTERY
+
-
When you are ready to learn the device to the control panel receiving equipment, and when the
equipment is in the learn mode (see Enforcer Programming Manual) follow the procedure below.
1. Make sure the battery is installed correctly and the plastic wrapping removed.
2. Press and Hold the Learn button until the 3 LEDs start cycling through the different colours, then
release the Learn button.
3. The device is correctly learnt when the Green LED flashes.
The three coloured LEDs give a visual indication of the signal strength.
Green indicates good signal strength and is a good location to install.
Red indicates poor signal strength and the device should not be
installed in that position.
If no LED illuminates then the device is completely out of range.
The blue LED will illuminate when the device is activated.
Learning the MC1-WE to the Enforcer control panel
Back view of the MC1-WE
Tamper Switch
Using Magnetic Contact 1 (S1)
To enable Magnetic Contact 1 you must remove the
jumper link from the S1 enable pins:
Door
Door Frame
Reed Switch
S1
S1 Enable
Learn
S2 Enable
Z T
Test Result
T
C
Z
WINDOW
Contact
Magnet
TAMPER
Tamper
Enable/
Disable
Zone
Enable/
Disable
Magnetic
Contact 1
Enable/
Disable
Learn
Button
Status LEDs
ZONE
S1
S1 Enable
Learn
Z T
Test Result
T
C
Z
Example:
Universal Transmitter
T
C
Z
Z T
T
T
N / C
Door
Contact
/ Sensor
+
-
S1
S1 Enable
Learn
Z T
Test Result
T
C
Z
CR2 Battery
CR2 Battery
If the battery needs to be replaced, the
correct battery type (CR2) must be
installed
RED BLUE GREEN
RED BLUE GREEN
RED BLUE GREEN
RED BLUE GREEN
RED BLUE GREEN
MC1-WE
WHITE
3mm ABS, 0.4mm HDPE in Lens Area
868MHz, FM Transceiver Narrow Band
Fully Encrypted Rolling Code
300m Free Space
Three LED Combinations
(RSSI, Battery Status and Alarm)
1 x MC1-WE
2, Side and End
1 External Input & 1 External Tamper Input
3.6V 2.2Ahr AA Lithium Battery
Up to 2 Years
Front+Optional Rear Tamper
-20°C to 50°C
-10°C to 50°C
Model:
Colour:
Casing:
Transmission Frequency:
Transmission Method:
Transmission Range:
Indication:
Reed Switch:
Detection Points:
Detection Inputs:
Battery:
Battery Life:
Tamper Switch:
Storage Temperature:
Operating Temperature:

 Loading...