17
DE PLIT ES HUEN FRNL PT RO EL
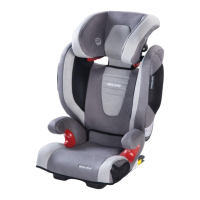
INSTALLING THE CHILD SEAT WITH ISOFIX
INSTALLATION
Using ISOFIX, you can fix the child seat to the vehicle, thereby increasing
your child’s safety. ISOFIX secures the seat when it is not in use.The child
still needs to be secured with the three-point belt of your vehicle.
NOTE! The ISOFIX anchorage 2 points are two metallic clips for each
seat and are positioned between the backrest and the seating surface of
the vehicle seat. In case of doubt, please refer to the driver’s manual of
your vehicle.
• Use the adjustment button 3 at the side of the child seat
• Pull the two ISOFIX connectors 4 as far as they will go
• Push the two ISOFIX connectors 4 into the ISOFIX anchorage points 2
until these lock into place with an audible ‘CLICK’
• Ensure that the child seat is secure by trying to pull it out
• The safety indicator 5 must now be clearly visible on the two connectors
Push the child seat backwards until the full surface of the backrest of the
child seat is against the backrest of the vehicle.
NOTE! Are the ISOFIX anchorage points 2 hard to reach in your vehicle,
you can use the supplied ISOFIX guides 6.
• Insert the supplied ISOFIX guides 6 with the longer strap upwards into
the two ISOFIX anchorage points 2. In some vehicles, it is better to
mount the ISOFIX guides 6 in the opposite direction
MONTAGGIO DEL SEGGIOLINO PER
BAMBINI CON ISOFIX
MONTAGGIO
Con ISOFIX è possibile collegare il seggiolino per bambini alla vettura
aumentando la sicurezza del vostro bambino. ISOFIX fissa il seggiolino per
bambini se non in uso. Il bambino deve essere ugualmente allacciato con
la cintura di sicurezza a 3 punti della vettura.
AVVISO! I punti di fissaggio ISOFIX 2 sono due linguette di metallo poste
su ogni sedile auto tra lo schienale e la superficie di seduta. In caso di
dubbi consultare le istruzioni per l’uso della vettura.
• Azionare il tasto di regolazione 3 posto a lato
• Estrarre i due connettori ISOFIX 4
• Inserire i due connettori ISOFIX 4 nei punti di fissaggio ISOFIX 2 finché
non scattano in posizione con un “CLIC” ben udibile
• Accertarsi che il seggiolino sia fissato per bene provando ad estrarlo
• L’indicatore di sicurezza 5 dei due connettori ora deve essere verde
Spingere all’indietro il seggiolino per bambini finché non aderisce comple
-
tamente allo schienale della vettura.
AVVISO! Se i punti di fissaggio ISOFIX 2 della vostra vettura sono di
difficile accesso, è possibile usare gli ausili di introduzione ISOFIX in
dotazione 6.
• Agganciare gli ausili di introduzione ISOFIX in dotazione 6 con la linguet
-
ta più lunga rivolta verso l’alto nei due punti di fissaggio 2. In alcune
autovetture è meglio indicata una direzione di montaggio opposta degli
ausili di introduzione ISOFIX 6
 Loading...