Chapter 2
Installing the Device
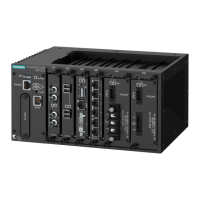
RUGGEDCOM RX1500
Installation Guide
6 Mounting the Device to a Rack
NOTE
For detailed dimensions of the device with either rack, DIN rail or panel hardware installed, refer to
Chapter 5, Dimension Drawings.
The following sections describe the various methods of mounting the device:
• Section 2.1.1, “Mounting the Device to a Rack”
• Section 2.1.2, “Mounting the Device on a DIN Rail”
• Section 2.1.3, “Mounting the Device to a Panel”
Section 2.1.1
Mounting the Device to a Rack
For rack mount installations, the RX1500 can be equipped with rack mount adapters pre-installed at the front or
rear of the chassis. Additional adapters are provided for added stability.
CAUTION!
Vibration hazard – risk of damage to the device. Always use four rack mount adapters (two at the
front of the device and two at the rear) when installing the device in high-vibration or seismically active
locations.
CAUTION!
Electrical/mechanical hazard – risk of damage to the device. Before installing the device in a rack,
make sure of the following:
• When installing the device in a closed or multi-device rack, be aware that the operating ambient
temperature of the rack may be higher than the ambient temperature of the room. Make sure the
rack is installed in a suitable environment that can withstand the maximum ambient temperature
generated by the rack.
• Make sure each device in the rack is separated by at least one rack-unit of space, or 44 mm (1.75
in), to promote convectional airflow. Forced airflow is not required. However, any increase in airflow
will result in a reduction of ambient temperature and improve the long-term reliability of all equipment
mounted in the rack space.
• Do not exceed the maximum number of devices or weight restrictions specified by the rack
manufacturer.
• Do not overload the supply circuit. Refer to the over-current protection and power supply ratings
specified by the rack manufacturer.
• Make sure the rack and all devices have a proper ground-to-Earth connection. Pay particular
attention to power supply connections other than direct connections to the branch circuit (e.g. power
strips).
To secure the device to a standard 48 cm (19 in) rack, do the following:
1. Make sure the rack mount adapters are installed on the correct side of the chassis.
• To make the modules and ports accessible, install the rack mount adapters at the rear of the chassis
• To make the management ports and LEDs accessible, install the rack mount adapters at the front of the
chassis
 Loading...