21
USO DEL ENSATADOR AUTOMATICO
¹
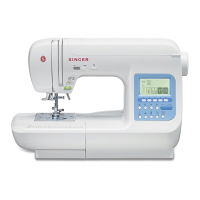
$VHJXUDUVHGHOHYDQWDUODSDODQFDGHOSUHQVDWHODV\OD
DJXMDDODSRVLFLyQPiVHOHYDGDDQWHVGHOHQVDUWDGR
HELPFUL SUGGESTIONS:
º
Put a drop of sewing machine oil onto the felt disc,
if the machine is used after a long interval.
º
If the threading hook is deviated from needle hole,
adjust the position of the hook using a small screw
driver.
SUGGESTIONS UTILES :
º
Mettez une goutte d’huile pour machine à coudre
sur le disque de feutre, si vous n’avez pas utilisé la
machine depuis un certain temps.
º
Si la fourchette d’enfilage ne s’insère pas dans
le chas de l’aiguille, ajustez la position de la
fourchette en utilisant un petit tournevis.
SUGERENCIAS UTILES
º
3RQHUXQDJRWDGHDFHLWHHOHOGLVFRGH¿HOWURVLOD
máquina ha sido usada por un largo periodo.
º
6LHOJDQFKRVHGHVYtDGHORUL¿FLRGHODDJXMDDMXVWH
la posición del gancho con un pequeño desarmador.
º
If the threading hook cannot catch thread, adjust
the vertical position by bending the twin thread
guide.
º
Si la fourchette d’enfilage ne peut agripper le fil,
ajustez la position verticale du guide double de
O¶HQ¿OHXU
º
Si el gancho no jala el hilo, ajuste la posición
vertical doblando la guía de hilo.
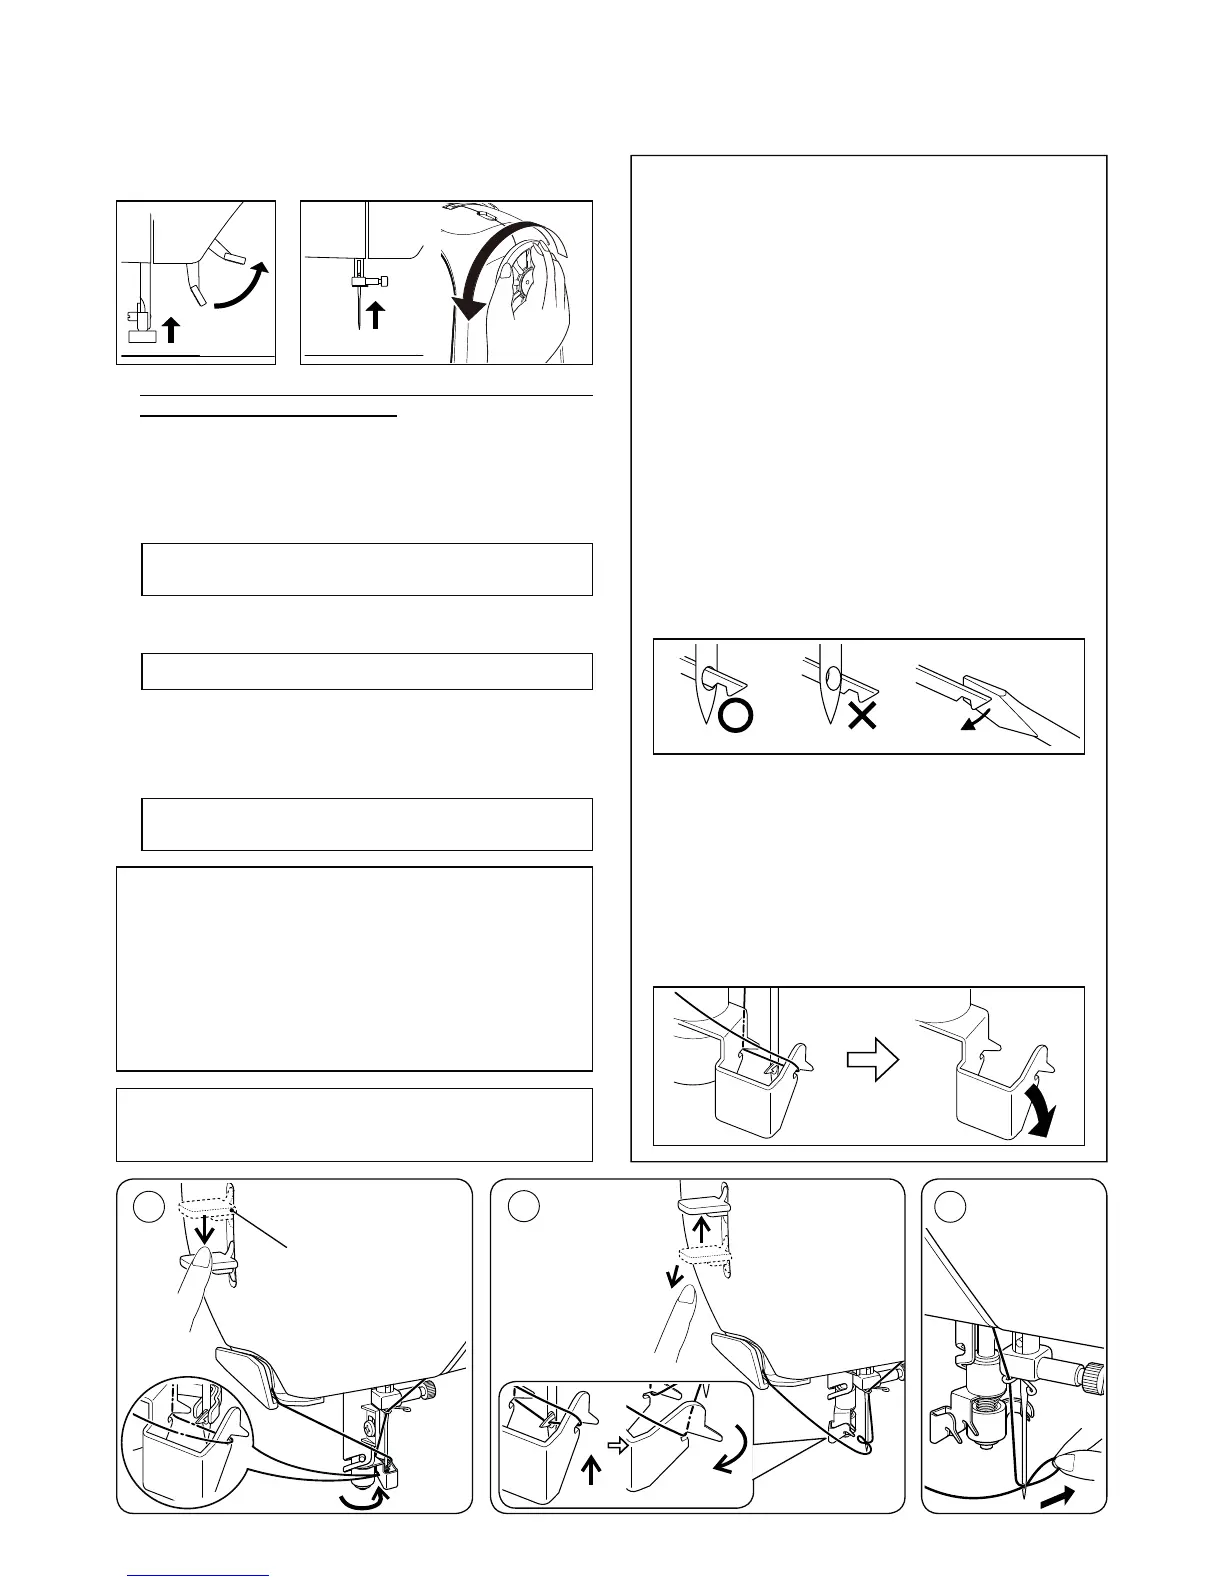
1. (QVDUWHODPiTXLQDFRQVXPDQRL]TXLHUGDPLHQWUDV
detiene el hilo con la derecha.(QJDQFKHHOKLORHQHO
JXtDKLORGHODEDUUDGHDJXMD\MiOHORKDFLDXVWHGGHMDQGR
DOUHGHGRUGH´FPGHKLOR
(QJDQFKHHOKLORHQHOJXtDKLORGREOH$\%
-DOHHOKLORVXDYHPHQWHHQHOFRUWDKLORFRUWH\PDQWpQJDOR
HQVXOXJDU
-DOHODSDODQFDGHHQVDUWDGRDVXPiVEDMDSRVLFLyQKDVWD
TXHODGREOHJXtDKLORJLUH\SDUH
/LEHUHODSDODQFD\ODDJXMDVHHQVDUWDUiDXWRPiWLFDPHQWH
6LODSDODQFDQRUHJUHVDDODSRVLFLyQRULJLQDOOHYDQWH
suavemente con la mano.
-DOHHOUL]RGHKLORVREUDQWHOHMRVGHXVWHG
No jale el hilo con fuerza o éste se saldrá del
RUL¿FLRGHODDJXMDDQWHVGHVHUHQVDUWDGD
Asegúrese de que la guía no toque la tela, etc.
Si la aguja no se ensartó correctamente, volver a
ensartar desde el paso 1
IMPORTANT: If the needle cannot be threaded due to
the nature of thread, manually thread the needle after
hooking thread to the thread guide on the needle bar.
NOTA:
º
3DUDXQIiFLOHQVDUWDGRVHUHFRPLHQGD¿MDUODPiTXLQD
en posición de costura recta (posición de la aguja al
centro) cuando se use el ensartador de aguja automático.
º
Los hilos gruesos no se pueden ensartar en agujas
delgadas.
º
No bajar la palanca de ensartado mientras la máquina está
funcionando o se puede romper el gancho del ensartador.
6
5
4
7KUHDGLQJOHYHU
/HYLHUGHQ¿ODJH
Palanca de ensartado
 Loading...