58
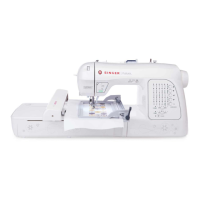
Presser foot
Pied de biche zigzag
Pie prensatelas
Presser bar
Barre de pied presseur
Barra de prensatelas
Embroidery presser foot
Pied presseur de broderie
Prensatelas de bordado
Needle clamp
Serre-aiguille
Abrazadera de aguja
Drive lever
Levier d’entraînement
Palanca de accionamiento
Screw
Vis
Guia
Foot holder
Support du pied
Sujetador prensatelas
3. PREPARATION FOR EMBROIDERY SEWING
BEFORE ATTACHING EMBROIDERY UNIT
$77$&+,1*(0%52,'(5<)227
* Raise presser foot lifter.
7XUQWKHKDQGZKHHO FRXQWHUFORFNZLVHWRZDUG\RXXQWLO
the needle is in its highest position.
1. Remove presser foot screw, presser foot and foot holder.
2. Attach the embroidery presser foot behind presser bar so
that the drive lever is above the needle clamp. Secure it by
tightening presser foot screw.
3. Turn hand wheel toward you to move needle up and down,
DQGFKHFNWKDWWKHHPEURLGHU\SUHVVHUIRRWPRYHVXSDQG
down together with the needle.
CAUTION
Always be sure to turn off power to machine
before changing presser foot.
CAUTION
Be careful not to touch the needle when
replacing presser foot.
INSERTING THE BOBBIN
Refer to page 14 - 15.
* A large amount of thread is required for embroidering, so
be sure to use full bobbin.
 Loading...