EasyManua.ls Logo

Sony DSC-V1 Operating Instructions (English) User Manual

Sony DSC-V1 Operating Instructions (English)
132 pages
To Next Page IconTo Next Page
To Previous Page IconTo Previous Page
Page #60 background image
60
Shooting in Multi
Burst mode
— Multi Burst
Mode dial:
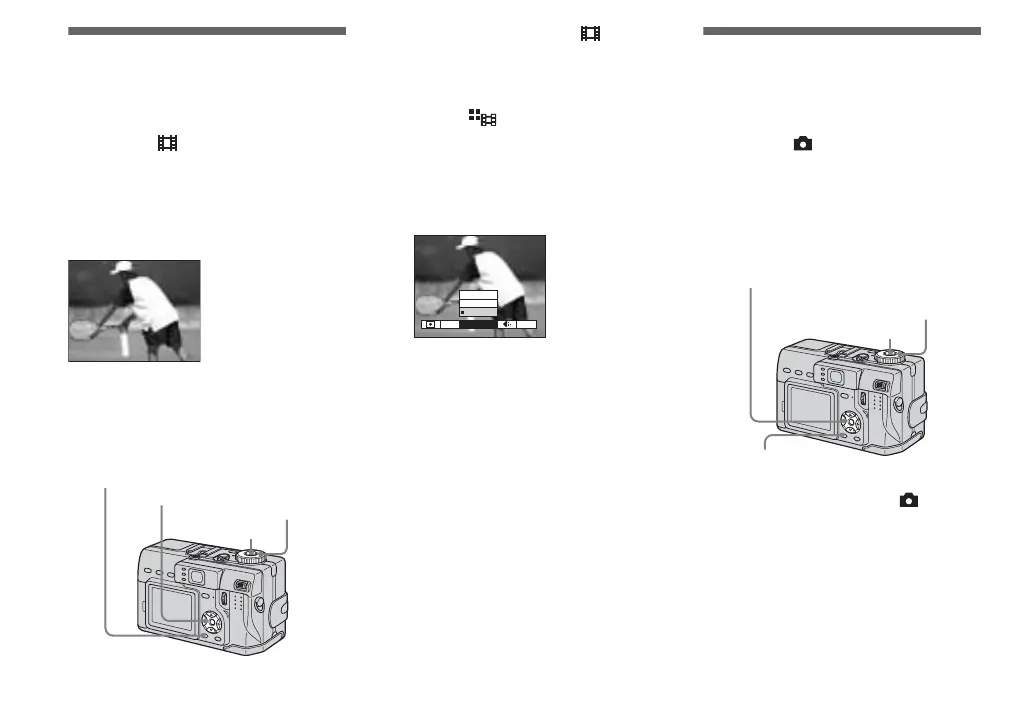
This mode records 16 frames in succession
each time you press the shutter button. This
is convenient for checking your form in
sports, for example.
Before operation
Set [Moving Image] to [Multi Burst] in the
SET UP settings (pages 39 and 115).
a Set the mode dial to .
b Press MENU.
The menu appears.
c Select (Interval) with b/B,
then select the desired frame
interval with v/V.
You can choose the frame interval
from the menu settings (page 39).
d Shoot the image.
The 16 frames are recorded as a single
image (image size: 1.2M).
See page 72 to play back images recorded in
Multi Burst mode using this camera.
For the number of images that can be recorded
in Multi Burst mode, see page 109.
You cannot use the flash in this mode.
Date and time cannot be superimposed onto
images.
Shooting three
images continuously
— Burst 3
Mode dial: /P/S/A/M/SCN
This mode is used for continuous shooting.
Each time you press the shutter button in
this mode, the camera records three images
in succession.
a Set the mode dial to , P, S,
A, M or SCN.
b Press MENU.
The menu appears.
Mode dial
Control button
Shutter
MENU
IntervalWB PFX
1/30
1/15
1/7.5
1/30"
Mode dial
Control button
Shutter
MENU

Table of Contents

Questions and Answers:

Sony DSC-V1 Operating Instructions (English) Specifications

General IconGeneral
ModelDSC-V1
CategoryDigital Camera
Effective Pixels5.0 Megapixels
Sensor TypeCCD
Sensor Size1/1.8 inch
LensCarl Zeiss Vario-Sonnar
Optical Zoom4x
Digital Zoom4x
Shutter Speed30 - 1/1000 sec
LCD Screen Size1.5 inch
Storage MediaMemory Stick, Memory Stick Pro
Battery TypeNP-FC11 Lithium-ion
ISO Sensitivity100, 200, 400

Summary

Operating Instructions

Owner's Record

Details about recording model and serial numbers for product registration.

Safety and Regulatory Information

General Safety Warnings

Instructions to prevent fire, shock hazard, and eye injury from product usage.

Before Using Your Camera

Initial Camera Setup and Usage

Covers trial recording, data backup, image compatibility, and copyright precautions.

Identifying Camera Parts

Camera Body Components

Detailed explanation of the camera's external buttons, dials, and connectors with their functions.

Charging the Battery Pack

Battery Installation and AC Adapter Connection

Step-by-step guide on inserting the battery and connecting the AC adapter for charging.

Battery Performance and Power Saving

External Power Sources

Using the AC Adapter

Instructions for connecting the AC adapter for continuous power supply.

Basic Camera Operation

Powering the Camera On and Off

Describes the procedure for turning the camera on and off using the power button.

Setting the Date and Time

Initial Date and Time Setup

Guide to setting the camera's date and time, including format selection.

Memory Stick Usage

Inserting and Removing Memory Stick

Step-by-step instructions for inserting and removing the Memory Stick storage medium.

Setting Still Image Parameters

Image Size Selection

Procedure for choosing the desired resolution for still images before shooting.

Basic Still Image Shooting

Advanced Shooting Modes

Using the Zoom Feature

Optical and Smart Zoom

Details how to use the zoom lever and the functionality of the smart zoom feature.

Macro Shooting

Close-up Photography Techniques

Instructions for using the macro mode for shooting small subjects at close distances.

Using the Self-Timer

Flash Modes and Red-Eye Reduction

Selecting Flash Modes

Explains the different flash modes available (Auto, Forced, Slow Synchro, No Flash).

Viewing Images on the LCD Screen

Image Playback Display Modes

Explains the different ways to view images: single, index (9-image), and index (3-image).

Viewing Images on a TV

Deleting Images

Deleting Single Images

Procedure for deleting individual still images from the camera.

Memory Stick Management

Formatting the Memory Stick

Instructions on how to format the Memory Stick, erasing all data.

Camera Setup and Menu Navigation

Using the Jog Dial

Jog Dial Navigation and Selection

Explains how to use the jog dial for selecting items and adjusting values in various modes.

Image Quality and Folder Management

Advanced Shooting Techniques

Shutter Speed Priority Mode

Exposure and Focus Modes

Focusing Techniques

Exposure Control and Histogram

Adjusting Exposure Value (EV)

How to manually adjust exposure compensation using EV settings.

Exposure Control Features

Exposure Bracket Shooting

Capturing Multiple Exposure Variations

How to shoot three images consecutively with different exposure values (±1.0EV).

Color Tone Adjustment

Low Light Shooting Modes

Using NightShot Mode

How to use NightShot for capturing images in dark environments like night scenes.

Flash and Multi-Frame Shooting

Continuous Shooting Modes

High Quality Still Image Shooting

Scene Selection Modes

Special Effects and External Flash

Enlarging and Zooming Images

Protecting Images

Protecting Single Images

How to protect individual images from accidental deletion in single-image view.

Shooting Movies

Movie Recording Setup

Steps to prepare the camera for shooting movies, including setting image size.

Viewing Movies

Playback on the LCD Screen

How to play back recorded movies on the camera's LCD screen with sound.

Deleting Movies

Deleting Single Movies

Procedure for deleting individual movie files from the camera.

Editing Movies

Cutting Movies

Instructions on how to cut movies into segments and save them as new files.

Installing the USB Driver

USB Driver Installation Procedure

Step-by-step guide to install the necessary USB driver for camera connection.

Installing Image Transfer Software

Image Transfer Installation Steps

Guide to installing the Image Transfer application for automatic image copying.

Installing ImageMixer Software

ImageMixer Installation Procedure

Instructions for installing the ImageMixer application for viewing and editing images.

Connecting Camera to Computer

Establishing USB Connection

Steps to connect the camera to the computer using the USB cable and AC adapter.

Managing USB Connection

Copying Images with Image Transfer

How to copy images using Image Transfer software on different Windows versions.

Viewing Images on Computer (Windows XP)

Connecting to a Computer (Macintosh)

Installing USB Driver for Mac

Procedure for installing the USB driver on Macintosh systems.

Managing Macintosh Computer Connection

Troubleshooting Camera Issues

Battery Pack and Power Problems

Solutions for issues related to battery charging, installation, and power.

Error Messages and Warnings

Memory Stick Errors

Details common error messages related to Memory Stick usage and their solutions.

Self-Diagnosis Display

Interpreting Error Codes

Guide to understanding camera error codes (e.g., C:32, E:61) and corrective actions.

Camera Menu Options

Menu Items by Mode Dial Setting

Lists available menu items and their descriptions based on the mode dial position.

SET UP Menu Options (Camera 1)

Camera 1 Settings Explained

Details settings like Moving Image, AF Mode, Smart Zoom, Date/Time, Red Eye Reduction, and Hologram AF.

SET UP Menu Options (Camera 2 & Memory Stick)

SET UP Menu Options (Setup 1 & 2)

Related product manuals