17
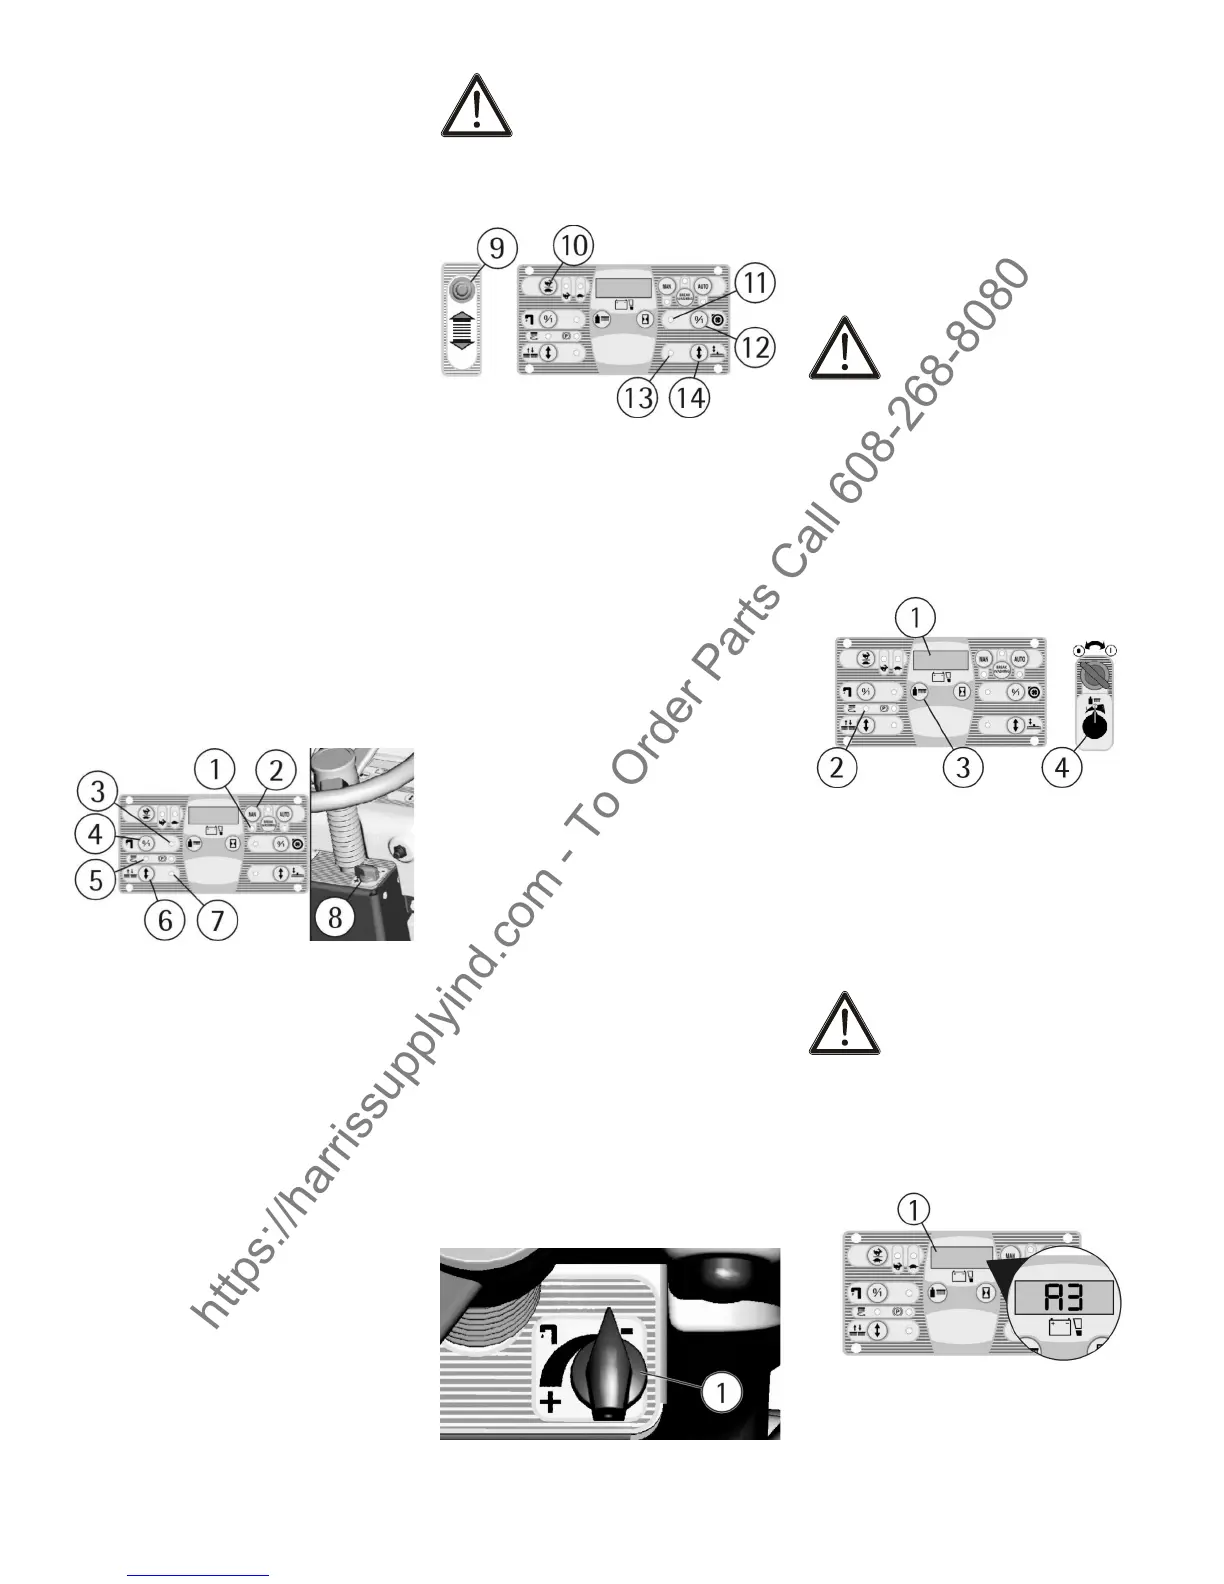
2. Pressing the push button (2) the
functioning of manual (MAN) mode is
chosen. When the signal lamp (1) is
on, then the machine is functioning in
manual (MAN) mode.
TO CARRY OUT THE WASHING
WITH ONLY THE BRUSHES:
1. Check that the knob of the solution
valve (8) is in the position of optimum
ow, depending on the type of oor
and the type of dirt (see under the
paragraph “FLOW ADJUSTMENT OF
THE DETERGENT SOLUTION”).
2. Press the push button (6) of up/
down of the brushes base to lower
the brushes. Once it is lowered, the
brushes begin to turn. The blinking sig-
nal lamp (7) indicates that the brushes
base is lowering or lifting (it remains
on when the brushes base is in work-
ing position), while the signal lamp (5)
signals that the brushes are turning.
3. Press the switch (4) to open the so-
lenoid valve and permit the detergent
solution to lower onto the brushes. The
signal lamp (3) will come on, to indi-
cate that the solenoid valve is open.
TO CARRY OUT THE FUNCTION OF
ONLY DRYING:
1. Press the push button (14) of up/
down squeegee to lower the squee-
gee. The blinking signal lamp (13)
indicates that the squeegee is lower-
ing or lifting (it remains on when the
squeegee is in working position).
2. Press the switch (12) of the suc-
tion motor to start the suction system.
The signal lamp (11 indicates that the
machine is drying.
Position the selector (9) forward to
choose the forward drive. Adjust the
movement speed in forward with the
push button (10) (see under para-
graph "FORWARD AND BACKWARD
MOVEMENT”).
Pressing the accelerator pedal, the
machine begins to move forward and
to work according to the set functions.
ATTENTION:
In manual mode every function of the
machine has to be activated or deacti-
vated manually.
WORKING ADJUSTMENTS
Both in automatic and in manual
mode, during the rst feet (metres)
check:
1. that the squeegee adjustment guar-
antees a perfect drying result (see
under paragraph “ADJUSTMENT OF
THE SQUEEGEE”).
2. that the adjustment of the detergent
solution ow is sufcient to wet the
oor uniformly avoiding the leakage of
detergent from the splash guards (see
under paragraph “FLOW ADJUST-
MENT OF THE DETERGENT SOLU-
TION”).
3. that the brushes pressure permits
an efcient washing action in function
of the dirt and the speed (see under
paragraph “ADJUSTMENT OF THE
BRUSHES PRES-SURE”).
FLOW ADJUSTMENT OF THE DE-
TERGENT SOLUTION
To adjust the detergent solution quan-
tity that ows down onto the brushes
it is necessary to rotate the solution
valve knob (1) placed on the right of
the steering column, rotating counter-
clockwise to increase it and clockwise
to reduce it up to close the ow.
It is better to adjust the water ow dur-
ing work and at every adjustment of
the brushes pressure.
ADJUSTMENT OF THE BRUSHES
PRESSURE
Through the knob (4) it is possible to
adjust the brushes pressure onto the
oor in three pre-set pressure levels.
We can visualize on the display (1) the
pressure in kg previously set by press-
ing the push button (3).
The adjustment occurs in this way
both in automatic and in manual mode.
ATTENTION:
In order not to overload the brushes
motor, it is convenient to reduce the
brushes pressure going from smooth
oors to rough ones (ex. concrete).
The visualization of the blinking led (2)
indicates an overload of the brushes
motor. It is therefore necessary to
reduce the pressure up to the level
where the blinking warning stops.
ELECTRIC PROTECTION
The machine is equipped with an
electronic system of protection for all
components that carry out functions of
power or control. This device blocks
the defective component and indicates
on the display (1) the corresponding
alarm from ”A1”, “A2” and on.
ATTENTION:
To restore the functioning of the
component, turn off and on again the
machine acting upon the key switch.
If the problem persists, please contact
the authorized technical assistance.
https://harrissupplyind.com - To Order Parts Call 608-268-8080
 Loading...