FT
DX
1200 Technical Supplement
Alignment
ALIGNMENT-16
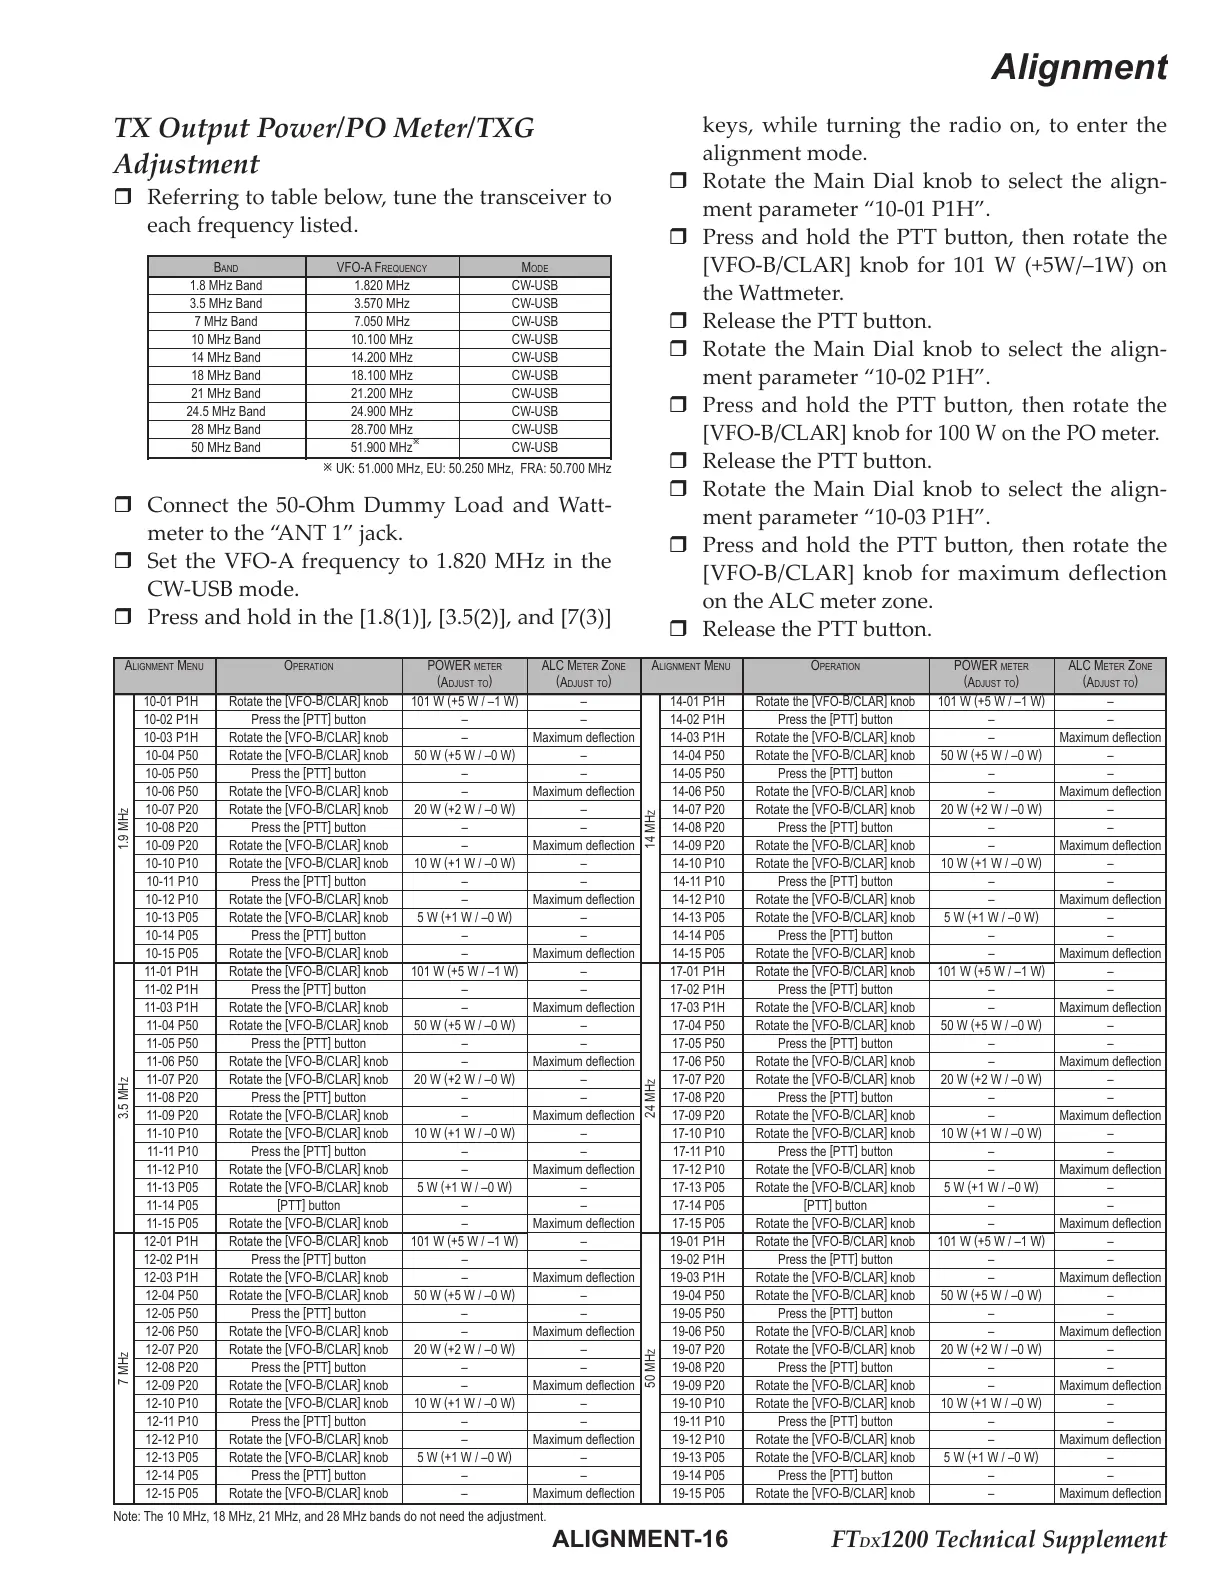
keys, while turning the radio on, to enter the
alignment mode.
Rotate the Main Dial knob to select the align-
ment parameter “10-01 P1H”.
Press and hold the PTT buon, then rotate the
[VFO-B/CLAR] knob for 101 W (+5W/–1W) on
the Wameter.
Release the PTT buon.
Rotate the Main Dial knob to select the align-
ment parameter “10-02 P1H”.
Press and hold the PTT button, then rotate the
[VFO-B/CLAR] knob for 100 W on the PO meter.
Release the PTT buon.
Rotate the Main Dial knob to select the align-
ment parameter “10-03 P1H”.
Press and hold the PTT buon, then rotate the
[VFO-B/CLAR] knob for maximum deflection
on the ALC meter zone.
Release the PTT buon.
Alignment menu
10-01 P1H
10-02 P1H
10-03 P1H
10-04 P50
10-05 P50
10-06 P50
10-07 P20
10-08 P20
10-09 P20
10-10 P10
10-11 P10
10-12 P10
10-13 P05
10-14 P05
10-15 P05
11-01 P1H
11-02 P1H
11-03 P1H
11-04 P50
11-05 P50
11-06 P50
11-07 P20
11-08 P20
11-09 P20
11-10 P10
11-11 P10
11-12 P10
11-13 P05
11-14 P05
11-15 P05
12-01 P1H
12-02 P1H
12-03 P1H
12-04 P50
12-05 P50
12-06 P50
12-07 P20
12-08 P20
12-09 P20
12-10 P10
12-11 P10
12-12 P10
12-13 P05
12-14 P05
12-15 P05
oPerAtion
Rotate the
[
VFO-
B
/CLAR
]
knob
Press the
[
PTT
]
button
Rotate the
[
VFO-
B
/CLAR
]
knob
Rotate the
[
VFO-
B
/CLAR
]
knob
Press the
[
PTT
]
button
Rotate the
[
VFO-
B
/CLAR
]
knob
Rotate the
[
VFO-
B
/CLAR
]
knob
Press the
[
PTT
]
button
Rotate the
[
VFO-
B
/CLAR
]
knob
Rotate the
[
VFO-
B
/CLAR
]
knob
Press the
[
PTT
]
button
Rotate the
[
VFO-
B
/CLAR
]
knob
Rotate the
[
VFO-
B
/CLAR
]
knob
Press the
[
PTT
]
button
Rotate the
[
VFO-
B
/CLAR
]
knob
Rotate the
[
VFO-
B
/CLAR
]
knob
Press the
[
PTT
]
button
Rotate the
[
VFO-
B
/CLAR
]
knob
Rotate the
[
VFO-
B
/CLAR
]
knob
Press the
[
PTT
]
button
Rotate the
[
VFO-
B
/CLAR
]
knob
Rotate the
[
VFO-
B
/CLAR
]
knob
Press the
[
PTT
]
button
Rotate the
[
VFO-
B
/CLAR
]
knob
Rotate the
[
VFO-
B
/CLAR
]
knob
Press the
[
PTT
]
button
Rotate the
[
VFO-
B
/CLAR
]
knob
Rotate the
[
VFO-
B
/CLAR
]
knob
[
PTT
]
button
Rotate the
[
VFO-
B
/CLAR
]
knob
Rotate the
[
VFO-
B
/CLAR
]
knob
Press the
[
PTT
]
button
Rotate the
[
VFO-
B
/CLAR
]
knob
Rotate the
[
VFO-
B
/CLAR
]
knob
Press the
[
PTT
]
button
Rotate the
[
VFO-
B
/CLAR
]
knob
Rotate the
[
VFO-
B
/CLAR
]
knob
Press the
[
PTT
]
button
Rotate the
[
VFO-
B
/CLAR
]
knob
Rotate the
[
VFO-
B
/CLAR
]
knob
Press the
[
PTT
]
button
Rotate the
[
VFO-
B
/CLAR
]
knob
Rotate the
[
VFO-
B
/CLAR
]
knob
Press the
[
PTT
]
button
Rotate the
[
VFO-
B
/CLAR
]
knob
PoWer meter
(
A
djust to
)
101 W
(
+5 W / –1 W
)
–
–
50 W
(
+5 W / –0 W
)
–
–
20 W
(
+2 W / –0 W
)
–
–
10 W
(
+1 W / –0 W
)
–
–
5 W
(
+1 W / –0 W
)
–
–
101 W
(
+5 W / –1 W
)
–
–
50 W
(
+5 W / –0 W
)
–
–
20 W
(
+2 W / –0 W
)
–
–
10 W
(
+1 W / –0 W
)
–
–
5 W
(
+1 W / –0 W
)
–
–
101 W
(
+5 W / –1 W
)
–
–
50 W
(
+5 W / –0 W
)
–
–
20 W
(
+2 W / –0 W
)
–
–
10 W
(
+1 W / –0 W
)
–
–
5 W
(
+1 W / –0 W
)
–
–
AlC meter Zone
(
A
djust to
)
–
–
Maximum deection
–
–
Maximum deection
–
–
Maximum deection
–
–
Maximum deection
–
–
Maximum deection
–
–
Maximum deection
–
–
Maximum deection
–
–
Maximum deection
–
–
Maximum deection
–
–
Maximum deection
–
–
Maximum deection
–
–
Maximum deection
–
–
Maximum deection
–
–
Maximum deection
–
–
Maximum deection
1.9 mHZ3.5 mHZ7 mHZ
Alignment menu
14-01 P1H
14-02 P1H
14-03 P1H
14-04 P50
14-05 P50
14-06 P50
14-07 P20
14-08 P20
14-09 P20
14-10 P10
14-11 P10
14-12 P10
14-13 P05
14-14 P05
14-15 P05
17-01 P1H
17-02 P1H
17-03 P1H
17-04 P50
17-05 P50
17-06 P50
17-07 P20
17-08 P20
17-09 P20
17-10 P10
17-11 P10
17-12 P10
17-13 P05
17-14 P05
17-15 P05
19-01 P1H
19-02 P1H
19-03 P1H
19-04 P50
19-05 P50
19-06 P50
19-07 P20
19-08 P20
19-09 P20
19-10 P10
19-11 P10
19-12 P10
19-13 P05
19-14 P05
19-15 P05
oPerAtion
Rotate the
[
VFO-
B
/CLAR
]
knob
Press the
[
PTT
]
button
Rotate the
[
VFO-
B
/CLAR
]
knob
Rotate the
[
VFO-
B
/CLAR
]
knob
Press the
[
PTT
]
button
Rotate the
[
VFO-
B
/CLAR
]
knob
Rotate the
[
VFO-
B
/CLAR
]
knob
Press the
[
PTT
]
button
Rotate the
[
VFO-
B
/CLAR
]
knob
Rotate the
[
VFO-
B
/CLAR
]
knob
Press the
[
PTT
]
button
Rotate the
[
VFO-
B
/CLAR
]
knob
Rotate the
[
VFO-
B
/CLAR
]
knob
Press the
[
PTT
]
button
Rotate the
[
VFO-
B
/CLAR
]
knob
Rotate the
[
VFO-
B
/CLAR
]
knob
Press the
[
PTT
]
button
Rotate the
[
VFO-
B
/CLAR
]
knob
Rotate the
[
VFO-
B
/CLAR
]
knob
Press the
[
PTT
]
button
Rotate the
[
VFO-
B
/CLAR
]
knob
Rotate the
[
VFO-
B
/CLAR
]
knob
Press the
[
PTT
]
button
Rotate the
[
VFO-
B
/CLAR
]
knob
Rotate the
[
VFO-
B
/CLAR
]
knob
Press the
[
PTT
]
button
Rotate the
[
VFO-
B
/CLAR
]
knob
Rotate the
[
VFO-
B
/CLAR
]
knob
[
PTT
]
button
Rotate the
[
VFO-
B
/CLAR
]
knob
Rotate the
[
VFO-
B
/CLAR
]
knob
Press the
[
PTT
]
button
Rotate the
[
VFO-
B
/CLAR
]
knob
Rotate the
[
VFO-
B
/CLAR
]
knob
Press the
[
PTT
]
button
Rotate the
[
VFO-
B
/CLAR
]
knob
Rotate the
[
VFO-
B
/CLAR
]
knob
Press the
[
PTT
]
button
Rotate the
[
VFO-
B
/CLAR
]
knob
Rotate the
[
VFO-
B
/CLAR
]
knob
Press the
[
PTT
]
button
Rotate the
[
VFO-
B
/CLAR
]
knob
Rotate the
[
VFO-
B
/CLAR
]
knob
Press the
[
PTT
]
button
Rotate the
[
VFO-
B
/CLAR
]
knob
PoWer meter
(
A
djust to
)
101 W
(
+5 W / –1 W
)
–
–
50 W
(
+5 W / –0 W
)
–
–
20 W
(
+2 W / –0 W
)
–
–
10 W
(
+1 W / –0 W
)
–
–
5 W
(
+1 W / –0 W
)
–
–
101 W
(
+5 W / –1 W
)
–
–
50 W
(
+5 W / –0 W
)
–
–
20 W
(
+2 W / –0 W
)
–
–
10 W
(
+1 W / –0 W
)
–
–
5 W
(
+1 W / –0 W
)
–
–
101 W
(
+5 W / –1 W
)
–
–
50 W
(
+5 W / –0 W
)
–
–
20 W
(
+2 W / –0 W
)
–
–
10 W
(
+1 W / –0 W
)
–
–
5 W
(
+1 W / –0 W
)
–
–
AlC meter Zone
(
A
djust to
)
–
–
Maximum deection
–
–
Maximum deection
–
–
Maximum deection
–
–
Maximum deection
–
–
Maximum deection
–
–
Maximum deection
–
–
Maximum deection
–
–
Maximum deection
–
–
Maximum deection
–
–
Maximum deection
–
–
Maximum deection
–
–
Maximum deection
–
–
Maximum deection
–
–
Maximum deection
–
–
Maximum deection
14 mHZ24 mHZ50 mHZ
Note: The 10 MHz, 18 MHz, 21 MHz, and 28 MHz bands do not need the adjustment.
TX Output Power/PO Meter/TXG
Adjustment
Referring to table below, tune the transceiver to
each frequency listed.
BAnd
1.8 MHz Band
3.5 MHz Band
7 MHz Band
10 MHz Band
14 MHz Band
18 MHz Band
21 MHz Band
24.5 MHz Band
28 MHz Band
50 MHz Band
mode
CW-USB
CW-USB
CW-USB
CW-USB
CW-USB
CW-USB
CW-USB
CW-USB
CW-USB
CW-USB
vfo-A frequenCy
1.820 MHz
3.570 MHz
7.050 MHz
10.100 MHz
14.200 MHz
18.100 MHz
21.200 MHz
24.900 MHz
28.700 MHz
51.900 MHz
UK: 51.000 MHz, EU: 50.250 MHz, FRA: 50.700 MHz
Connect the 50-Ohm Dummy Load and Watt-
meter to the “ANT 1” jack.
Set the VFO-A frequency to 1.820 MHz in the
CW-USB mode.
Press and hold in the [1.8(1)], [3.5(2)], and [7(3)]
 Loading...