Instruction Manual
D103175X012
GX Valve and Actuator
July 2017
5
Actuator Maintenance
For electric actuators, see the supplier's instruction manual.
The following sections provide procedures for actuator maintenance. Refer to figures 18, 19, 20, and 21.
The actuator soft parts may require periodic replacement. This includes the diaphragm (key 10), diaphragm O-ring
(key 109), actuator rod bushing (key 19), and the actuator rod seal (key 20).
If the actuator stroking direction (air‐to‐open or air‐to‐close) is unknown, refer to the nameplate on top of the actuator
casing and figure 2.
There are several optional actuator constructions, depending on supply pressure. Refer to the nameplate on the top of
the actuator to determine the construction installed. Refer to figure 3 and table 2 for proper spring configuration.
Note
Older GX actuator nameplates do not contain spring configuration information. If you require replacement springs or wish to
switch to an optional actuator construction, consult your Emerson sales office
or Local Business Partner.
Note
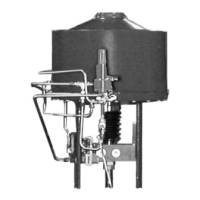
When the GX actuator is equipped with the integrated FIELDVUE DVC2000 digital valve controller (figure 1), additional
considerations may be required. Refer to the FIELDVUE DVC2000 Digital Valve Controller Mounting section of this manual for
additional instruction.
Actuator Disassembly (For Air‐to‐Open Constructions ‐ see figures 18 or 19)
1. Connect a separate air supply to the lower diaphragm casing via the air supply connection on the yoke (as shown in
figure 18 or 19) and apply sufficient air pressure to raise the valve plug/stem off the seat to mid‐travel.
2. Remove the stem connector nut half (key 23), stem connector bolt half (key 24), and travel indicator (key 26).
3. Push the valve plug/stem (key 3) down until it contacts the seat.
4. Loosen the locknut (key 28) and thread the stem adjustor nut (key 27) down until it clears the top of the valve
plug/stem (key 3).
5. Shut off the air pressure and disconnect the separate air supply to the lower diaphragm casing (as shown in figure
18 or 19).
WARNING
To avoid personal injury or property damage due to actuator springs (keys 12 and 82) being under compression, remove the
long cap screws (key 16) last.
The upper actuator casing may remain fixed to the diaphragm and lower casing during disassembly, even if the casing cap
screws have been loosened. If this happens, the actuator springs are still under compression. The upper casing could
suddenly come loose and jump, due to the compressed energy of the springs. If the upper casing is stuck to the diaphragm
and lower casing when you begin loosening the casing cap screws, pry the casings apart with a prying tool. Always ensure
that the springs are dispersing energy and the upper casing is moving against the long bolts during disassembly.

 Loading...