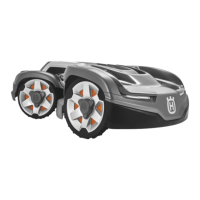
4. Push with a flat screwdriver on the clip and pull out
the holder.
5. Push the clips with a flat screwdriver to remove the
collision circuit board.
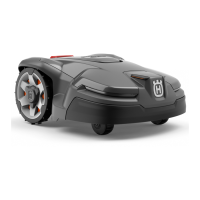
6. Install the new sensor circuit board.
7. Install in opposite sequence.
6.18.11 To replace the rear collision circuit board
The magnet on the right rear joystick must be installed
correctly for the correct operation of the collision sensor.
If this is not the condition, the front joystick must be
replaced. Refer to
To replace the rear joysticks on page
26
.
1. Remove the body. Refer to
To remove and install
the body on page 20
.
2. Remove the upper chassis. Refer to
To remove and
install the upper chassis on page 20
.
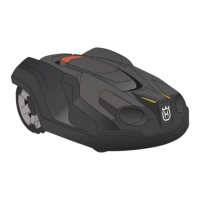
3. Disconnect the cable from the rear collision circuit
board.
4. Push the clips with a flat screwdriver and pull the
rear collision sensor circuit board down to remove it.
5. Install in opposite sequence.
6.19 The battery system
WARNING: Use only original batteries
recommended by the manufacturer. Product
safety cannot be guaranteed with other
batteries. Do not use non-rechargeable
batteries.
The battery is considered to be fully charged when the
battery reaches 80% of the total capacity. To charge the
battery to 100% would take too long since the charging
current is low. The most rational way of using Li-ion
batteries is therefore to stop charging at 80%. The
maximum utilised capacity is thus 80% of the battery’s
total capacity.
The battery is maintenance-free, but has a limited life
span. The battery is expected to last for 3000 - 4000
charging cycles. The normal charging current is 1.3 A.
6.19.1 To replace the battery
Automower
®
420/430X/430XH/520 have 1 battery.
Automower
®
440/450X/450XH/550/550H have 2
batteries.
1. Remove the body. Refer to
To remove and install
the body on page 20
.
2. Remove the upper chassis. Refer to
To remove and
install the upper chassis on page 20
.
32 - Repair instructions 1191 - 001 -

 Loading...