Home
KTM
Motorcycle
250 SX 2010
KTM 250 SX 2010 User Manual
5
of 1
of 1 rating
104 pages
Give review
Manual
Specs
To Next Page
To Next Page
To Previous Page
To Previous Page
Loading...
VIEW
OF
V
EHICLE
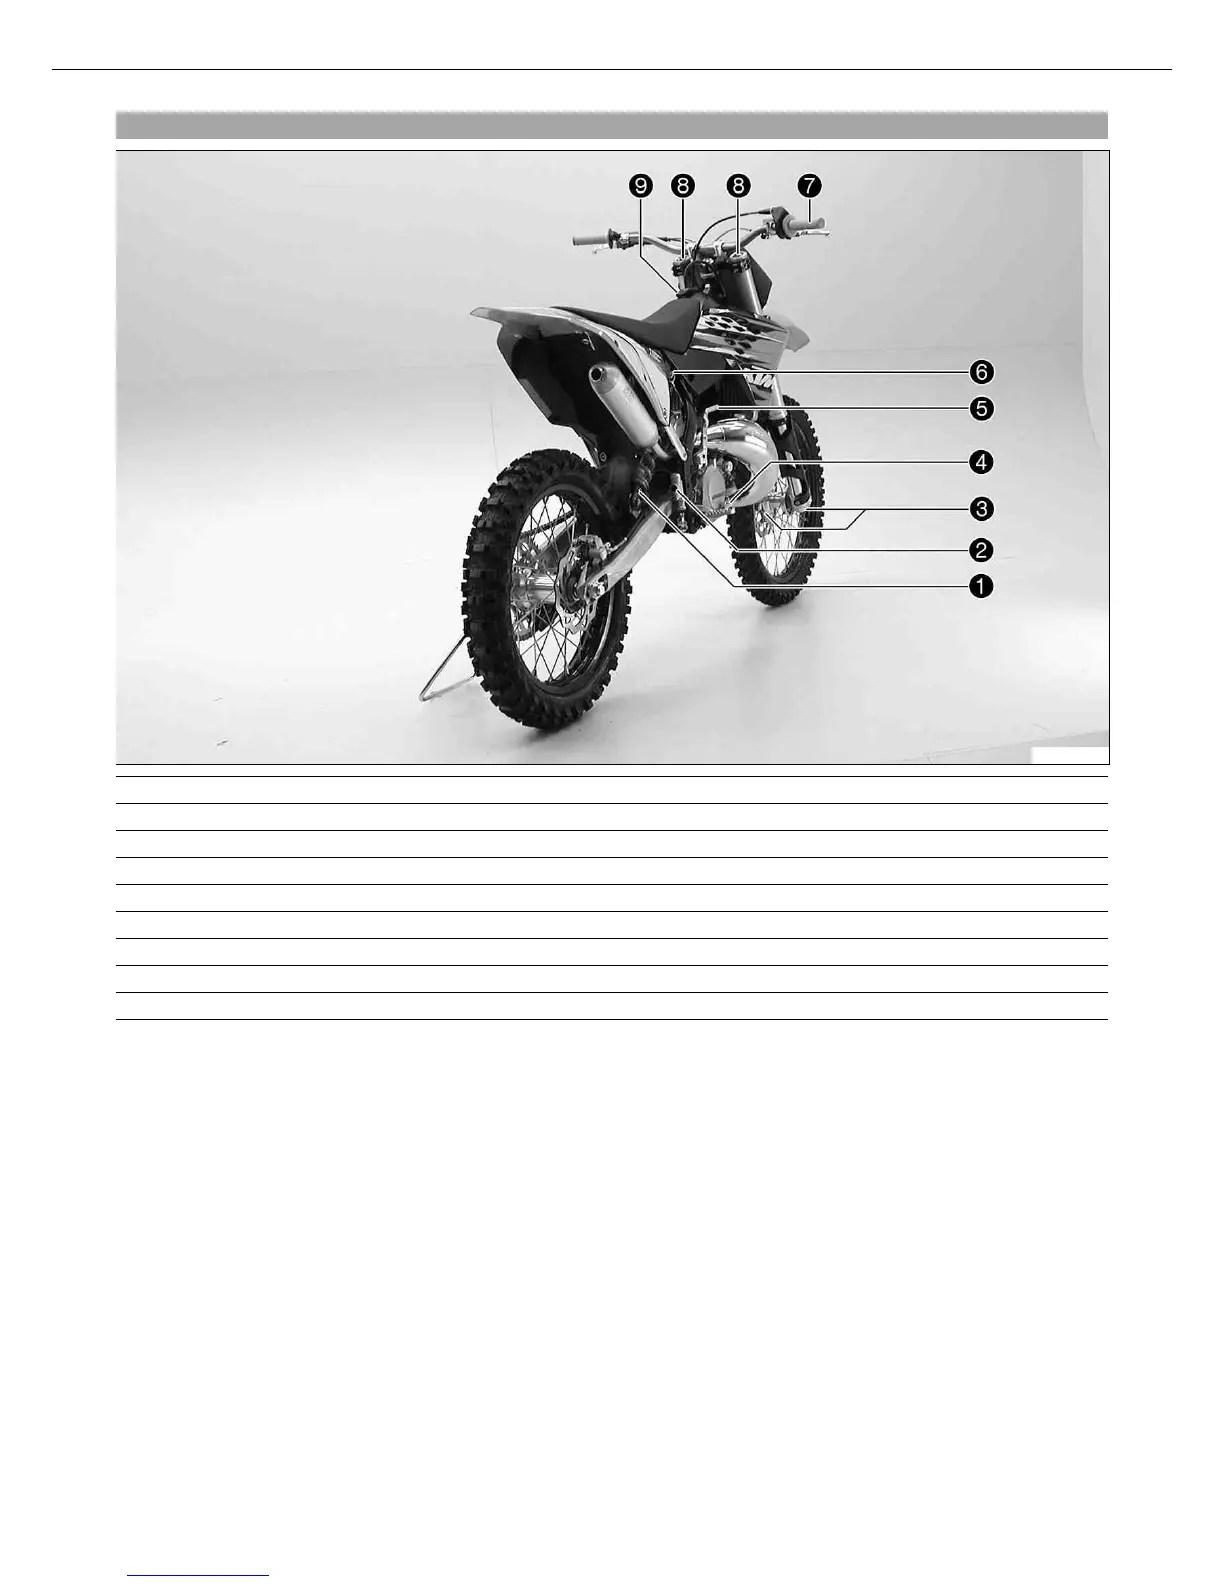
8
3.2
View
of
the
vehic
le
from
the
right
r
ear
(example)
B00014-10
1
Shock
absorber
rebound
adjustment
2
Level
viewer
for
brake
fluid,
rear
3
Fork
rebound
adjustment
4
Foot
brake
lever
5
Kickstarter
6
Shock
absorber
compression
adjustment
7
Throttle
grip
8
Fork
compression
adjustment
9
Filler
cap
9
11
Table of Contents
Table of Contents
4
Means of Representation
6
Important Information
7
View of Vehicle
9
View of the Vehicle from the Left Front (Example)
9
View of the Vehicle from the Right Rear (Example)
10
Location of Serial Numbers
11
Chassis Number
11
Type Label
11
Engine Number
11
Fork Part Number
11
Shock Absorber Part Number
11
Controls
12
Clutch Lever
12
Hand Brake Lever
12
Short Circuit Button
12
Throttle Grip
12
Fuel Tap
13
Opening the Filler Cap
13
Closing the Filler Cap
13
Choke
13
Shift Lever
14
Kickstarter
14
Foot Brake Lever
14
Plug-In Stand
15
General Tips and Hints on Putting into Operation
16
Advice on First Use
16
Running in the Engine
17
Preparing the Vehicle for Difficult Operating Conditions
17
Preparations for Riding on Dry Sand
17
Preparations for Riding on Wet Sand
18
Preparations for Riding on Wet and Muddy Surfaces
19
Preparations for Riding at High Temperatures and Riding Slowly
20
Preparations for Riding at Low Temperatures and in Snow
20
Riding Instructions
21
Checks before Putting into Operation
21
Starting
21
Starting up
22
Shifting, Riding
22
Braking
22
Stopping, Parking
23
Refueling
23
Service Schedule
25
Important Maintenance Work that Must be Done in an Authorized KTM Workshop
25
Important Maintenance Work to be Carried out by an Authorized KTM Workshop (as Additional Order)
26
Important Checks and Maintenance Work to be Carried out by the Rider
26
Maintenance Work on Chassis and Engine
28
Jacking up the Motorcycle
28
Removing the Motorcycle from the Work Stand
28
Checking the Basic Chassis Setting with the Rider's Weight
28
Compression Damping of Shock Absorber
28
Adjusting the High-Speed Compression Damping of the Shock Absorber
28
Adjusting the Low-Speed Compression Damping of the Shock Absorber
29
Adjusting the Rebound Damping of the Shock Absorber
30
Measuring the Sag of the Unloaded Rear Wheel
30
Checking the Static Sag of the Shock Absorber
31
Checking the Riding Sag of the Shock Absorber
31
Adjusting the Spring Preload of the Shock Absorber
31
Adjusting the Riding Sag
32
Removing the Shock Absorber
32
Installing the Shock Absorber
33
Checking the Basic Setting of the Fork
33
Adjusting the Compression Damping of the Fork
33
Adjusting the Rebound Damping of the Fork
34
Bleeding the Fork Legs
34
Cleaning the Dust Boots of the Fork Legs
34
Loosening the Fork Protection
35
Positioning the Fork Protection
35
Checking the Play of the Steering Head Bearing
35
Adjusting the Play of the Steering Head Bearing
36
Removing the Fork Legs
36
Installing the Fork Legs
37
Removing the Fork Protector
37
Installing the Fork Protector
37
Removing the Lower Triple Clamp
38
Installing the Lower Triple Clamp
38
Greasing the Steering Head Bearing
39
Removing the Front Fender
39
Installing the Front Fender
39
Removing the Start Number Plate
39
Installing the Start Number Plate
40
Handlebar Position
40
Adjusting the Handlebar Position
40
Checking the Play in the Throttle Cable
41
Adjusting the Play in the Throttle Cable
41
Checking the Chain for Dirt
41
Cleaning the Chain
41
Checking the Chain Tension
42
Checking the Rear Sprocket/Engine Sprocket for Wear
42
Checking Chain Wear
42
Adjusting the Chain Tension
43
Adjusting the Chain Guide
44
Checking the Brake Discs
44
Checking the Free Travel of the Hand Brake Lever
45
Adjusting the Basic Position of the Hand Brake Lever
45
Checking the Front Brake Fluid Level
45
Adding Front Brake Fluid
46
Checking the Front Brake Linings
46
Removing the Front Brake Linings
47
Installing the Front Brake Linings
47
Changing the Front Brake Linings
48
Checking the Free Play of the Foot Brake Lever
48
Adjusting the Basic Position of the Foot Brake Lever
49
Checking the Rear Brake Fluid Level
49
Adding Rear Brake Fluid
50
Checking the Rear Brake Linings
50
Removing the Rear Brake Linings
51
Installing the Rear Brake Linings
51
Changing the Rear Brake Linings
52
Removing the Front Wheel
52
Installing the Front Wheel
53
Removing the Rear Wheel
54
Installing the Rear Wheel
54
Checking the Tire Condition
55
Checking the Tire Air Pressure
56
Checking the Spoke Tension
56
Ignition Curve Plug Connection
56
Changing the Ignition Curve
57
Engine Characteristic - Auxiliary Spring (250 SX)
57
Engine Characteristic - Adjusting the Auxiliary Spring (250 SX)
57
Removing the Seat
58
Mounting the Seat
58
Removing the Fuel Tank
58
Installing the Fuel Tank
59
Cooling System
60
Checking the Antifreeze and Coolant Level
60
Checking the Coolant Level
61
Draining the Coolant
61
Refilling with Coolant
62
Removing the Main Silencer
63
Installing the Main Silencer
63
Glass Fiber Yarn Filling of Main Silencer
63
Changing the Glass Fiber Yarn Filling of the Main Silencer
63
Removing the Glass Fiber Yarn Filling of the Main Silencer
64
Installing the Glass Fiber Yarn Filling of the Main Silencer
64
Removing the Air Filter Box Lid
64
Installing the Air Filter Box Lid
64
Removing the Air Filter
65
Installing the Air Filter
65
Cleaning the Air Filter
65
Adjusting the Basic Position of the Clutch Lever
66
Checking the Fluid Level of the Hydraulic Clutch
66
Changing the Hydraulic Clutch Fluid
67
Checking the Basic Position of the Shift Lever
68
Adjusting the Basic Position of the Shift Lever
68
Carburetor
68
Carburetor - Adjusting the Idle Speed
69
Emptying the Carburetor Float Chamber
70
Checking the Gear Oil Level
70
Changing the Gear Oil
71
Draining the Gear Oil
71
Refilling with Gear Oil
72
Adding Gear Oil
72
Troubleshooting
74
Cleaning
76
Cleaning the Motorcycle
76
Storage
77
Putting into Operation after Storage
77
Technical Data - Engine
78
Capacity - Gear Oil
79
Capacity - Coolant
79
Technical Data - Engine Tightening Torques
80
125 Sx, 150 Sx
80
Technical Data - Carburetor
82
Carburetor - Basic Setting for Sandy Surfaces (125 SX)
82
Carburetor Configuration (125 SX)
83
Carburetor - Basic Setting for Sandy Surfaces (150 SX)
84
Carburetor Configuration (150 SX)
85
Carburetor - Basic Setting for Sandy Surfaces (250 SX)
86
Carburetor Configuration (250 SX)
87
Technical Data - Chassis
88
Tires
88
Capacity - Fuel
88
Technical Data - Fork
89
125 Sx, 150 Sx
89
Technical Data - Shock Absorber
90
125 Sx, 150 Sx
90
Technical Data - Tightening Torques for Chassis
92
Wiring Diagram
94
Substances
96
Auxiliary Substances
98
Standards
100
Index
101
5
Based on 1 rating
Ask a question
Give review
Questions and Answers:
Need help?
Do you have a question about the KTM 250 SX 2010 and is the answer not in the manual?
Ask a question
KTM 250 SX 2010 Specifications
General
Brand
KTM
Model
250 SX 2010
Category
Motorcycle
Language
English
Related product manuals
KTM 250 SX 2017
137 pages
KTM 250 SX 2016
22 pages
KTM 250 SX 2018
130 pages
KTM 250 SX 2019
158 pages
KTM 2012 250 SX-F
33 pages
KTM 250 SX-F 2016
118 pages
KTM 250 SX-F 2017
125 pages
KTM 250 SX-F 2018
120 pages
KTM 250 SX-F 2011
306 pages
KTM 250 SX US 2015
129 pages
KTM 250 SX-F EU 2010
125 pages
250 sx-f Musquin replica 2011
306 pages

 Loading...