 Loading...
Do you have a question about the Nikon D700 and is the answer not in the manual?
| Megapixel | 12.1 MP |
|---|---|
| Sensor type | CMOS |
| Digital zoom | 0 x |
| Interface | USB |
| Digital SLR | Yes |
| Video capability | No |
| Effective sensor resolution | 12870000 pixels |
| Display diagonal | 3 \ |
| Display resolution (numeric) | 920000 pixels |
| USB version | 2.0 |
| Product color | Black |
| Flash modes | auto, Flash off |
| Compatible memory cards | CF |
| Light metering | centre-weighted, spot |
| Light exposure modes | aperture priority AE, auto, manual, shutter priority AE |
| Depth | 77 mm |
|---|---|
| Width | 147 mm |
| Height | 123 mm |
| Weight | 995 g |
Find information using a question and answer format, categorized by topic for quick access to specific camera functions.
Follow step-by-step instructions for a rapid initial setup and basic operation of your camera.
Lists common indicators and error messages appearing in the viewfinder, control panel, and monitor, with solutions.
Familiarize yourself with the camera's controls and displays, including detailed descriptions of the camera body.
Understand the various indicators and settings displayed on the camera's top control panel for immediate status checks.
Learn about the information shown in the viewfinder, including exposure settings, focus points, and indicators.
Understand how the main and sub-command dials are used in combination with buttons to adjust various camera settings.
Learn how to navigate and use the camera's menu system to access shooting, playback, and setup options.
Essential initial steps for preparing your camera, including charging the battery and attaching a lens.
Guidance on basic shooting operations, checking battery level, and viewing photographs on the camera.
Understand the different focus modes, including single-servo AF, continuous-servo AF, and manual focus options.
Learn how AF-area mode determines focus point selection in autofocus, with options like Single-point AF and Dynamic AF Area.
Use focus lock to recompose photographs after focusing, ensuring appropriate flash output even when the subject is off-center.
Explore the camera's supported release modes: Single frame, Continuous low/high speed, Live view, Self-timer, and Mirror Up.
Learn to take pictures in Continuous High Speed (CH) and Continuous Low Speed (CL) modes for capturing sequences of shots.
Understand Live View options, including Hand-held and Tripod modes, and phase-detection versus contrast-detect AF.
Set ISO sensitivity values between 200 and 6400 in '/3 EV steps for optimal exposure control.
Configure automatic ISO sensitivity adjustment for optimal exposure based on shooting conditions.
Understand how the camera determines exposure, with options like 3D Color Matrix II, Center-weighted, and Spot metering.
Explore the four primary exposure modes: Programmed Auto (P), Shutter-Priority Auto (S), Aperture-Priority Auto (A), and Manual (M).
Adjust exposure from the camera's suggested value to make pictures brighter or darker, especially useful with center-weighted metering.
Learn about exposure, flash, and white balance bracketing to capture variations for optimal results.
Select appropriate white balance settings to match the light source for natural coloration.
Adjust white balance on amber-blue and green-magenta axes to compensate for light source color variations.
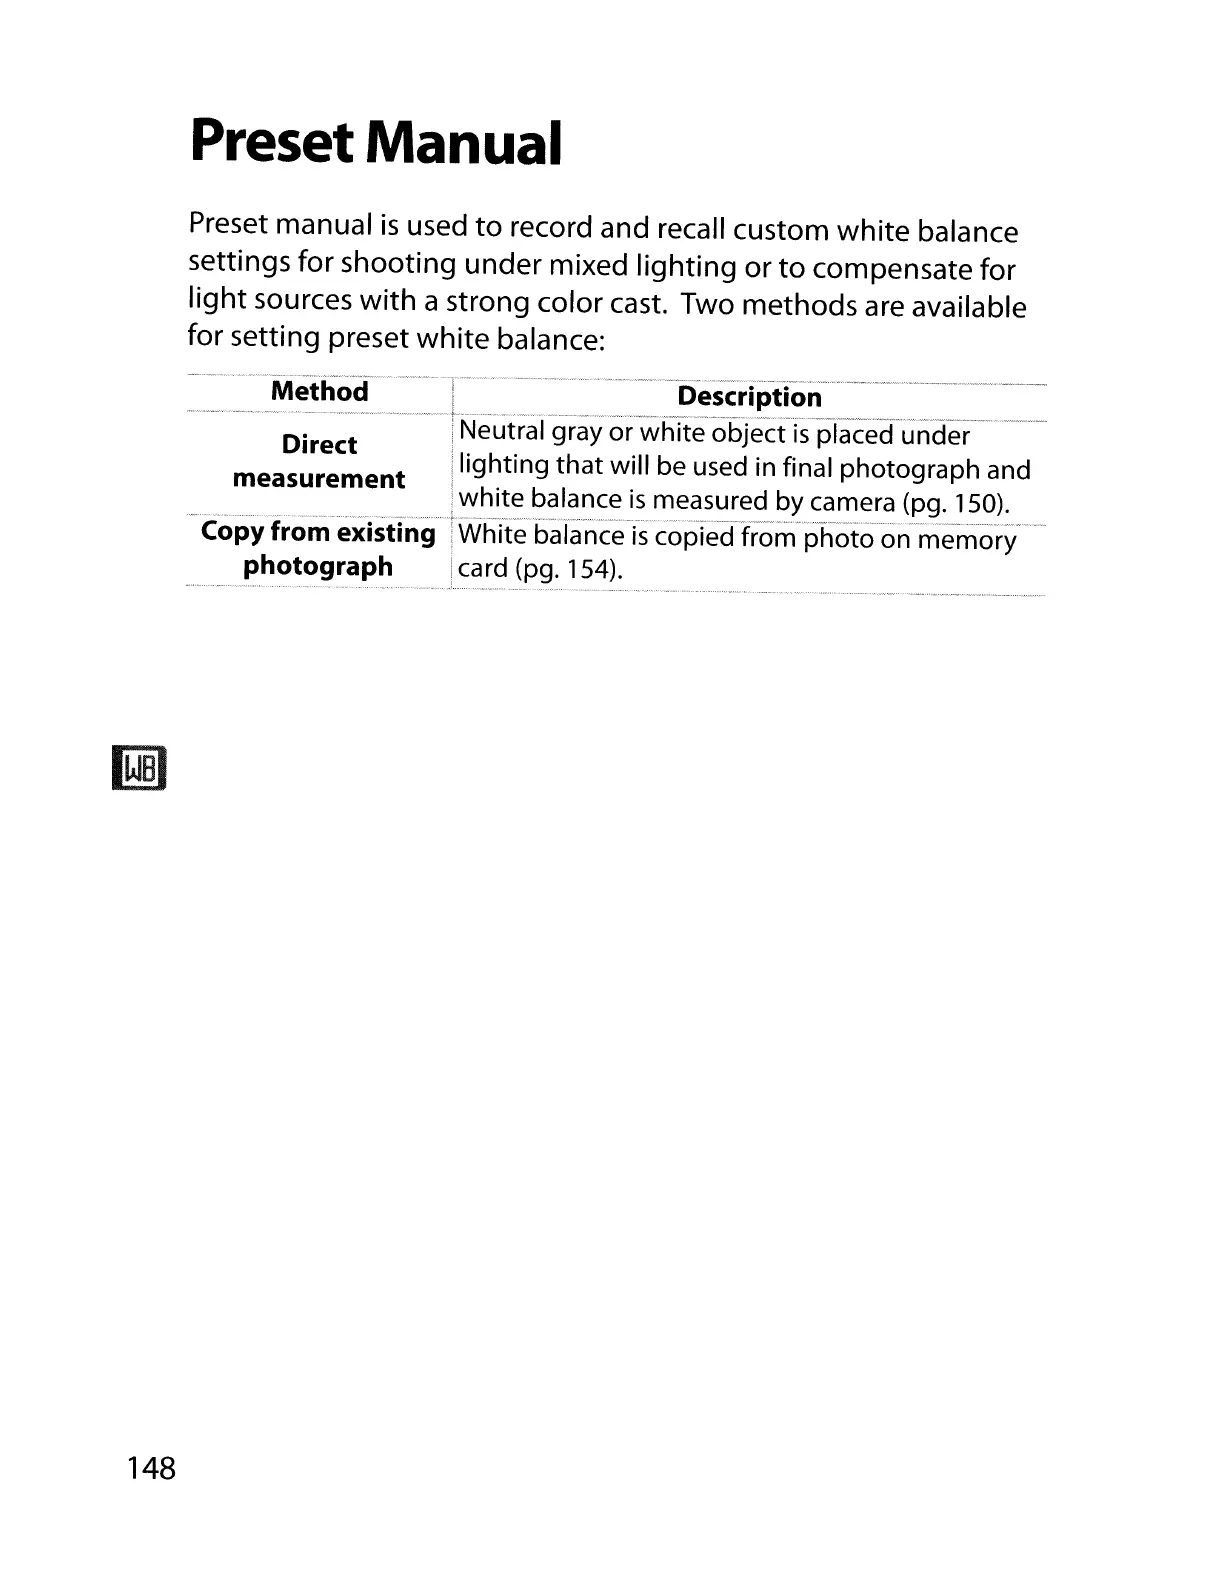
Record and recall custom white balance settings for mixed lighting or strong color casts using direct measurement or photo copy.
Optimize sharpening, contrast, brightness, saturation, and hue using pre-set or custom Picture Controls.
Preserve detail in highlights and shadows for natural contrast, especially in high-contrast scenes.
Choose between sRGB and Adobe RGB color spaces for color reproduction based on processing needs.
Information on the built-in flash, including i-TTL control, ISO sensitivity, and range.
Step-by-step guide on raising the flash, choosing modes, checking exposure, and taking pictures.
Explore supported flash modes like Front-curtain sync, Red-eye reduction, and Slow sync for various shooting scenarios.
Adjust flash output from -3 EV to +1 EV to alter subject brightness relative to the background.
Lock flash output to recompose shots without changing flash level, ensuring appropriate output even with off-center subjects.
Restore camera settings to default values using the QUAL and iID buttons for a quick reset.
Record a series of two to ten exposures in a single photograph for creative effects.
Set the camera to automatically take photographs at preset intervals for time-lapse sequences.
Gain access to CPU lens functions when using non-CPU lenses by specifying lens data.
Connect optional Garmin GPS units to record position information with photographs.
Use the UC-E4 USB cable to connect the camera to a computer for transferring and managing photographs.
Connect the camera directly to a PictBridge printer or computer using the UC-E4 USB cable.
Transfer or print photographs over wireless or Ethernet networks using the WT-4 wireless transmitter.
Learn various methods for printing photographs, including direct camera printing and using network computers.
Connect the camera to standard or high-definition TVs or VCRs for playback.
Options for managing images during playback, including delete, hide, rotate, and slideshow.
Detailed options for controlling shooting settings like image quality, AF, exposure, and white balance.
Customize camera settings to suit individual preferences across six groups: Autofocus, Metering/Exposure, etc.
Configure core camera settings such as language, world time, LCD brightness, and sensor cleaning.
Create trimmed or retouched copies of photographs, including D-Lighting, Red-eye correction, and Monochrome effects.
Create a personalized menu of frequently-used options from various camera menus for quick access.
Common problems related to viewfinder and control panel displays, including dimness or unusual characters.
Solutions for common shooting issues like slow camera response, disabled shutter-release, or out-of-focus photos.
Lists indicators and error messages that appear in the camera, with corresponding problems and solutions.
Detailed technical specifications for the camera, including type, lens mount, sensor, storage, and file format.
Specifications related to the viewfinder, magnification, diopter adjustment, and focusing screen.
Information on compatible CPU and non-CPU lenses, including features and limitations.
Details on the camera's release modes: Single frame, Continuous, Live View, Self-timer, and Mirror Up.
Information on expected shots per battery charge under CIPA and Nikon standards, and factors affecting battery life.