PBK 4 A2
■ 46
│
GB
│
MT
Securing/attaching the carrying harness
♦ Hook the carrying harness
into the carrying lug .
♦ Adjust the carrying harness
to your size so that the carrying lug
is at hip height when the strap is hooked in place.
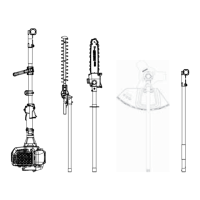
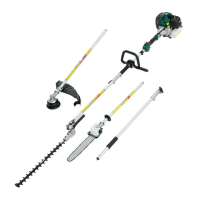
Fitting the hedge trimmer
♦ First, undo the locking screw on the boom of the engine unit.
♦ Push the pin on the front boom
of the hedge trimmer into the opening
on the boom
on the engine unit as far as the stop.
You have to make sure that the spring-loaded ball engages in the hole
provided.
♦ Tighten the locking screw
.
NOTE
►
The assembly for the pole pruner/strimmer/3-tooth cutting blade/
extension attachment is done in the same order.
Removing the hedge trimmer
♦ Undo the locking screw and pull the front boom of the hedge
trimmer out of the boom
on the engine unit.
NOTE
► Dismantling the pole pruner/strimmer/3-tooth cutting blade/exten-
sion attachment is done in the same order.
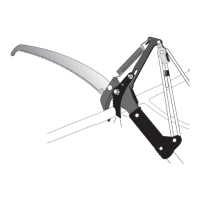
Swivelling the hedge trimmer
♦ Release the lock/release .
♦ Press the control lever
and swivel the hedge trimmer into the
desired position.
WARNING!
► The cutter bar
must not be pivoted completely backwards parallel
to the front boom
in order to work with it.
There is a risk of injury! This position only serves as a transport
position.
♦ Allow the control lever
to click into the recess in the base plate
(hedge trimmer)
.
Mounting the saw chain and blade
WARNING!
► Wear protective gloves! There is a risk of injury from the sharp cutting
teeth.
NOTE
► Pay close attention to the running direction of the saw chain
on
the blade
and at the base plate (hedge trimmer) .
► Depending on wear, the blade
can be turned.
♦ Undo the nut
using the spark plug wrench
.
♦ Remove the sprocket cover
.
♦ Place the saw chain
around the blade starting at the tip.
♦ Now fit the blade
and saw chain .
♦ Lay the guide rail
over the blade guide , while inserting the chain
tensioner pin
in the blade hole . At the same time, lay the saw
chain
over the chain sprocket .
♦ Now you can tighten the saw chain
(see section "Tightening and
checking the saw chain").
♦ Replace the sprocket cover
and tighten the nut firmly.
Removing the saw chain
♦ You may have to loosen the saw chain to remove the blade
and the saw chain
(see section "Tightening and checking the
saw chain"). Follow these instructions in reverse order.
Tightening and checking the saw chain
WARNING!
► Wear protective gloves! There is a risk of injury from the sharp cutting
teeth.
♦ Turn the chain tensioning screw
clockwise using the flat-blade
screwdriver
to increase the tension.
♦ The saw chain
must lie against the underside of the blade. Check
whether the saw chain
can be drawn by hand over the blade .
NOTE
► A new saw chain
stretches and must be tightened more regularly.
Chain lubrication
♦ Remove the oil filler cap .
♦ Fill the oil tank
with approx. 100ml of organic chain oil
.
♦ The chain lubrication can be increased or decreased using the oil
adjusting screw
.
♦ Press and then turn the oil adjusting screw
clockwise to decrease
the chain lubrication.
♦ Press and then turn the oil adjusting screw
anticlockwise to increase
the chain lubrication.
WARNING!
► Never work without chain lubrication!
If the saw chain runs dry, the cutting equipment may become irrepa-
rably damaged within a short time. Always check chain lubrication
and oil level in the tank before starting work.
NOTE
►
Use only saw chain oil, preferably biodegradable. Do not use waste
oil, motor oil, etc.
► While working, check whether the chain lubrication is working
correctly.
Sharpening the saw chain
NOTE
►
A bench grinder can be attached to the grinder support
for a
secure grip during grinding.
► You will find detailed information on sharpening in a sharpening set,
e.g. from Oregon.
► Alternatively, you can use an electrical saw chain sharpening device
and follow the instructions of the manufacturer.
► If you have any doubts about carrying out the work, the saw chain
should be replaced.
 Loading...