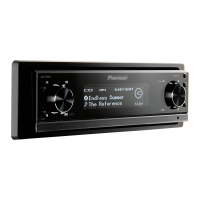
2 Push MULTI-CONTROL left or right to
select the time alignment.
Each time MULTI-CONTROL is pushed left or
right, time alignment is selected in the follow-
ing order:
Initial (initial)—Custom (custom)—AutoTA
(auto-time alignment) —OFF (off)
! Initial is the factory supplied time align-
ment.
! Custom is an adjusted time alignment that
you created.
! AutoTA is the time alignment created by
auto TA and EQ. (Refer to Auto TA and EQ
(auto-time alignment and auto-equalizing)
on page 31.)
# You cannot select AutoTA if auto TA and EQ
has not been carried out. In this case,
Please Set Auto TA appears.
Adjusting the time alignment
You can adjust the distance between each
speaker and the selected position.
! An adjusted time alignment is memorized
in Custom.
1 Use MULTI-CONTROL to select TA1 in
the audio function menu.
Refer to Introduction of audio adjustments on
page 24.
2 Press MULTI-CONTROL to select a unit
of distance.
Each press of MULTI-CONTROL selects the
unit of distance in the following order:
(cm) (centimeter)—(inch) (inch)
3 Use MULTI-CONTROL to select TA2 in
the audio function menu.
Refer to Introduction of audio adjustments on
page 24.
# Can't Adjust TA. Set POS. FL or FR appears
when neither Left nor Right is selected in the po-
sition selector mode (POSI).
# When selecting OFF in TA1, you cannot
switch to TA2.
4 Push MULTI-CONTROL left or right to
select the speaker to be adjusted.
Each time MULTI-CONTROL is pushed left or
right, the speaker is selected in the following
order:
High L (high-range left)—High R (high-range
right)—Mid L (middle-range left)—Mid R
(middle-range right)—Low L (low-range left)—
Low R (low-range right)—SW L (subwoofer
left)—SW R (subwoofer right)
5 Push MULTI-CONTROL up or down to
adjust the distance between the selected
speaker and the listening position.
Each time MULTI-CONTROL is pushed up or
down, the distance increases or decreases.
394.75cm to 0.00cm is displayed as the dis-
tance is increased or decreased, if you have
selected centimeters ((cm)).
155.39inch to 0.00inch is displayed as the dis-
tance is increased or decreased, if you have
selected inches ((inch)).
# You can adjust the distance for the other
speakers in the same way.
6 Press B to cancel the time alignment
mode.
Recalling or copying
equalizer curves
The equalizer lets you adjust the equalization
to match the car’s interior acoustic character-
istics as desired.
It is possible to store the adjusted equalizer
curve in the memory, or recall the stored
equalizer curve from the memory.
Recalling the equalizer curve
1 Use MULTI-CONTROL to select EQ 1 in
the audio function menu.
Refer to Introduction of audio adjustments on
page 24.
Audio Adjustments
En
29
Section
03
Audio Adjustments
 Loading...