En
18
03 Connecting your equipment
Note
! Please refer to the manual that came with
your speakers for details on how to connect
the other end of the speaker cables to your
speakers.
! Use an RCA cable to connect the subwoofer.
It is not possible to connect using speaker
cables.
! If you have two subwoofers, the second
subwoofer can be connected to the
SUBWOOFER 2 terminal. Connecting two
subwoofers increases the bass sound to
achieve more powerful sound reproduction. In
this case, the same sound is output from the
two subwoofers.
Bi-amping your speakers
Bi-amping is when you connect the high
frequency driver and low frequency driver of
your speakers to different amplifiers for better
crossover performance. Your speakers must be
bi-ampable to do this (having separate termi-
nals for high and low) and the sound improve-
ment will depend on the kind of speakers you’re
using.
High
Low
RS-232C
ZONE2
OUT
CENTER
CU-RF100
FRONT CENTER
RL
SPEAKERS
FRONT HEIGHT
A
FM UNBAL 75
AM LOOP
ANTENNA
(
OUTPUT 5 V
150 mA MAX
)
CONTROL
IR
OUT
IN
OUT
IN
1
IN
2
2
1
12 V TRIGGER
(OUTPUT 12 V
TOTAL 150 mA MAX)
AUDIO
Bi-amp compatible speaker
CAUTION
! Most speakers with both High and Low
terminals have two metal plates that connect
the High to the Low terminals. These must
be removed when you are bi-amping the
speakers or you could severely damage the
amplifier. See your speaker manual for more
information.
! If your speakers have a removable crossover
network, make sure you do not remove it for bi-
amping. Doing so may damage your speakers.
Bi-wiring your speakers
Your speakers can also be bi-wired if they sup-
port bi-amping.
! With these connections, the Speaker System
setting makes no difference.
CAUTION
! Don’t connect different speakers from the
same terminal in this way.
! When bi-wiring as well, heed the cautions for
bi-amping shown above.
% To bi-wire a speaker, connect two
speaker cords to the speaker terminal on
the receiver.
Some tips for improving sound
quality
Where you put your speakers in the room has
a big effect on the quality of the sound. The
following guidelines should help you to get the
best sound from your system.
! The subwoofer can be placed on the floor.
Ideally, the other speakers should be at about
ear-level when you’re listening to them.
Putting the speakers on the floor (except the
subwoofer), or mounting them very high on a
wall is not recommended.
! For the best stereo effect, place the front
speakers 2 m to 3 m apart, at equal distance
from the TV.
! If you’re going to place speakers around your
CRT TV, use shielded speakers or place the
speakers at a sufficient distance from your
CRT TV.
! If you’re using a center speaker, place the
front speakers at a wider angle. If not, place
them at a narrower angle.
! Place the center speaker above or below the
TV so that the sound of the center channel is
localized at the TV screen. Also, make sure the
center speaker does not cross the line formed
by the leading edge of the front left and right
speakers.
! It is best to angle the speakers towards the
listening position. The angle depends on
the size of the room. Use less of an angle for
bigger rooms.
! Surround and surround back speakers should
be positioned 60 cm to 90 cm higher than your
ears and tilted slightly downward. Make sure
the speakers don’t face each other. For DVD-
Audio, the speakers should be more directly
behind the listener than for home theater
playback.
! Try not to place the surround speakers farther
away from the listening position than the front
and center speakers. Doing so can weaken the
surround sound effect.
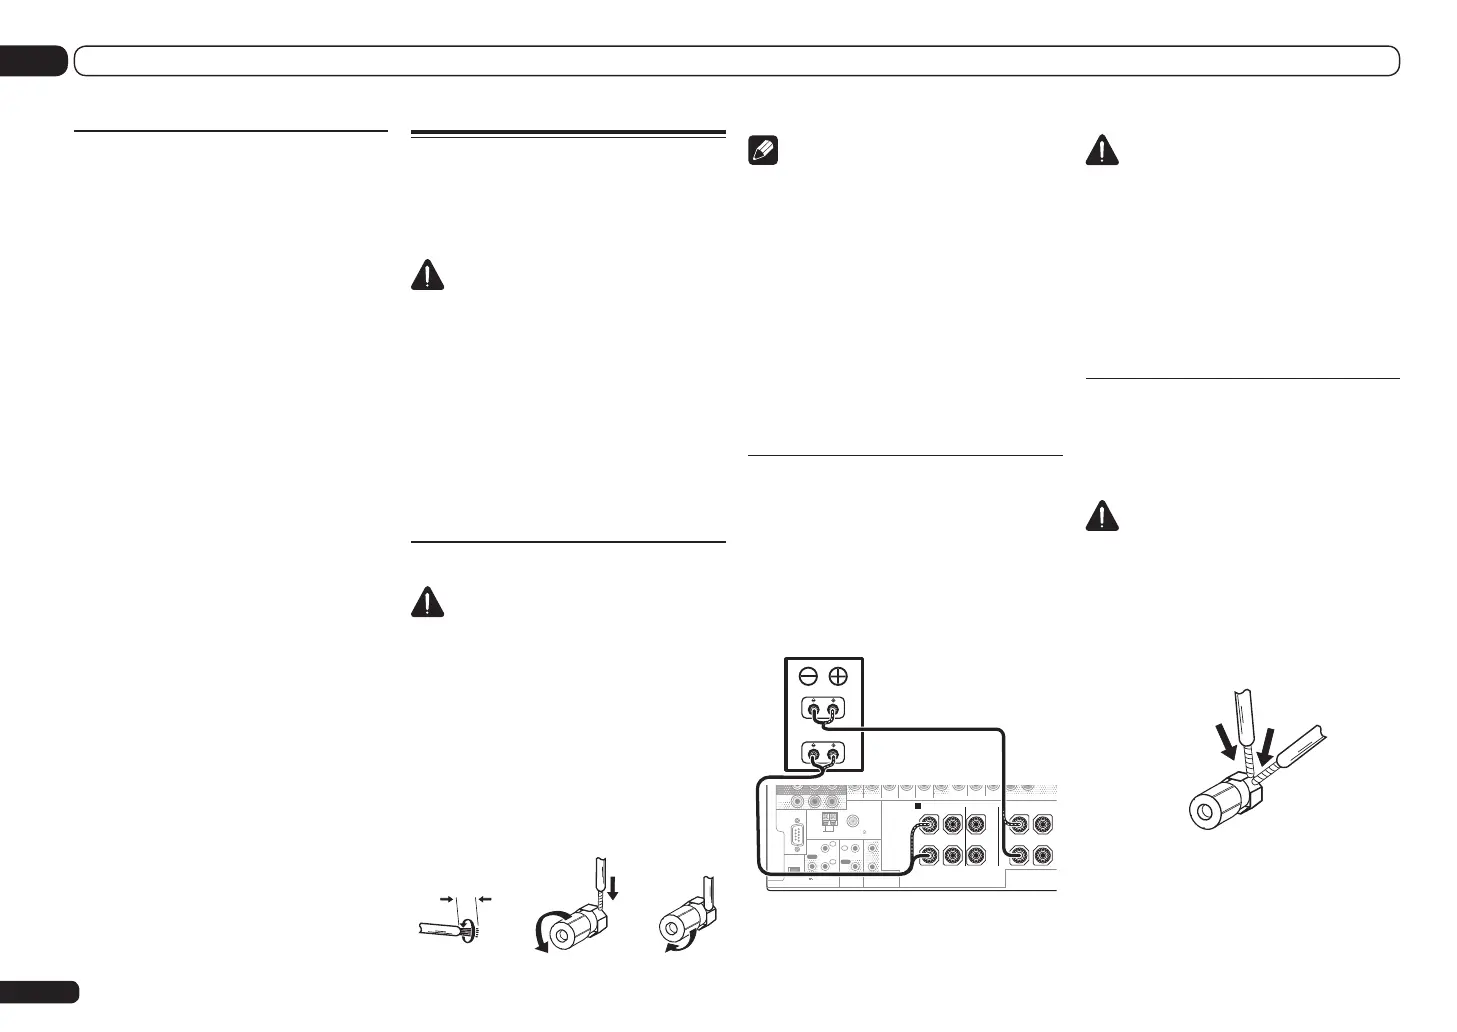
Connecting the speakers
Each speaker connection on the receiver com-
prises a positive (+) and negative (–) terminal.
Make sure to match these up with the terminals
on the speakers themselves.
CAUTION
! These speaker terminals carry HAZARDOUS
LIVE voltage. To prevent the risk of electric
shock when connecting or disconnecting the
speaker cables, disconnect the power cord
before touching any uninsulated parts.
! Make sure that all the bare speaker wire is
twisted together and inserted fully into the
speaker terminal. If core wires touch each
other or come in contact with the rear panel or
the metal parts of other speaker terminals, the
protective circuit may be activated, setting the
power to the standby mode.
Bare wire connections
CAUTION
Make sure that all speakers are securely
installed. This not only improves sound quality,
but also reduces the risk of damage or injury
resulting from speakers being knocked over or
falling in the event of external shocks such as
earthquakes.
1 Twist exposed wire strands together.
2 Loosen terminal and insert exposed
wire.
3 Tighten terminal.
12 3
10 mm
 Loading...