EasyManuals Logo

Pioneer SX-1080 Service Manual

Pioneer SX-1080
65 pages
To Next Page IconTo Next Page
To Previous Page IconTo Previous Page
Page #25 background imageLoading...
Page #25 background image
SX-1
080
10.
DIAL
CORD
STRINGING
Remove
the
bonnet
and
front
panel
as
des¬
cribed
in
“Disassembly”
on
page
10.
Loosen
screws
O
€>
and
remove
the
blind
sash
as
shown
in
Fig.
16.
1.
Turn
the
front-end
variable
capacitor
shaft
fully
clockwise
(Vanes
of
capacitor
fully
inside.)
2.
Tie
one
end
of
the
string
to
the
peg
on
the
dial
pulley.
3.
Position
the
dial
pulley
so
that
the
set
screw
is
at
the
top
and
tighten
the
screw.
4.
Pass
the
string
through
the
notch
in
the
dial
pulley,
wrap
it
1/2
turn
around
the
pulley
and
pass
it
thru
pulley
A
^
B
pulley
C
dial
shaft
(3
turns)
pulley
D.
Next,
wrap
the
string
two
turns
around
the
pulley,
along
the
pulley
grooves,
and
tie
it
to
the
spring
hook.
5.
Turn
the
dial
shaft
and
confirm
that
the
movement
of
the
dial
pulley
and
string
is
normal,
and
then
cut
off
the
surplus
tring.
6
.
Turn
the
dial
shaft
counter
clockwise
(variable
capacitor
vanes
fully
outside)
and
set
the
dial
pointer
to
the
start
point
of
the
scale
and
attach
it
to
the
string.'
Fig.
16
Remove
blind
sash
Dial
pointer
Dial
shaft
27

Questions and Answers:

Question and Answer IconNeed help?

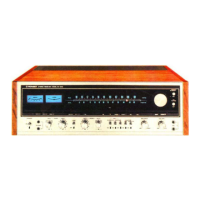
Do you have a question about the Pioneer SX-1080 and is the answer not in the manual?

Pioneer SX-1080 Specifications

General IconGeneral
Total Harmonic Distortion0.1% (at rated power)
Tuning RangeFM, MW
Damping Factor30
Input Sensitivity2.5mV (MM), 150mV (line)
Output150mV (line), 1V (Pre out)
Speaker Load Impedance4Ω to 16Ω
Frequency Response5Hz to 100kHz
Signal to Noise Ratio90dB (line)
Semiconductors4 x FET, 6 x IC
Power Output120 watts per channel (8 ohms, 20Hz-20kHz)

Related product manuals