5.1Cameramounting
Locationrequirement
Whenplanningtheinstallationlocation,considerthefollowing
points:
•Thecameraiswaterproof,andappropriateforabovedecks
mounting.
•Theunderside(inside)ofthecompartmentordeckontowhich
thecameraismountedmustbeweathertight.Youmustensure
protectionfromwateringresstocablesandconnections.
•Themountingsurfacemustbehorizontal.
•Ifyoucannotaccessbothsidesofthemountingsurface,thenyou
willneedtheoptional“topdownmountingkit”.
•Mountingscrewsaresuppliedforamountingsurfaceofupto
41mm(1.6in)thick.Athickersurfacewillrequiretheinstallerto
providealternativefasteners.
•Thecameramountingsurfacemustbeatleastaslargeasthe
footprintofthecameraitselftoensureanadequatesealwiththe
O-ring.
•Thecamerashouldbemountedashighaspractical,butwithout
interferingwithanyradar,navigationalorcommunications
electronics.
•Choosealocationthatwillprovidethemostunobstructedviewin
alldirections.
•Choosealocationasclosetothevessel’scenterlineaspossible.
Thisprovidesasymmetricalviewwhenlookingforwardoraft.
•Selectalocationthatisatleast1m(3ft)fromdevicesthat
maycauseinterference,suchasmotors,generatorsandradio
transmitters/receivers.
Cameraorientation
Thecameracanbemountedin2orientationsinformallyknownas
“Ballup”and“Balldown”.
Note:ThestabilizedvariantsoftheT-Seriesthermalcameras
MUSTbemountedintheballupconguration.
Ballup:Thecameraismountedon
topofthemountingsurface.
Balldown:Thecameraissuspended
upsidedown,belowthemounting
surface.
Note:Forballdownmountingyoumustsettheballdownoption
inthecamerasystemsetupmenuappropriately.
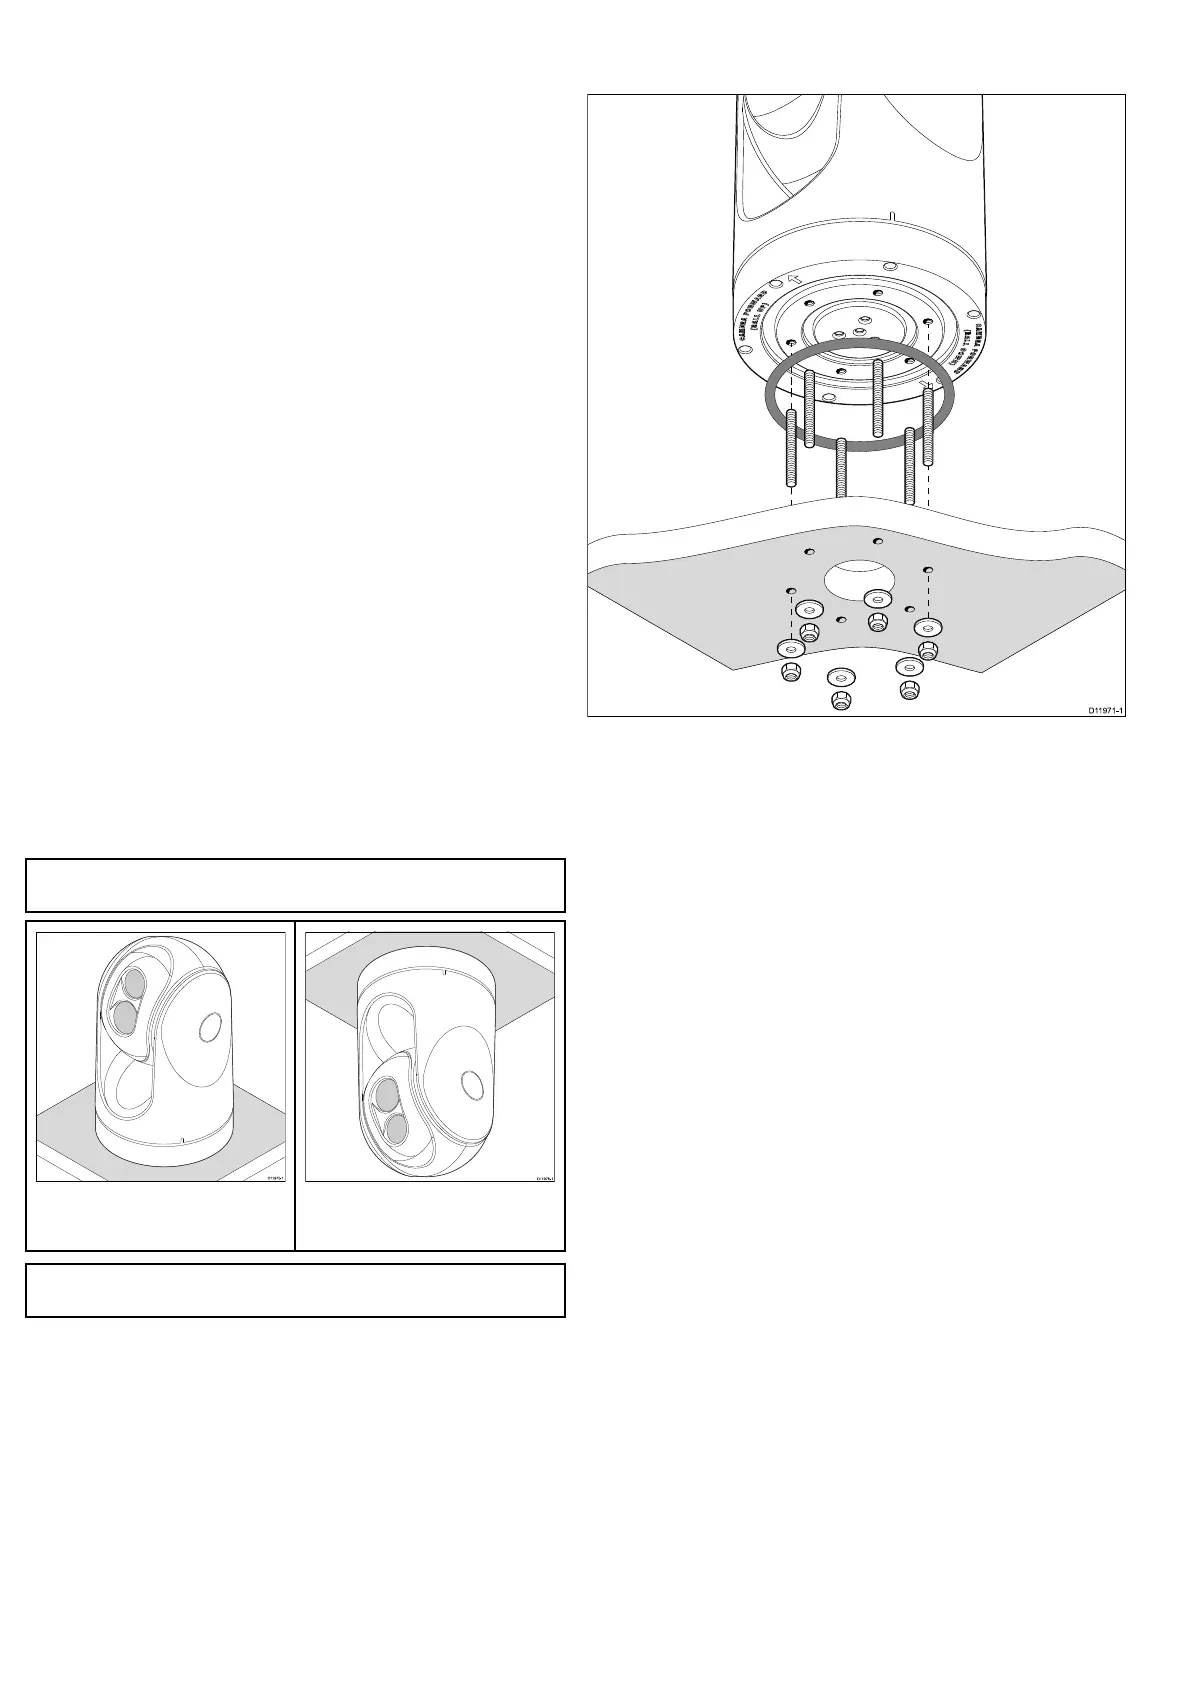
Mountingthecamera
Usetheseinstructionstomountthecameraunitinposition.
1.Usingthetemplatesupplied,markanddrilltheholesfor
mountingthecamera.
Mountingholescarepoints:
•Checkthedimensionsofanyprintedtemplate(toensurethat
thetemplateisprintedtothecorrectscale)priortodrillingany
holes.
•Notethecameraforwardmarkingsonthecamerabase,and
makesurethetemplateisorientedproperlyrelativetothebow
ofthevessel.Thisisaffectedbywhetherthecameraistobe
mountedball-uporball-down.
2.Installthe6xthreadedstudsintothebaseofthecamerawith
thread-lockingcompound.Ifrequired,youcanusestudsofa
differentlengthtosuityourinstallation.
Tightenthestudstoatorqueof9.5Nm(7lb-ft).
3.InstalltherubberO-ringinthebaseofthecamera.
4.Threadthepowersupply,video,andnetworkcablesfromthe
camerathroughthecenterhole,andthenplacethecameraon
themountingsurface(ortop-downriserifapplicable)sothe
threadedstudsextendthroughthedrilledholes.
5.Maketherequiredcableconnectionstothecameratails.
6.Securethecamerabodytothemountingsurfacewiththe
suppliednutsandwashers.
Domecappednutsareprovidedforaneatersolutionwherethe
mountingisexposedtoview.
Youmustensureawatertightseal.Youmayuseamarine-grade
sealantasanalternativetothemountingO-ring.
Mountingthecamerawiththetop-downkit
Thetop-downmountingkitisusedwhenaccesstotheunderside
ofthemountingsurfaceisrestricted.Usetheinstructionsbelowto
mountthecameraunitusingatop-downmountingkit.
1.Usethetop-downriserasatemplatetomarkanddrilltheholes
formountingthecamera.
26T-Series
 Loading...