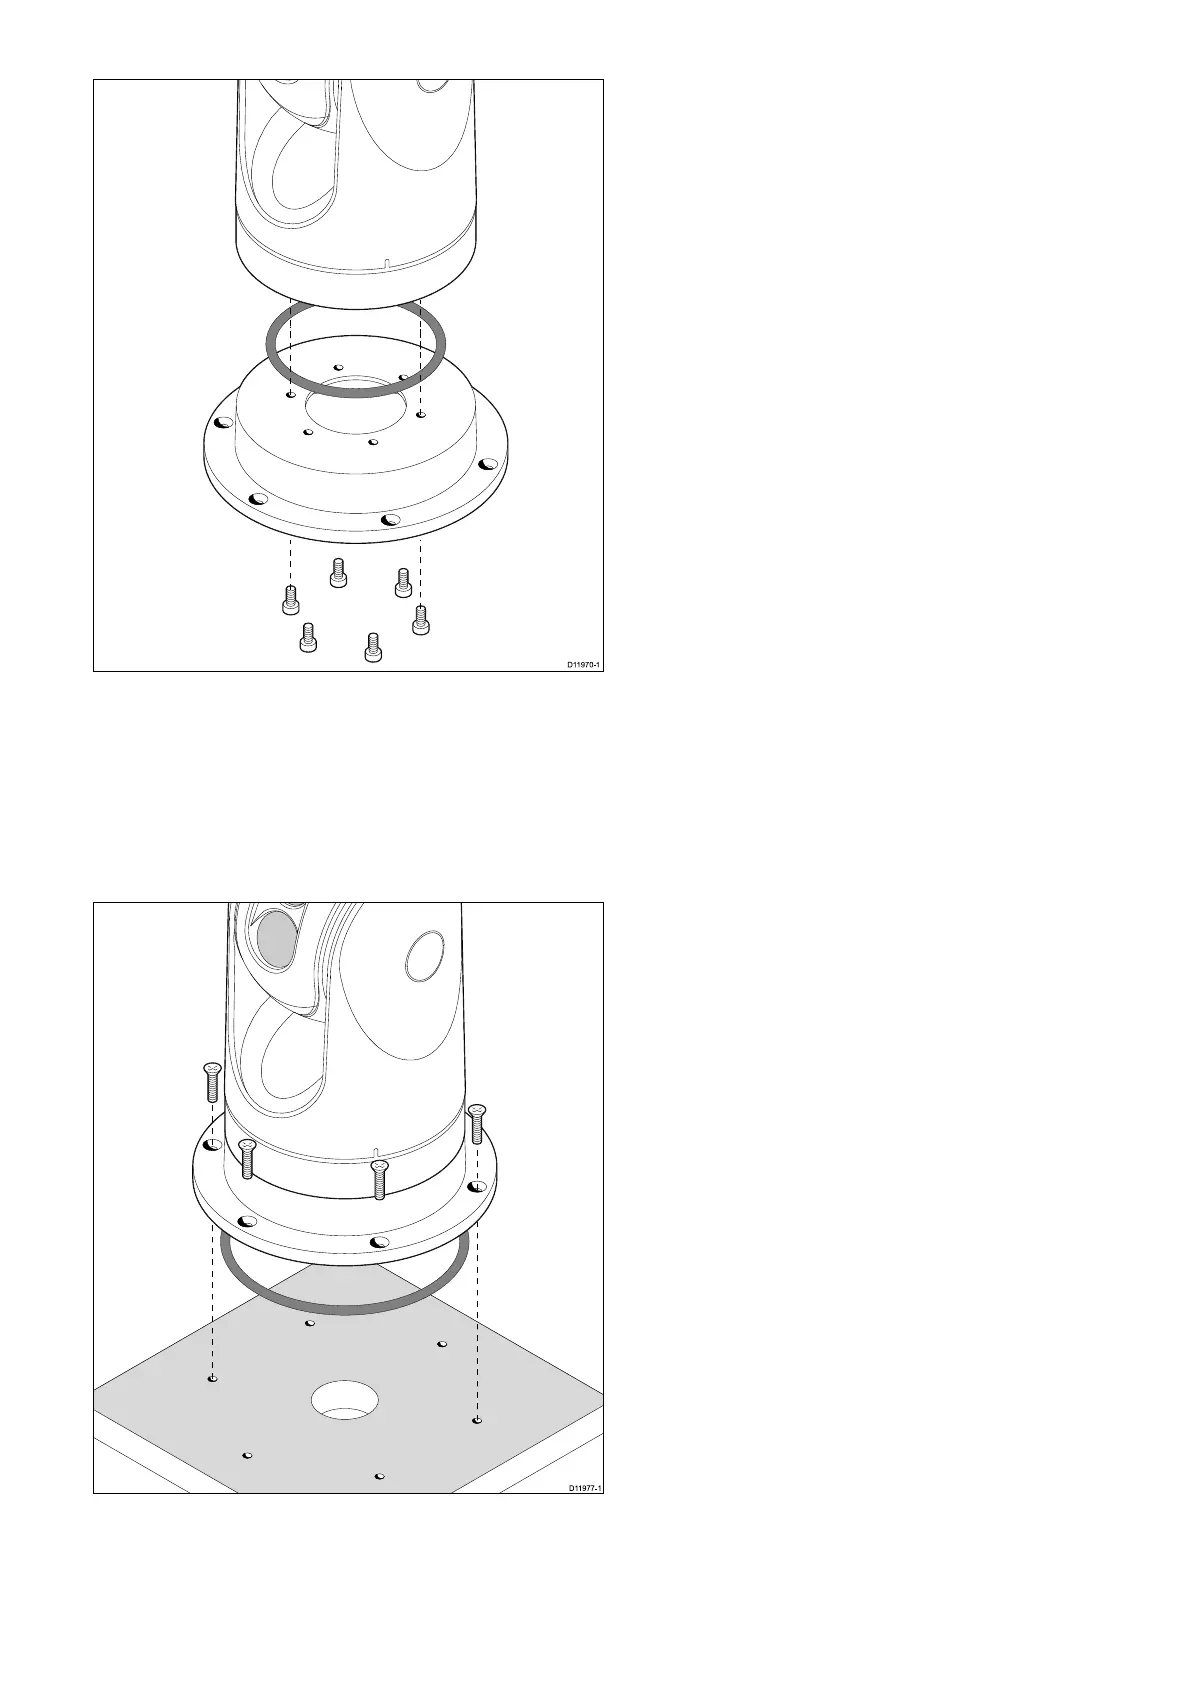
2.Fastenthecameraunittotheriserusingthe6xthreadedbolts
andasuitablethread-lockingcompound.
•Notethecameraforwardmarkingsonthecamerabase.
Youmustensurethatthecameraisfacingthecorrectway
dependinguponwhetherthecameraistobemountedball-up
orball-down.
•EnsuretherubberO-ringispositionedcorrectlyinthebase
ofthecamera.
3.Maketherequiredcableconnectionstothecameratails.
4.Fastenthecamera-riserassemblytothemountingsurfaceusing
thefastenerssupplied.
Youmustensureawatertightseal.Youmayuseamarine-grade
sealantasanalternativetothemountingO-ring.
5.2JCUMounting
Locationrequirements
Whenplanningtheinstallationlocation,considerthefollowing
points:
•Selectapositiononyourvesselthatisclosetothemonitorthat
displaystheT-Seriescameravideooutput.
•EnsuretheJCUismountedatleast55cm(21.7")awayfromany
equipmentttedwithamagneticcompass.
•TheJCUcanbemountedtoadashorothersurfaceinany
orientation.
•Considercablelengthsandcablerouting.
Flushmounting
ThestandardmethodformountingtheJCUisaushorpanel
mountingarrangement.
Beforemountingtheunit,ensurethatyouhave:
•Selectedasuitablelocation.Aclear,atareawithsuitable
clearancebehindthepanelisrequired.
•Identiedthecableconnectionrequiredandtheroutethatthe
cablewilltake.
•Detachedthefrontbezeltorevealthemountingscrews.
MountingtheJCU
1.Cutthemountingholeaccordingtothedimensionsspeciedin
themountingtemplateincludedinthisdocument.
2.Ensurethattheunittsintotheremovedareaandthenle
aroundthecutedgeuntilsmooth.
3.Drillfour6.4mm(0.25in)holesasindicatedonthetemplateto
acceptthemountingscrews.
4.BeforemountingtheJCU,insertthesuppliedethernetcable
throughthemountingholeandintotheJCUethernetport.
Ensurethecableglandsealingnutistightenedcorrectly.
5.Removethe4panelmountingclampsandinserttheJCUin
place.Afxthemountingclampstothescrewsontheotherside
ofthemountingsurface,ensuringthatthemountingclamps
arerotatedoutwardfromtheJCUhousing.Tightenthescrews
todrawthemountingclampsupagainstthemountingsurface
andthentightenanother1/4to1/2turn.Donotovertightenthe
screws.
i.Asshippedfromthefactory,theJCUcanbemountedtoa
panelthicknessrangingfrom0.79to4.45cm(0.31to1.750
in).Theclampsaresetwiththesmall“foot”ontheclamp
facingtowardsthemountingsurface,awayfromthefrontof
theJCU,asshowninthe"Thickpanelmounting"diagram
inthisdocument.
ii.TomounttheJCUtoapanelthicknessof0.79cm(0.31in)or
less,removetheclampsfromthemountingscrews,turnthem
aroundandthreadthembackontoeachofthefourscrews.
Inthisconguration,theclamp“foot”facesawayfromthe
mountingsurfaceandallowstheclamptocontactthinner
panelsurfaceswhilestillallowingforpropercompression
oftheJCUmountinggaskettoformawatertightseal.This
mountingcongurationisshowninthe"Thinpanelmounting"
diagraminthisdocument.
6.OnceyouhavesecuredtheJCUinplace,replacethebezel.
Installation
27
 Loading...