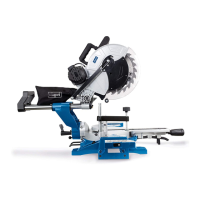
Danger: The laser is activated when the saw blade turns.
Donotlookintothebeam,evenwithopticalinstruments.
Do not remove the warning sign which is attached to the
saw blade cover. Avoid direct eye contact with the light
source.
Note: Theredlaserbeamappearsasadottedlinewhen
the motor is activated and the saw blade Is in the highest
position.Thisdottedlineallowsyoutoadjustthemarkings
on the materials with the cutting line of the saw blade.
Whenthesawbladeisbroughtdownward,theprotection
is removed and the dotted line becomes a continuous laser
beam.
LaserWarningSign:Maximumoutput<1mWDiodenlaser:
630–670nm.CorrespondstothestandardEN608251.
Laser Operation
Withthesawbladeunitinthemostuprightposition:
• Placeyourmaterialsonthemitreboxsaw.
• Switchthesawontoactivatethelaserbeam.
• Makesurethatthelaserbeamandthemarkingsonyour
materialsareinagreement.(Warning: do not lower the
sawbladeduringadjustments.)
• Should the markings on the materials and the laser
beam not agree with each other, switch the machine off,
waituntilthebladehascometoacompletestandstill,
andadjustthepositionofthematerials.
• Switchthesawonandrechecktheline.
• Onceagreementhasbeenreached,fastenthematerials
with a screw vice and carry out the cut.
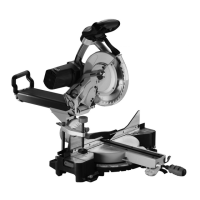
Changing the Saw Blade (fig. 24, 25, 26)
Warning: In order to prevent an unintentional start up of
the saw, always switch off and unplug the machine be-
fore changing the saw blade. Use correctly sharpened saw
blades. Conform to the maximum speed and the tooth type
indicated on the saw blade. Exchange of saw blades and in-
stallation must be carried out correctly. Only use saw blades
of the type recommended in the operating instructions.
Removal of the Saw Blades
• Unplugthemachinefromthepowersource.
• Raisethemitreboxsawintotheuprightposition.
• Raisethelower,transparent,plasticsawbladecoverinto
themostuprightposition(1,g.24).
• While holdingonto the lower sawblade cover, release
thescrewofthecover(2,g.24)withaPhillipsscrew-
driver.
• Turnthecover(3)soastorevealtheframescrew(4,
g.26).
• Putthebladekeyontheframescrew.
• Findthecorrugatedclosureandholdthissteadywhile
turning the blade in a clockwise direction. The corrugat-
edclosurewillclickinandadjusttheguard.Continue
to hold the closure while turning the key in a clockwise
direction to release the closure.
• Removethebracingclamp(5,g.26)fromthebracing
cylinder(6)andtheblade(7).Donotremovetheinner
cylinder.
• Liftupthetransparent,plasticsawbladeprotection(1,
g.24)totheuprightpositioninordertoremove the
blade.
Note: Pay closeattentionto thepartswhichyouremove
andthewaytheywereinstalled.Cleananysawdustaway
fromthecylindersbeforeyouinstallanewblade.The254
mmbladehasawaveholewitha16mmreductionpiece
in order to assemble it on the saw.
Installing the Saw Blade
Unplug the machine before changing or installing a saw
blade.
• Installa254mmsawbladewitha16mmwave.Please
notethatthedirectionalarrowwhichpointsinaclock-
wise direction and the upper saw blade must be in
agreementontheblademustcorrespondtoeachother
andthesawbladeteethhavetopointdown.
• Putthebracingcylinder(4,g.26)ontothebladeand
thewave.Screwthebracingcylinder(6)tothewavein
an anticlockwise direction. Important: Make sure that
theatpartofthecylinderandtheatpartofthewave
shaftlockintoeachother.Equally,theatsideofthe
bracing cylinder must meet the blade.
• Placethebladekeyintothewavescrew.
• Pressonthewaveclosure(5,g.25)andholdittightly
while turning the blade in an anticlockwise direction.
Whenitclicksin,pressthewaveclosurefurtherdown
and turn the bracing screw until it is tight.
• Returnthecoveringplates(3,g.24)totheiroriginal
positionuntiltheslitinthecoverisoverthescrew(2,
g.24). While holding on to the lower saw blade lid,
tightenthescrewwithaPhillipsscrewdriver.
Note: Thelower sawblade covermust bein theupright
positioninordertoachieveaccesstothecoveringplate
screw.
• Movethetransparentsawbladeprotectioncover(1,g.
24)downandmakesurethatnowheredoesItmakecon-
tact with the blade.
• Seethatthewaveclosureisreleasedsothattheblade
can turn freely. Turn the blade until the closure is re-
leased.
Note: Bothcylinderpartsmustbecleanandproperlyposi-
tioned. Put the blade down into the lower table and ensure,
by turning it by hand, that it does not come into contact
with the body of the machine or the mounting table.
m Electrical Connections
• Checktheelectricalconnections.Donotusedamaged
cables. See the section on electric cables.
• Onlyanelectricalspecialistshouldundertakeinstalla-
tion,repairsandmaintenanceworkontheelectriccon-
nections.
• To deal with power malfunctions, switch off the ma-
chine.Pullouttheplug.
• Switchoffthemotorwhenyouleavetheworkplace.Pull
outtheplug.
• Even when the machine is only being moved a small
distance,unplugitfromexternalpowersources!Before
operatingthemachineagain,plugthemachineinprop-
erly!
Theelectricmotorinstalledinthemachineisreadytoop-
eratewhenitisdelivered.Theconnectioncorrespondsto
therelevantVDEandDINnorms.Thecustomer‘selectri-
cal connection as well as the extension leads used must
alsocorrespondtothesenormsor,respectively,thelocal
electrical standards.
Defective Electrical Connections
Electricalconnectionscanoftenhaveinsulationdecien-
cies. Possible causes include:
• Pressurepointswhenthecableispassedthroughdoor
or window cracks.
• Bendingpointsduetoinexpertbindingorlayingofelec-
trical cables.
 Loading...