17
2-1 Control Panel
Chapter 2 Locations and Functions of Parts
h PHONES level control
Adjusts the output level to the PHONES jack.
For details, see “5-1-2 Selecting Audio Signals” on
page 103.
i PHONES jack
Connect stereo headphones with 8 Ω impedance for audio
monitoring during recording, playback, and editing.
Adjust the headphone output level with the PHONES level
control.
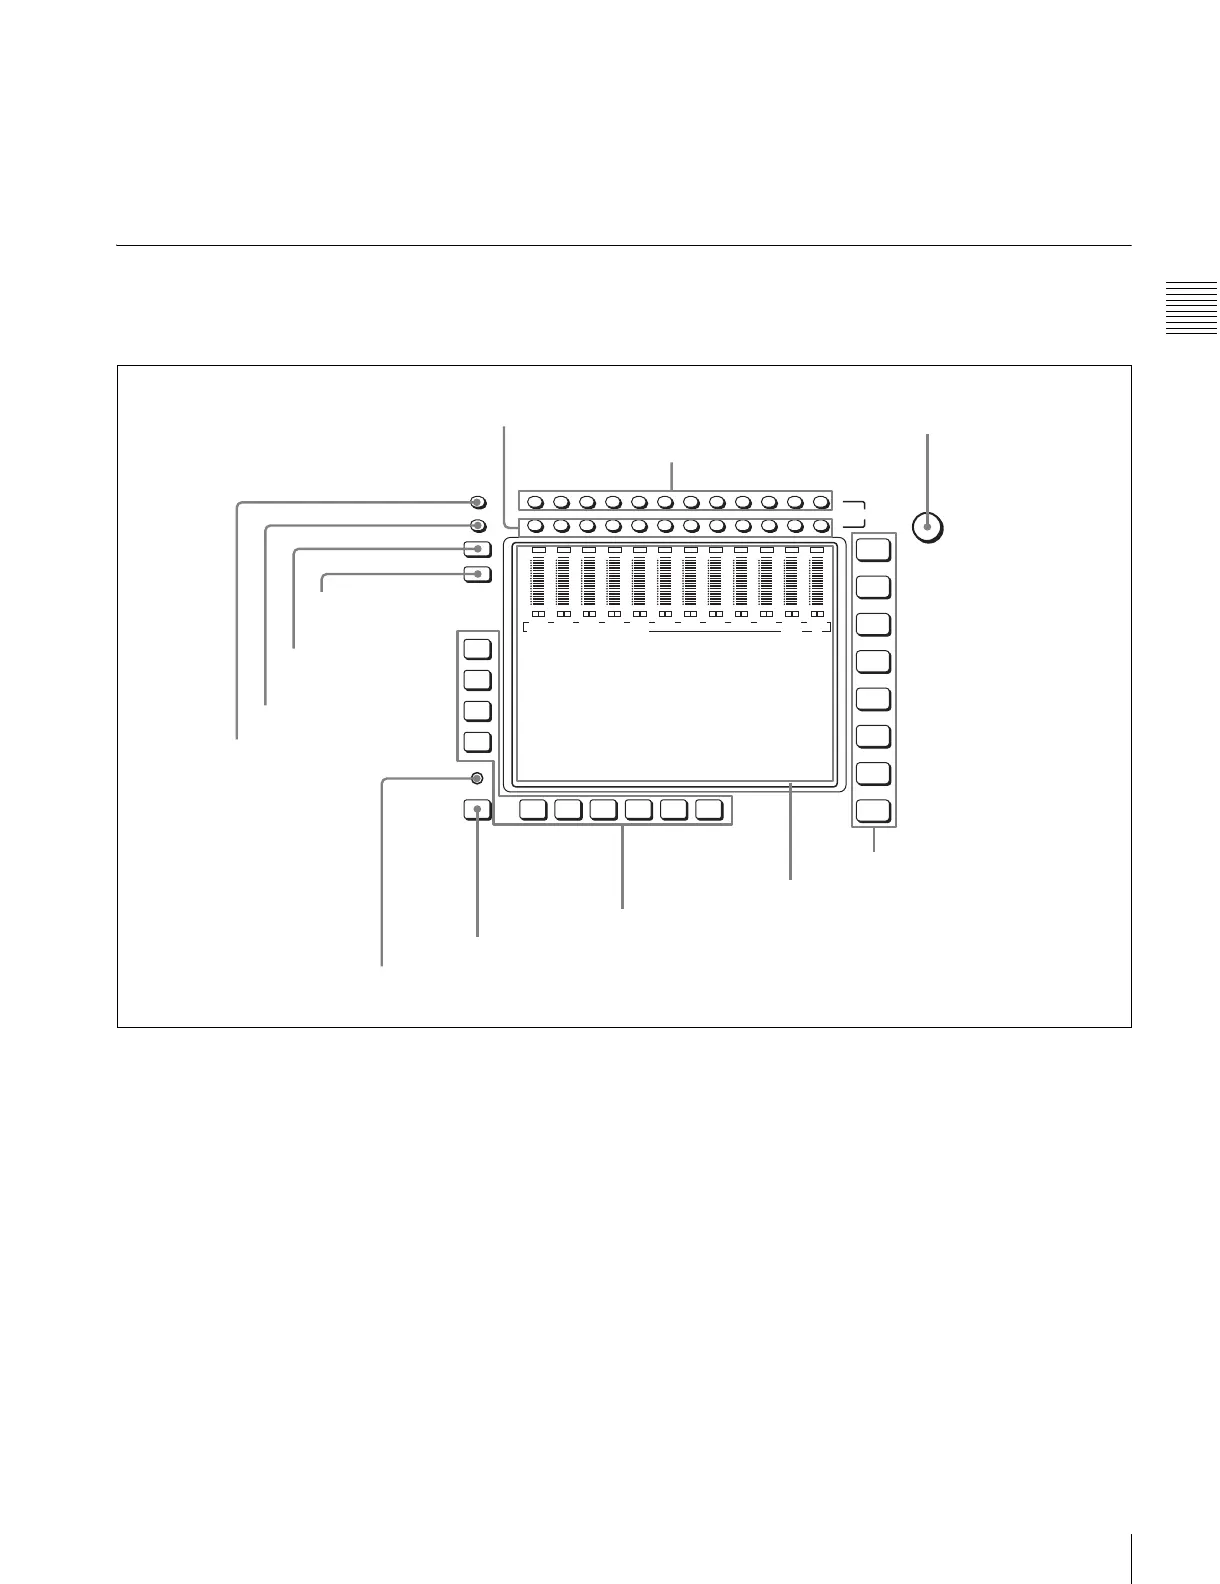
2-1-2 Lower Control Panel
1 Menu control section
a MONITOR R buttons
Select the audio signal output from the MONITOR
OUTPUT R connector. This assigns the desired channel to
the MONITOR OUTPUT R connector. If you assign more
than one channel to the same monitor output connector, a
mixed audio signal is output.
You can also make this setting using the VTR SETUP
menu item 808 “AUDIO MONITOR-R select”.
In the audio playback level adjustment mode, this is used
to select the channel to be adjusted.
b MONITOR L buttons
Select the audio signal output from the MONITOR
OUTPUT L connector. This assigns the desired channel to
the MONITOR OUTPUT L connector. If you assign more
than one channel to the same monitor output connector, a
mixed audio signal is output.
You can also make this setting using the VTR SETUP
menu item 807 “AUDIO MONITOR-L select”.
In the audio playback level adjustment mode, this is used
to select the channel to be adjusted.
c MULTI CONTROL knob
Used to set the audio recording/playback level and make
settings in the SET UP menu (see page 97).
d Menu selection buttons
These select the menu screen displayed on the display.
HOME button: Press this to go to the HOME menu
screen. The home menu provides settings for the basic
VTR operations and editing operations.
TC button: Press this to go to the TC (time code) menu
screen. In the time code menu, you can switch LTC/
MULTI
CONTROL
L
R
MONITOR
CH12CH11CH10CH9CH8CH7CH6CH5CH4CH3CH2CH1
DIAG
F1
F2
F3
F4
F5ALT F6 F7 F8 F9 F10
HOME
TC
VIDEO
AUDIO
CUE
PF1
PF2
SET UP
0
-10
-20
-30
-40
L
R
OVER
CH1
dB
0
-10
-20
-30
-40
L
R
OVER
CH2
dB
0
-10
-20
-30
-40
L
R
OVER
CH3
dB
0
-10
-20
-30
-40
L
R
OVER
CH4
dB
0
-10
-20
-30
-40
L
R
OVER
CH5
dB
0
-10
-20
-30
-40
L
R
OVER
CH6
dB
0
-10
-20
-30
-40
L
R
OVER
CH7
dB
0
-10
-20
-30
-40
L
R
OVER
CH8
dB
0
-10
-20
-30
-40
L
R
OVER
CH9
dB
0
-10
-20
-30
-40
L
R
OVER
CH10
dB
0
-10
-20
-30
-40
L
R
OVER
CH11
dB
0
-10
-20
-30
-40
L
R
OVER
CH12
dB
EDIT PRESET VIDEO TC
1 MONITOR R buttons
2 MONITOR L buttons
3 MULTI CONTROL knob
4 Menu selection buttons
5 Color display
6 Function buttons
7 ALT button
8 DIAG button
9 DISPLAY button
0 FULL/FINE button
qa PB LEVEL button
qs REC LEVEL button
 Loading...