Home
Sony
Digital Camera
Alpha DSLR-A330
Sony Alpha DSLR-A330 User Manual
4
of 1
of 1 rating
171 pages
Give review
Manual
Specs
To Next Page
To Next Page
To Previous Page
To Previous Page
Loading...
44
Shooting images
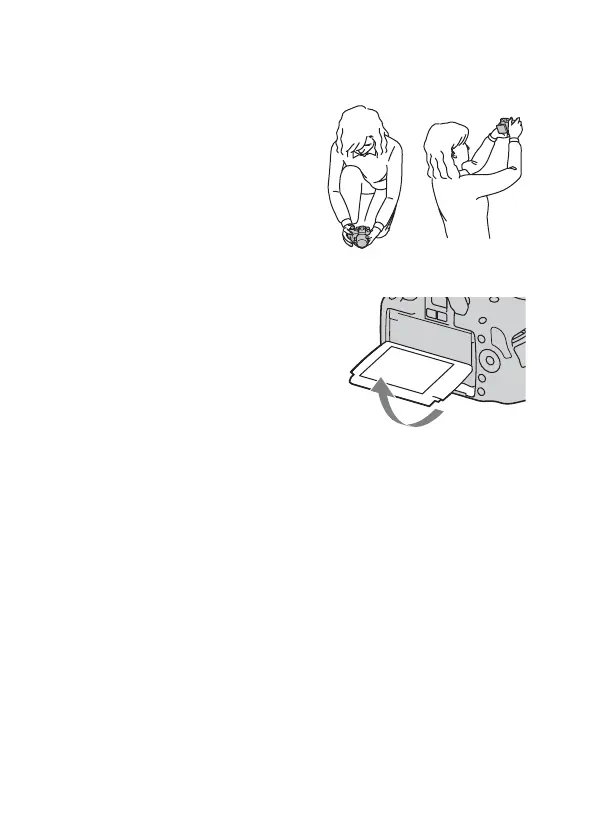
Adjusting the angle of the LCD monitor
You can adjust the angle of the LCD
monitor to meet
variou
s shooting
situations.
You can shoot from various shooting
positions.
Low position
High position
Adjust the LCD monitor to an easily
viewable angle.
43
45
Table of Contents
Default Chapter
2
Electric Shock
2
For Customers in Europe
5
Notes on Using Your Camera
7
Table of Contents
9
Preparing the Camera
13
Checking the Accessories Supplied
13
Preparing the Battery Pack
14
Inserting the Charged Battery Pack
17
Attaching a Lens
20
Inserting a Memory Card
22
Notes on Using Memory Cards
23
Preparing the Camera
25
Using the Accessories Supplied
27
Checking the Number of Recordable Images
29
Cleaning
32
Cleaning the Image Sensor
33
Before Your Operation
35
Identifying Parts and Screen Indicators
35
Front Side
35
Operation Front Side
35
Rear Side
36
Sides/Bottom
37
LCD Monitor
38
Selecting a Function/Setting
40
The Functions Selected by the Control Button
41
The Functions Selected by the Fn (Function) Button
42
The Functions Selected by the MENU Button
42
Shooting Images
44
Adjusting the Angle of the LCD Monitor
44
Shooting an Image Without Camera Shake
45
Correct Posture
45
Using the Steadyshot Function
46
Using a Tripod
47
Shooting with the Automatic Setting
48
Shooting with a Suitable Setting for the Subject (Scene Selection)
50
Taking Portrait Photos
51
Taking Landscape Photos
52
Taking Small-Subject Photos
53
Taking Moving-Subject Photos
54
Taking Sunset Photos
55
Taking Night View Photos
56
Shooting an Image the Way You Want It (Exposure Mode)
57
Shooting with Program Auto
59
Shooting by Controlling the Blur of the Background (Aperture Priority)
60
Shooting a Moving Subject with Various Expressions (Shutter Speed Priority)
62
Control Dial
63
Shooting with the Exposure Adjusted Manually (Manual Exposure)
64
Shooting Trails with Long Exposure (BULB)
66
Shooting with the Viewfinder (OVF)
68
Switching to the Viewfinder
68
Adjusting the Focus of the Finder (Diopter Adjustment)
69
Switching the Recording Information Display (DISP)
70
LCD Monitor (Graphic Display)
71
LCD Monitor (Standard Display)
73
Viewfinder
75
Using the Shooting Function
76
Selecting the Focus Method
76
Using Autofocus
76
Shooting with Your Desired Composition (Focus-Lock)
78
Selecting the Focus Method to Suit the Movement of the Subject (Autofocus Mode)
79
Selecting the Focus Area (AF Area)
80
Adjusting the Focus Manually (Manual Focus)
81
Zooming in in One Step
82
Using the Flash
84
Performing Wireless Flash Shooting
87
Adjusting the Brightness of the Image (Exposure, Flash Compensation, Metering)
88
Using Brightness Compensation for the Entire Image (Exposure Compensation)
88
Adjusting the Amount of Flash Light (Flash Compensation)
90
Selecting the Method for Measuring the Brightness of a Subject (Metering Mode)
91
Setting ISO
92
Adjusting the Color Tones (White Balance)
93
Adjusting the White Balance to Suit a Specific Light Source (Auto/Preset White Balance)
93
Registering the Color Tones (Custom White Balance)
94
Image Processing
96
Correcting the Brightness of the Image (D-Range Optimizer)
96
Selecting Your Desired Image Processing (Creative Style)
96
Changing the Range of Color Reproduction (Color Space)
98
Selecting the Drive Mode
99
Shooting Single Shot
99
Shooting Continuously
99
Using the Self-Timer
100
Shooting Images with the Exposure Shifted (Exposure Bracket)
101
Shooting with the Remote Commander
103
Using the Viewing Function
104
Playing Back Images
104
Rotating an Image
105
Enlarging Images
105
Switching to the Display of the Image List
106
Checking the Information of Recorded Images
108
Histogram Display
109
Protecting Images (Protect)
111
Deleting Images (Delete)
112
Viewing Images on a TV Screen
114
Changing Your Setup
118
Setting Image Size and Image Quality
118
Aspect Ratio
118
Setting the Method for Recording on a Memory Card
120
Creating a New Folder
121
Selecting the Recording Folder
121
Formatting the Memory Card
121
Changing the Noise Reduction Setting
122
Changing the Functions of the Control Dial
123
Changing Other Settings
124
Setting the Date
125
Selecting the Language
125
Setting the LCD Monitor
126
Confirming the Version of the Camera
128
Resetting to the Default
129
Viewing Images on a Computer
131
Copying Images to Your Computer
131
Recommended Computer Environment
131
Viewing Images on Your Computer
135
For Windows
135
For Macintosh
135
Deleting the Usb Connection
135
Image File Storage Destinations and File Names
137
Using the Software
139
Installing the Software
140
Printing Images
145
Specifying DPOF
145
Printing Images by Connecting the Camera to a Pictbridge Compliant Printer
147
Specifications
150
Rechargeable Battery Pack
152
Troubleshooting
154
Warning Messages
164
Precautions
167
Index
169
Other manuals for Sony Alpha DSLR-A330
Quick Start Guide
1 page
4
Based on 1 rating
Ask a question
Give review
Questions and Answers:
Need help?
Do you have a question about the Sony Alpha DSLR-A330 and is the answer not in the manual?
Ask a question
Sony Alpha DSLR-A330 Specifications
General
Brand
Sony
Model
Alpha DSLR-A330
Category
Digital Camera
Language
English
Related product manuals
Sony Alpha DSLR-A290
228 pages
Sony Alpha DSLR-A850
171 pages
Sony Alpha DSLR-A560
199 pages
Sony a (alpha) DSLR-A100
159 pages
DSLR-A200 - alpha; Digital Single Lens Reflex Camera
1 page
Sony Alpha 9
108 pages
Sony Alpha 1
96 pages
Sony Alpha A7
455 pages
Sony Alpha 7s
96 pages
Sony Alpha 7C
2 pages
Sony Alpha 7 IV
179 pages
Sony Alpha 6100
171 pages

 Loading...