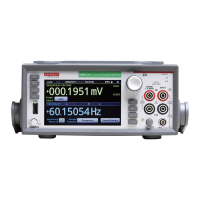
DMM4040 and 4050
Safety and Installation Instructions
Unpacking
and
Inspecting the Meter
Every care
is
taken in the choice
of
packing material to ensure that
your
Meter will reach
you in perfect condition.
If
the Meter has been subject to excessive handling
in
transit,
there may be visible external
damage
to the shipping carton. In the event
of
damage
, keep
the shipping container and packing material for the
carrier's
inspection.
Carefully unpack the Meter from its shipping container and inspect the contents for
damaged
or
missing items.
If
the
Meter
appears
damaged
or
something
is
missing,
contact the carrier and Tektronix immediately.
Save
the container and packing material in
case you have to return the Meter.
Storing
and
Shipping the Meter
To
prepare the
Meter
for storage or shipping, use the original shipping container
if
possible, as it provides shock isolation for normal handling operations.
If
the original
shipping container
is
not
available, use a box that
is
17.5 x
15
.5 x 8.0 inches, with
cushioning material that fills the
space
between the
Meter
and the sides
of
the box.
To store the Meter, place the box under cover
in
a location that complies with the storage
environment specifications described in the "General Specifications" section later
in
this
manual.
Power Considerations
The
Meter
operates on varying power distribution standards found throughout the world
and
must
be set up to operate
on
the line voltage that will
power
it. The
Meter
is
packed
ready for use with a line voltage
detennined
at the time
of
ordering. I f the selected line
voltage does
not
match the
power
that the Meter will be plugged into, the
Meter's
line-
voltage setting must be changed and replacement
of
the line fuse
may
be required.
Selecting the
Line
Voltage
The
Meter
operates on
four
different input line Voltages.
The
selected line-voltage setting
is
visible through the
window
in the line-fuse holder on the
Meter's
rear panel.
I. Unplug the
power
cord.
2. Insert a small screwdriver blade into the narrow recess to the left
of
the fuse
holder
and pry it to the right until the holder pops out. See Figure
2.
3.
Remove
the voltage-selector block from the fuse holder.
4. Rotate the selector block until the desired voltage rating faces outward.
5.
Replace
the selector block back into the fuse holder.
6.
Install the fuse holder back into the
Meter
and reconnect the power cord.
Changing
the line-voltage setting may require a different line-power fuse for
proper
operation.
10

 Loading...