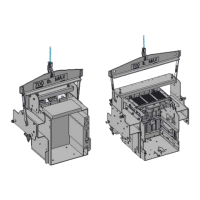
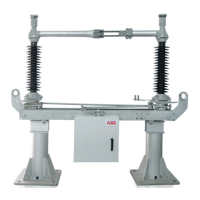
10. Mounting of Disconnector
Note : If you suspect shipping damage, check the spacing dimensions of the contact Figure (66)
Figure 66.
The disconnector pole can be mounted either on the supporting structure or in front of the supporting
structure. If mounting in front of the supporting structure, first lift the completely mounted disconnector
pole onto the supporting structure and then align and tighten it there.
Note : Remember that the materials for fixing the disconnector bases (2) on the supporting structure
are not included in the scope of supply.
he transportation angles (328) Figure 13 must be mounted in place and may under no
circumstances be removed during this mounting phase.
Caution : The diagonal rods (68) Figure 13 have been adjusted at the factory for the precise
engagement of the main contacts. The adjustment may only be changed by ABB-trained specialist
erectors.
Mounting steps :
1. Unpack components
2. If mounting on the supporting structure : Using lifting tackle, place disconnector base (2) on the
supporting structure Figure 12
3. If mounting on the supporting structure : Align and tighten disconnector base on the supporting
structure.
4. Mount support insulators (201) on the rotary pedestals (70) Figure 14
5. Wipe contact fingers (66) and contact pieces (67) with a cloth and grease Figure 14
6. For rated voltages 245 ... 300 kV : Mount corona - protection fittings (7) on current paths (5, 6)
Figure 16, Figure 17
7. Mount finger - side current path (6), in ON position, on support insulator (201) Figure 14 (for
rated voltage 300 kV, together with the corona-protection fitting Figure 15)
8. Slide contact - side current path (5) with counter-contact (67) into contact fingers (66) and mount
on support insulator (201) Figure 14 (for rated voltage 300 kV, together with the corona-
protection fitting Figure 15)
9. Align current paths (5, 6) longitudinally parallel with sectional-steel base frame (221) (use play in
holes in flanges) Figure 14
10. If mounting in front of supporting structure : Using lifting tackle, place completely mounted
disconnector pole on support structure Figure 13, align and tighten
11. Next step : Chapter 11 : Mounting of Operating Mechanism for Disconnector
A
Caution : T A
A
A
A
A
A
A
A
A
A
A
A
A
16/113
1HDB 050016-YN-A
 Loading...