Do you have a question about the Cisco UCS C240 M4 and is the answer not in the manual?
| Tcase | 78.9 °C |
|---|---|
| Bus type | QPI |
| Stepping | M1 |
| Scalability | 2S |
| Processor code | SR1YA |
| Processor cache | 25 MB |
| Processor cores | 10 |
| Processor model | E5-2650V3 |
| System bus rate | 9.6 GT/s |
| Processor series | Intel Xeon E5-2600 v3 |
| Processor socket | LGA 2011-v3 |
| Processor threads | 20 |
| Processor codename | Haswell |
| Motherboard chipset | Intel C610 |
| Processor frequency | 2.3 GHz |
| Processor cache type | Smart Cache |
| Processor lithography | 22 nm |
| Processor manufacturer | Intel |
| Processor package size | 52.5 x 45 mm |
| Processor front side bus | - MHz |
| Processor boost frequency | 3 GHz |
| Processor operating modes | 64-bit |
| ECC supported by processor | Yes |
| Embedded options available | No |
| PCI Express configurations | x4, x8, x16 |
| Supported instruction sets | AVX 2.0 |
| Thermal Design Power (TDP) | 105 W |
| Compatible processor series | Intel® Xeon® |
| Supported processor sockets | LGA 2011-v3 (Socket R) |
| Number of processors installed | 2 |
| Physical Address Extension (PAE) | 46 bit |
| Maximum number of PCI Express lanes | 40 |
| Memory types supported by processor | DDR4-SDRAM |
| Memory channels supported by processor | Quad |
| Memory clock speeds supported by processor | 1600, 1866, 2133 MHz |
| Memory bandwidth supported by processor (max) | 68 GB/s |
| Maximum internal memory supported by processor | 768 GB |
| HDD size | - \ |
| RAID levels | 0, 1, 5, 6, 10, 50, 60 |
| Total storage capacity | - GB |
| Maximum storage capacity | - TB |
| Number of HDDs installed | - |
| Memory slots | 24 |
| Internal memory | 16 GB |
| Memory clock speed | 2133 MHz |
| Maximum internal memory | 384 GB |
| Maximum graphics card memory | 8 MB |
| Graphics card | G200e |
| Graphics card family | Matrox |
| Intel® Virtualization Technology (Intel® VT) | VT-d, VT-x |
| LAN controller | Intel® I350 |
| Cabling technology | 10/100/1000Base-T(X) |
| Ethernet interface type | Fast Ethernet, Gigabit Ethernet |
| Serial ports quantity | 0 |
| USB 2.0 ports quantity | USB 2.0 ports have a data transmission speed of 480 Mbps, and are backwards compatible with USB 1.1 ports. You can connect all kinds of peripheral devices to them. |
| Ethernet LAN (RJ-45) ports | 4 |
| Compatible operating systems | Microsoft Windows Server 2012 R2 Microsoft Windows Server 2012 Microsoft Windows Server 2008 R2 Red Hat Enterprise Linux Novell SUSE Linux Enterprise Server Oracle Linux Oracle Solaris Ubuntu Server CentOS |
| Chassis type | Rack (2U) |
| Power supply input frequency | 50 - 60 Hz |
| Processor ARK ID | 81705 |
| Intel Secure Key Technology version | 1.00 |
| Intel Identity Protection Technology version | 0.00 |
| Trusted Platform Module (TPM) version | 1.2 |
| PCI Express slots version | 3.0 |
| Depth | 738 mm |
|---|---|
| Width | 448 mm |
| Height | 87 mm |
Describes the intended audience for the guide, typically experienced network administrators.
Explains document conventions for notes, cautions, and safety warnings for clarity.
Provides contact information for submitting technical feedback or reporting errors in the document.
Guides on how to obtain Cisco documentation and submit service requests.
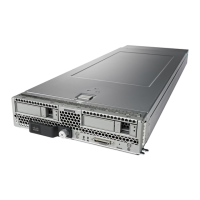
Provides a visual and descriptive overview of the server's external components and features.
Details the physical locations of all field-replaceable components within the server.
Offers a comprehensive list and description of the server's key hardware and software features.
Outlines the initial steps for receiving and checking the server for any shipping damage.
Covers site requirements, rack considerations, and necessary equipment before server installation.
Provides step-by-step instructions for physically mounting the server into a standard equipment rack.
Guides through the first-time configuration of the server, including power and basic network settings.
Explains how to configure network interface card (NIC) modes and redundancy for optimal connectivity.
Details information and procedures for managing the server's BIOS and Cisco IMC firmware versions.
Introduces tools like Cisco IMC and Server Configuration Utility for server management.
Explains the meaning and function of front and rear panel LEDs and buttons for status indication.
Covers prerequisites and safety for installing or replacing server hardware components.
Provides a comprehensive guide to installing and replacing various internal server hardware components.
Details the function and usage of service DIP switches for system recovery and configuration.
Lists the physical dimensions, weight, and form factor details of the server.
Details the electrical characteristics and options for the server's power supply units.
Outlines the operating and non-operating environmental parameters for the server.
Lists and illustrates the power cords and plugs supported for server connection.
Details the supported RAID controllers and the specific cables needed for their installation.
Explains the importance of matching RAID controller firmware with server BIOS and IMC versions.
Covers the requirements, configuration, and management of the embedded SATA RAID controller.
Lists minimum server firmware versions required for supported GPU cards.
Outlines the rules and restrictions for populating GPU cards in the server, including mixing rules.
Provides detailed steps for installing the NVIDIA K80 GPU card and its associated conversion kit.
Explains the architecture and editions of NVIDIA GRID licenses for GPU functionality.
Guides on updating server BIOS and installing NVIDIA drivers for GPU card functionality.
Directs users to specific guides for integrating the server with Cisco UCS Manager.