10
2.5 Connections with a FlexPDU (Power Distribution Unit) Module (optional)
2.6 Connections with a HotSwap MBP Module (optional)
The HotSwap MBP module makes it possible to service or even replace the UPS without affecting the connected
loads (HotSwap function).
1. Connect the UPS powercord (10) to the AC
power source.
2. Connect the input cord of the FlexPDU
module (48) to the UPS outlet (9). The cord
and the outlet are marked in red.
3. Connect the equipment to the outlets (45),
(46) on the FlexPDU module. These outlets
differ, depending on the version of the
FlexPDU module.
EX 3000
EX 3000
1. Connect the input cord (56) of the
HotSwap MBP module to the AC power
source.
2. Connect the UPS input cord (10) to the
“UPS Input” (55) of the HotSwap MBP
module. This cord and the receptacle are
marked blue.
3. Connect the UPS outlet (7) to the “UPS
Output” cord (54) of the HotSwap MBP
module. This cord and the outlet are
marked red.
4. Connect the equipment to the outlets (49)
on the HotSwap MBP module.
Caution:
Do not use UPS outlets (8)and (9) to
supply equipment because use of switch
(53) on the HotSwap MBP module would
cut supply to the equipment. It is advised
not to remove the protective film from
outlets (8) and (9).
86-86710-00EN A02 - Page 14
2. Installation
86-86710-00 A02 UM.indd 14 14/01/2009 10:56:24
2. インストレーション
2.5
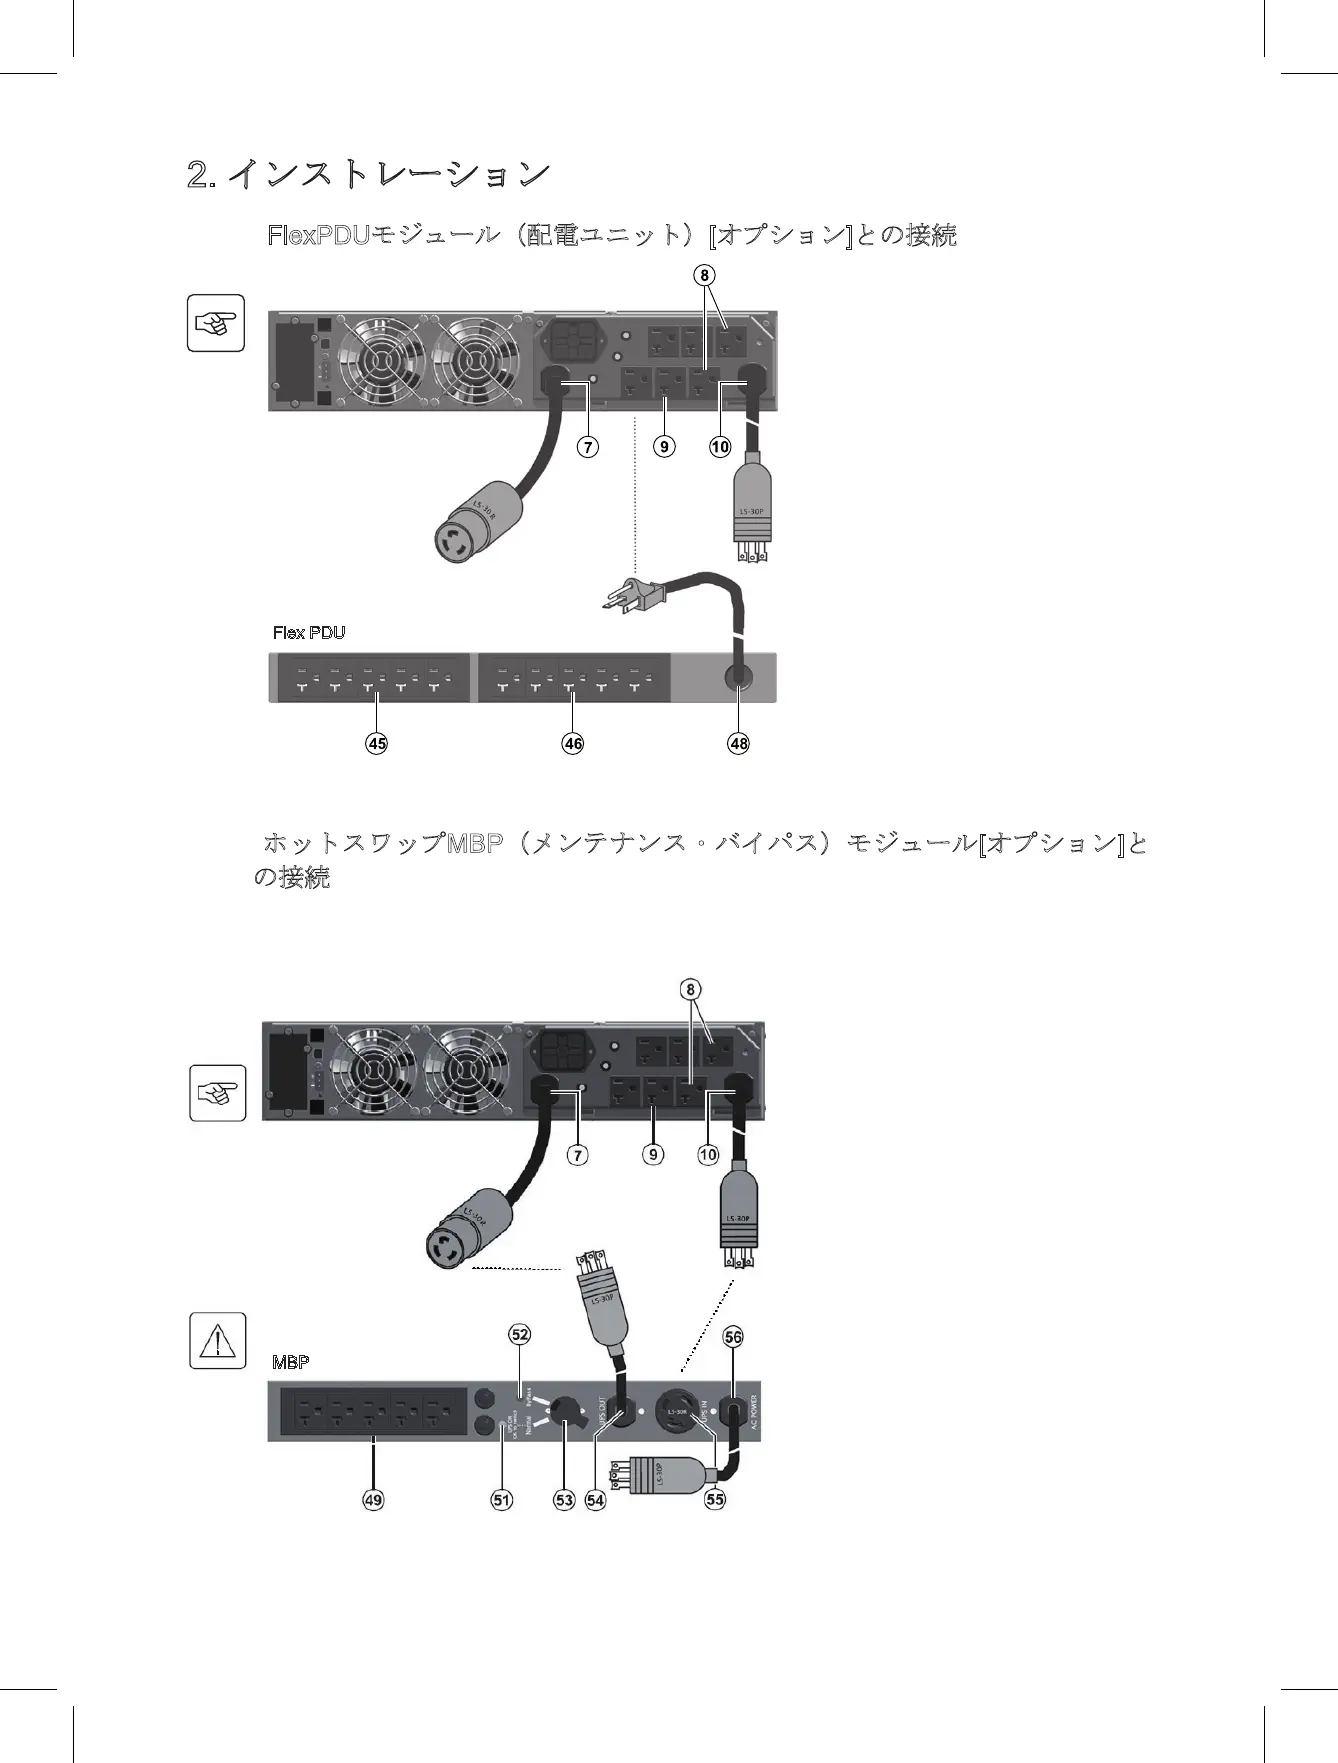
FlexPDUモジュール(配電ユニット)[オプション]との接続
2.6
ホットスワップMBP(メンテナンス・バイパス)モジュール[オプション]と
の接続
ホットスワップMBPモジュールにより、負荷の給電に影響を与えず、UPSの修理及びバッテリ交換が可能となります(ホッ
トスワップ機能)。
2.5 Connections with a FlexPDU (Power Distribution Unit) Module (optional)
2.6 Connections with a HotSwap MBP Module (optional)
The HotSwap MBP module makes it possible to service or even replace the UPS without affecting the connected
loads (HotSwap function).
1. Connect the UPS powercord (10) to the AC
power source.
2. Connect the input cord of the FlexPDU
module (48) to the UPS outlet (9). The cord
and the outlet are marked in red.
3. Connect the equipment to the outlets (45),
(46) on the FlexPDU module. These outlets
differ, depending on the version of the
FlexPDU module.
EX 3000
EX 3000
1. Connect the input cord (56) of the
HotSwap MBP module to the AC power
source.
2. Connect the UPS input cord (10) to the
“UPS Input” (55) of the HotSwap MBP
module. This cord and the receptacle are
marked blue.
3. Connect the UPS outlet (7) to the “UPS
Output” cord (54) of the HotSwap MBP
module. This cord and the outlet are
marked red.
4. Connect the equipment to the outlets (49)
on the HotSwap MBP module.
Caution:
Do not use UPS outlets (8)and (9) to
supply equipment because use of switch
(53) on the HotSwap MBP module would
cut supply to the equipment. It is advised
not to remove the protective film from
outlets (8) and (9).
86-86710-00EN A02 - Page 14
2. Installation
86-86710-00 A02 UM.indd 14 14/01/2009 10:56:24
1. UPS
電源ケーブル(
10
)を
AC
電源に接続しま
す。
2. FlexPDU
モジュール(
48
)の入力電源ケーブル
を
UPS
コンセント(
9
)に接続します。この電
源ケーブルとコンセントは赤色です。
3.
負荷機器を
FlexPDU
モジュールのコンセント
(
45
)と(
46
)に接続します。
FlexPDU
モジュー
ルの型番によってコンセントは異なります。
1.
ホットスワップ
MBP
モジュールの入力ケー
ブル(
56
)を
AC
電源に接続します。
2. UPS
入力ケーブル(
10
)をホットスワップ
MBP
モジュールの
UPS
入力(
55
)に接続します。こ
の電源ケーブルとコンセントは紺色です。
3. UPS
入力ケーブル(
7
)をホットスワップ
MBP
モジュールの
UPS
出力(
54
)に接続します。こ
の電源ケーブルとコンセントは赤色です。
4.
機器をホットスワップ
MBP
モジュールのコ
ンセント(
49
)に接続します。
注意:
ホットスワップ
MBP
モジュールのスイッチ(
53
)
を使うと、機器の電源が遮断されますので、
UPS
側コンセント(
8
)と(
9
)から機器に給電しない
でください。コンセント(
8
)と(
9
)の保護シールを
外さないようにお勧めします。
Flex PDU
MBP
 Loading...