11
HotSwap MBP module operation
UPS start-up with the HotSwap MBP module
1. Check that the UPS is correctly connected to the HotSwap MBP module.
2. Set switch (53) to the Normal position.
3. Start the UPS by pressing the ON/OFF button (27) on the UPS control panel.
The load is supplied by the UPS.
LED (51) “UPS ON - OK to switch” on the HotSwap MBP module goes ON.
HotSwap MBP module test
1. Set switch (53) to the Bypass position and check that the load is still supplied.
2. Set switch (53) back to the Normal position.
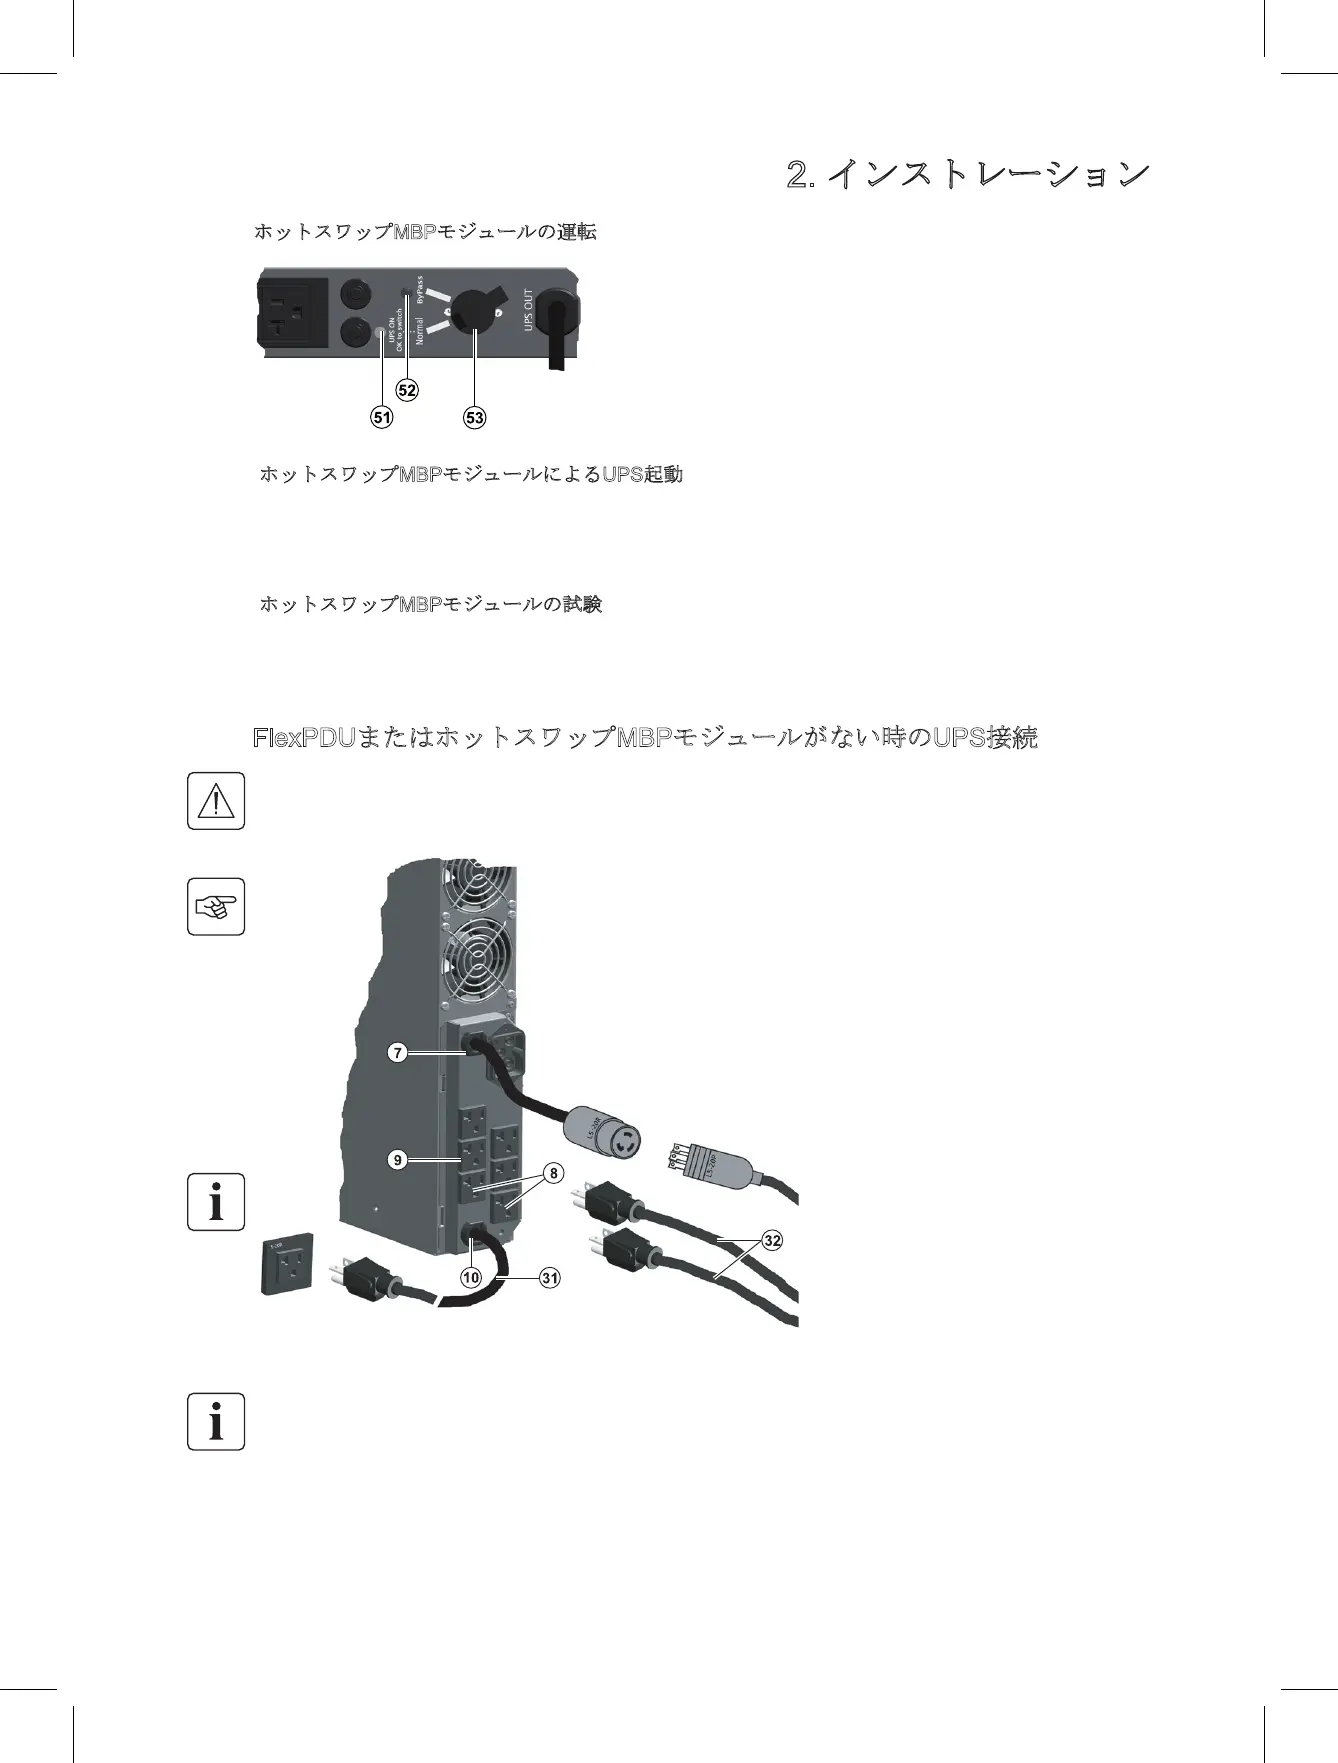
2.7 UPS Connection Without a FlexPDU or HotSwap MBP Module
Check that the indications on the name plate located on the back of the UPS correspond to the AC power source
and the true electrical consumption of the total load.
i
Note: The UPS charges the battery as soon as it is connected to the AC power source, even if button (27) is not
pressed. Once the UPS is connected to the AC power source, eight hours of charging are required before the
battery can supply the rated backup time
i
The HotSwap MBP module has a rotary
switch (53) with two positions:
Normal – the load is supplied by the UPS,
LED (51) is ON.
Bypass – the load is supplied directly by
the AC power source. LED (52) is
ON.
1. Connect the input cord (31) (100V 30A / or
20A on EX 2200) to the AC power source.
2. Connect the loads to the UPS.
It is preferable to connect the priority loads
to the four outlets marked (9) and the
non-priority loads to the two outlets
marked (8) that can be programmed.
Connect any high-power devices to the
20A (or 30A on EX 3000) outlet (7) as
shown at left for EX 2200.
To program shutdown of outlets (8)
during operation on battery power and
thus optimise the available backup time,
the EATON communications software is
required.
86-86710-00EN A02 - Page 15
2. Installation
86-86710-00 A02 UM.indd 15 14/01/2009 10:56:26
HotSwap MBP module operation
UPS start-up with the HotSwap MBP module
1. Check that the UPS is correctly connected to the HotSwap MBP module.
2. Set switch (53) to the Normal position.
3. Start the UPS by pressing the ON/OFF button (27) on the UPS control panel.
The load is supplied by the UPS.
LED (51) “UPS ON - OK to switch” on the HotSwap MBP module goes ON.
HotSwap MBP module test
1. Set switch (53) to the Bypass position and check that the load is still supplied.
2. Set switch (53) back to the Normal position.
2.7 UPS Connection Without a FlexPDU or HotSwap MBP Module
Check that the indications on the name plate located on the back of the UPS correspond to the AC power source
and the true electrical consumption of the total load.
i
Note: The UPS charges the battery as soon as it is connected to the AC power source, even if button (27) is not
pressed. Once the UPS is connected to the AC power source, eight hours of charging are required before the
battery can supply the rated backup time
i
The HotSwap MBP module has a rotary
switch (53) with two positions:
Normal – the load is supplied by the UPS,
LED (51) is ON.
Bypass – the load is supplied directly by
the AC power source. LED (52) is
ON.
1. Connect the input cord (31) (100V 30A / or
20A on EX 2200) to the AC power source.
2. Connect the loads to the UPS.
It is preferable to connect the priority loads
to the four outlets marked (9) and the
non-priority loads to the two outlets
marked (8) that can be programmed.
Connect any high-power devices to the
20A (or 30A on EX 3000) outlet (7) as
shown at left for EX 2200.
To program shutdown of outlets (8)
during operation on battery power and
thus optimise the available backup time,
the EATON communications software is
required.
86-86710-00EN A02 - Page 15
2. Installation
86-86710-00 A02 UM.indd 15 14/01/2009 10:56:26
2. インストレーション
ホットスワップMBPモジュールにはスイッチ(53)
があり、切り替えが出来ます。
Normal 負荷はUPSから給電されます。LEDラ
ンプ(51)が点灯します。
ByPass 負荷はAC電源から直接給電されま
す。 LEDランプ(52) が点灯します。
ホットスワップMBPモジュールによるUPS起動
1. UPSが正確・確実にホットスワップMBPモジュールに接続されていることを確認してください。
2. スイッチ(53)を「Normal」位置に合わせてください。
3. UPS操作パネルの主電源スイッチ(27) をオンにしてUPSを起動します。UPSから電源が供給されます。
LED(51)「UPS ON - OK to switch」が点灯すれば、ホットスワップMBPモジュールが動作しています。
ホットスワップMBPモジュールの試験
1. スイッチ(53)をBypass位置に設し、給電されていることを確認してください。
2. スイッチ(53)をNormal位置に戻してください。
2.7
FlexPDUまたはホットスワップMBPモジュールがない時のUPS接続
1. 入力ケーブル(31)(100V30A、EX 2200は
20A)をAC電源に接続します。
2. 負荷をUPSに接続します。
出力コンセント4口(9)は、優先負荷コンセン
トです。
出力コンセント2口(8)(プログラマブル)
は、非優先負荷コンセントです。
プログラムコントロールを使用しない場合
は、優先負荷コンセントのご使用をお勧めい
たします。
左図のように、大容量機器をコンセント(7)
(EX 3000は30A、EX 2200は20A)に接続し
ます。
(8)のプログラマブルコンセントは、プログラ
ムの組み方によっては、バックアップ運転時
に誤動作を起こす場合がありますので、プロ
グラムソフトを最適化してご使用ください。
必ずUPS背面表示されている定格値とAC電源および全負荷の実際消費量が充分余裕があるかを確認してください。
ホットスワップMBPモジュールの運転
ご注意:主電源スイッチ(27)を押さなくても、UPSがAC電源に接続すると、バッテリが充電されます。 定格のバックアップ
時間を満たすには 8 時間の充電が必要とされます。
 Loading...