427-0032-00-12, Version 170 Mar 2014 2-8
2 Basic Operation and Configuration
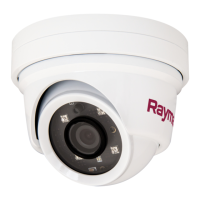
When the Goto Preset button is selected, the keypad changes to a numeric
keypad. As digits are selected, they are displayed below the keypad. To
cause the camera to go to the entered preset, select the Goto Preset button
again.
To return to the Control Panel, select the Back button (left arrow).
Other buttons on the control panel may be disabled if not available for the
camera. In the control panel, a disabled button is indicated with a grey color
and when the cursor is positioned over a disabled button, the screen tip
indicates the function is not available.
2.4.4 Help
At the top of the page, select the Help menu to display software version information. This page has
information about the camera including hardware and software revision numbers, part numbers, and
serial numbers. If it is necessary to contact FLIR Technical Support for assistance, it will be helpful to
have the information from this page (such as Software Version) on hand.
2.4.5 Log Off
Use the Log Off menu entry to disconnect from the camera and stop the display of the video stream.
2.5 Bench Test Using FSM
IF FSM is to be used in the final installation, it is a good idea to perform a bench test with it, as
described below, prior to making configuration changes. The FSM software is included with the
camera; the software installation will begin automatically when the CD is inserted into the PC. Once
the bench test is complete, use a web browser to make configuration changes as needed (for
example, set the IP address to an address that is compatible with the existing network).
The following provides a brief description of how to use FSM to control a camera and stream video
from the camera. For more detailed information on how to use FSM, refer to the FLIR Sensors
Manager User Manual. Once the software is installed, the manual is available from the Windows
Start Menu. If the FSM software has not been installed yet, locate the CD that came with the camera
and install it on the PC. The latest version of the software is also available from http://support.flir.com/
in the Downloads page.
2.5.1 Running FSM
Run the FSM software by double clicking the FLIR Sensors Manager icon on the desktop, or click on
the Windows Start button and select Programs > FLIR Sensors Manager > FLIR Sensors Manager.
Initially the FLIR Sensors Manager splash screen will be displayed. After a brief while, the FSM main
window will appear. A popup FSM Notification window will appear in the lower right of the screen
indicating that no cameras (servers) have been discovered yet.
 Loading...