GIA 63/GIA 63W Installation Manual Page 3-3
190-00303-05 Revision S
3.5 Backshell Assembly
The GIA 63(W) connector kit includes six Garmin backshell connectors. The backshell assemblies house
the configuration module/temperature sensor, if applicable. Garmin’s backshell also gives the installer the
ability to easily terminate shield grounds at the backshell housing using one of two methods available
(SPIDER or Shield Block). To assemble the backshell and configuration module refer to instructions
provided in the G1000 System Installation Manual (190-00303-00), as well as the SPIDER Installation
Instructions (190-00313-03) and Shield Block Installation Instructions (190-00313-09).
Information about the SPIDER grounding system is provided in support of existing
installations. All new installations shall use the SHIELD BLOCK grounding system.
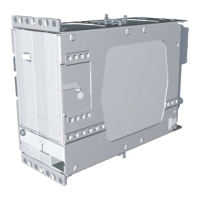
3.6 Unit Installation
For installation and assembly, refer to the outline and installation drawings shown in Appendix B of this
manual.
1. Assemble the backshell connectors, refer to Section 3.5.
2. Connect backshell connectors to the rear plate using the provided screws.
3. Mount the unit rack to the main system rack or other suitable mounting location, using the
nutplates provided for the modular rack or appropriate hardware from Section 2.1.3 for the
standalone rack.
4. Assemble the NAV and Main rear plates into the GIA 63(W) unit rack.
5. Carefully slide the GIA 63(W) into the rack. Ensure that the orientation of the unit allows for
the engagement of the locking stud in the channel on the rack. The unit can only be installed in
one direction.
6. Push the GIA 63(W) lever down towards the bottom of the unit. This engages the locking stud
with the dogleg slot and locks unit into the rack. If there is excessive resistance, do not force
the unit.
7. Lock the handle into the GIA 63(W) body and tighten the Phillips screw (or push in the D-Ring
and twist clockwise 90°, for units with a D-Ring).
CAUTION
Do not use excessive force when inserting the GIA 63(W) into the rack. This may cause
damage to the connectors, unit and/or unit rack. If excessive resistance is felt during
installation, stop! Remove the GIA 63(W) and identify the source of resistance. The rear
plates are designed to float in the unit rack. Check to ensure the rear plates are not bound
by the connectors or spring clip.
NOTE
 Loading...