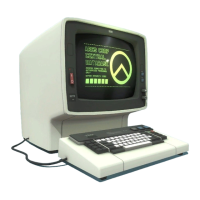
6.5.1 CRT Frame Assembly
1. Remove
the
side and
top
covers.
2. Disconnect
the
On/Off switch cable connector
from
the
top
of
the prime power box and
remove
the
rubber cable retainer.
3. Remove
the
two screws from the upper rear
of
the
CRT support.
4.
While
pulling
the
mask forward, press
the
plastic tabs located under
the
top
cover
ground spring, near
the
on/off
switch, and
near
the
intensity control.
5. Pivot
the
mask down
in
front
of
the
unit.
6.5.2
On/Off Switch
1.
Remove
the
rubber clamp from the cable clamp.
2.
Press
the
plastic catch
at
the
rear
of
the
switch
to
one side, and pull
the
switch out.
6.5.3 Intensity
and
Contrast Controls
1.
Pull
off the two knobs and spacer
or
the
audible alarm knob.
2. Disconnect the connector, and slip it
out
of
the
fasteners.
3. Expand
the
spring clips (2) with a screwdriver,
and
pull
the
control assembly off the pins.
6.5.4
Indicator Card Assembly
1.
Remove the screw with spring.
2.
Remove the connector and card assembly.
6.5.5 Switches
1. Remove the
cable connectors. (Note where
the
leads are connected for reinstallation.)
2.
Press
the
spring latch, and remove the switch.
3.
Reinstall
in
the
reverse sequence.
SY27-2510-6
(1/81}
6-9
 Loading...