-
17
-
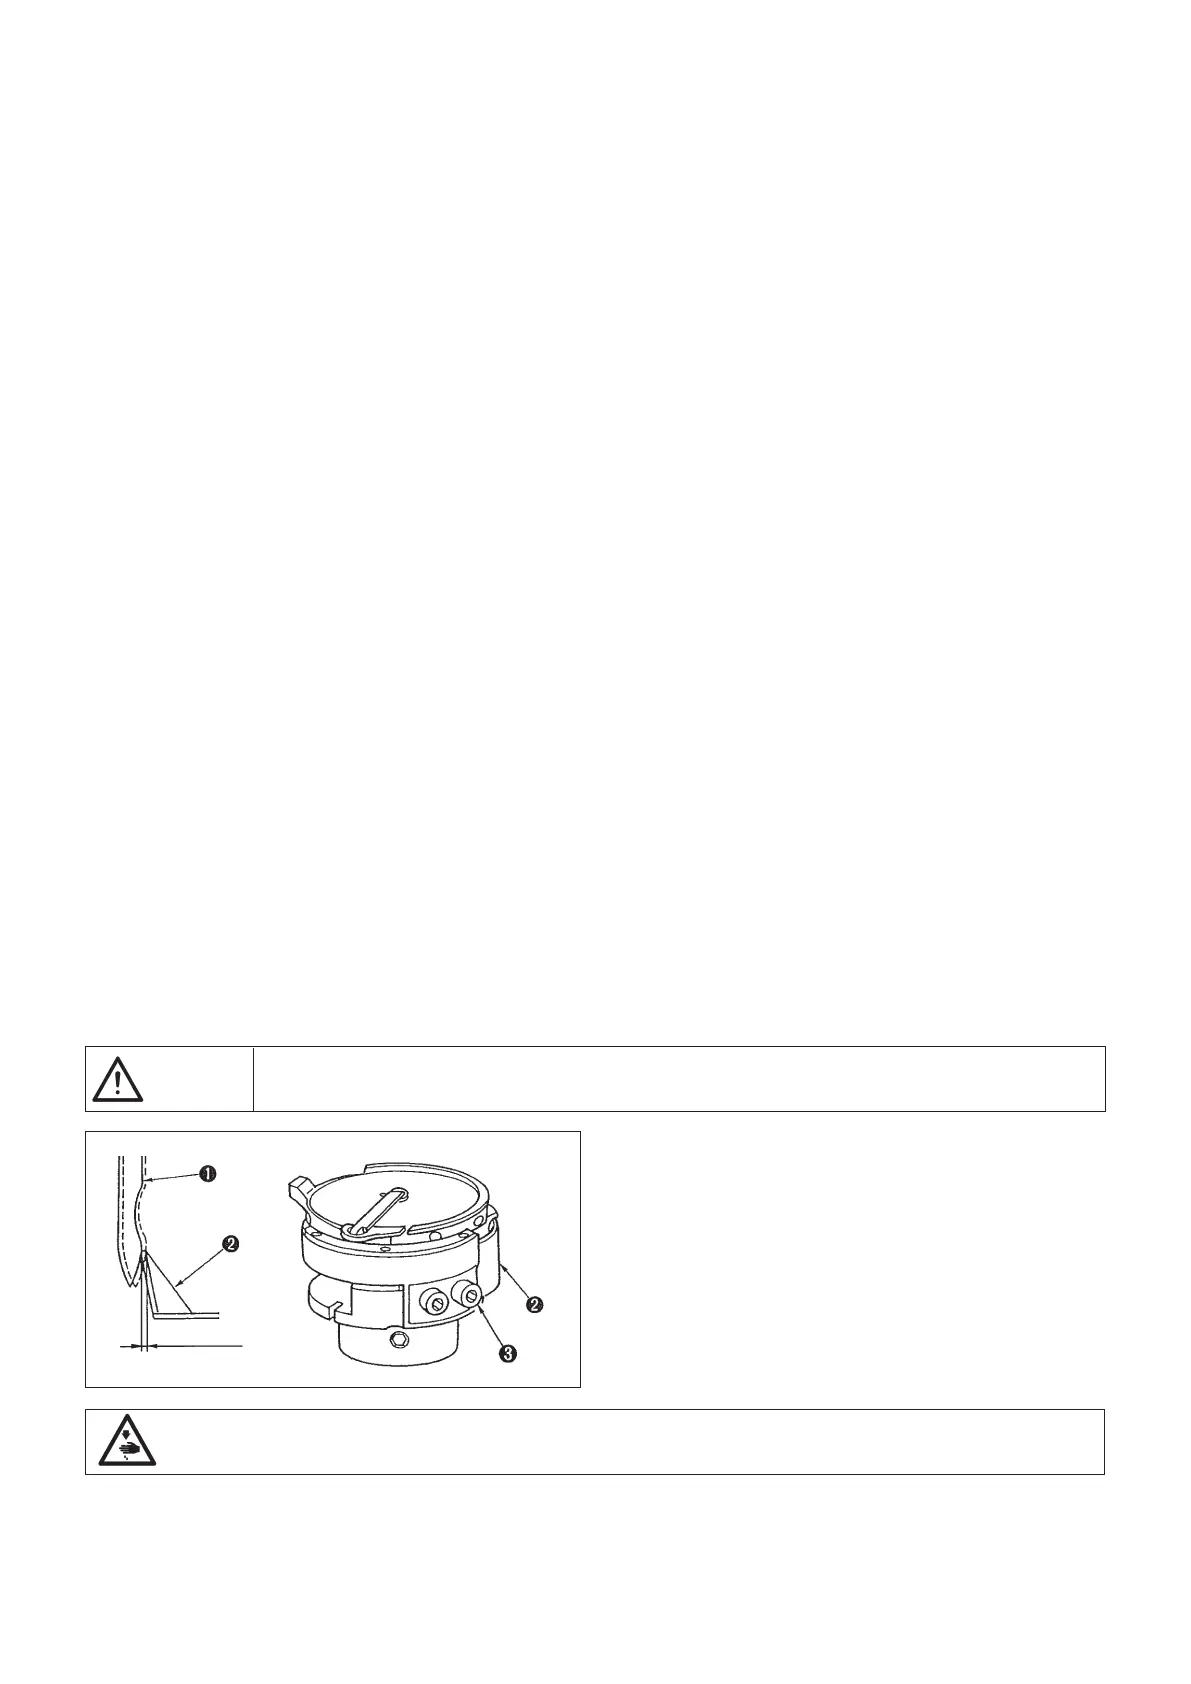
ADJUSTING THE HOOK NEEDLE GUARD
MODO DE AJUSTAR EL PROTECTOR DE AGUJA DEL GANCHO
0.15 - 0.2 mm
4) ベッド上面の釜軸台止めねじおよび、釜軸台止めねじをゆるめて、釜剣先と針のすき間が 0.02 〜 0.1
mm になるように釜軸台の位置を左右に動かして調整して、止めねじ およびを固定します。
5) 標準送り調節ダイヤルを最大に合わせて、釜剣先と針が当たらないことを確認してください。
1) Set the stitch dial to "0".
2) Loosen hook driving shaft set collar clamping screw , and turn the handwheel counterclockwise to make the needle bar
ascend by 2.0 mm from the lowest position of its stroke.
3) In the state described in 2), align blade point 1 of the hook with the center of needle , and tighten hook driving shaft set collar
clamping screw . At this time, a clearance of 1.4 mm is provided between the blade point of the hook and the top end of the
needle eyelet. (As reference, the handwheel pointer meets the marker line of the scale L on the handwheel.)
4) Loosen screw in the top face of the bed and screw in the hook driving shaft saddle, and adjust so that a clearance of 0.02
to 0.1 mm is provided between the blade point of hook and the needle by moving the hook driving shaft saddle to the right or
left.Oncethespeciedclearanceisobtained,securelytightenscrews and .
5) Set the standard feed adjusting dial to maximum value, and check that the blade point of the hook does not come in contact
with the needle.
(Caution) The operation panel could come in contact with the thread stand when tilting the machine head. To protect the
relevant parts from contact, shift the thread stand to a position at which the thread stand does not interfere
with the control panel.
1) Fije a “0”(cero) el cuadrante de puntada.
2) Aojeeltornillosujetadordelcollarínjadordelejeimpulsordelgancho,ygireelvolantehacialaizquierdaparaquelabarra
de aguja suba 2,0 mm desde la posición más baja de su recorrido.
3) En el estado descrito en 2). alinee la punta de la hoja del gancho con el centro de la aguja , y apriete el tornillo sujeta-
dordelcollarínjadordelejeimpulsordelgancho.Enestemomento,seproveeunaseparaciónde1,4mmentrelapuntade
la hoja del gancho y el extremo superior del ojal de la aguja. (Como referencia, el indicador del volante coincide con la línea
demarcadora de la escala L en el volante.)
4) Aojeeltornillo en la cara superior de la base y el tornillo en la silleta del eje impulsor del gancho, y haga el ajuste de
modo que se provea una separación de 0,02 a 0,1 mm entre la punta de la hoja del gancho y la aguja moviendo la silleta del eje
impulsordelganchohacialaderechaohacialaizquierda.Unavezobtenidalaseparaciónespecicada,aprieteconseguridad
los tornillos y .
5) Fije el cuadrante de ajuste de transporte al valor máximo, y compruebe que la punta de la hoja del gancho no toca la aguja.
(Precaución) El panel de operación podría tocar el pedestal de hilos cuando se inclina el cabezal de la máquina. Para
proteger la piezas relevantes contra contacto, desplace el pedestal de hilos a una posición en la que el estante
dehilosnointereraconelpaneldecontrol.
釜を交換した場合は、釜針受け位置を確認してくだ
さい。
標準位置は針の側面に釜針受けが当たり 0.15
〜 0.2 mm そった状態です。そのような状態になっ
ていないときは、釜針受けを調整してください。
1) 釜針受けを内側に移動する場合は、調節ねじを
時計方向に回してください。
2) 釜針受けを外側に移動する場合は、調節ねじを
反時計方向に回してください。
WARNING :
Turn OFF the power before starting the work so as to prevent accidents caused by abrupt start of the sewing machine.
When a hook has been replaced, be sure to check the position
of the hook needle guard.
As the standard position of the hook needle guard, hook needle
guard must push the side face of needle to lean the needle
by 0.15 to 0.2 mm away from its straight position. If not, adjust
the hook needle guard by bending it.
1) If you want to move the hook needle guard inwards, turn
adjusting screw clockwise.
2) If you want to move the hook needle guard outwards, turn
adjusting screw counterclockwise.