Calibration Program
The Model 617 must be placed in the calibration program
in order to perform the front panel digital calibration pro-
cedures. Select the calibration program as follows:
1. Turn off the instrument for at least three seconds if it
is presently turned on.
2. Press and hold the PROGRAM SELECT button and
then turn on the power.
3. The instrument powers up as normal, but the CAL pro-
gram is accessible in the program menu.
4. Select the calibration program by pressing PROGRAM
SELECT repeatedly until the following message is
displayed briefly:
CAL
5. A normal reading will now be displayed except that the
exponent decimal points will be dislayed to indicate that
the instrument is in the calibration mode.
With the instrument in the calibration mode, perform the
following procedures to calibrate the Model 617 from the
front panel.
Amps Calibration
Calibration of the amps function should be performed in
the following order: ZOOpA, 2OnA, 2OpA, and 2OmA
ranges. Once these ranges are calibrated, the remaining
ranges are automatically calibrated. Use the AMPS (active)
function of the Model 263 to source current. Proceed as
follows:
1. Connect the Model 263 Calibrator/Source to the Model
617 as shown in Figure 5-5.
2. Place the Model 617 in the amps function and select
the 200pA range.
3. Zero correct the Model 617 by enabling zero check and
zero correct in that order.
4. l’rogram the Model 263 to output OO.CHIOpA and release
zero check on the Model 617.
5. After allowing the readine to settle for a few seconds.
9. On the Model 617, disable zero correct and suppress.
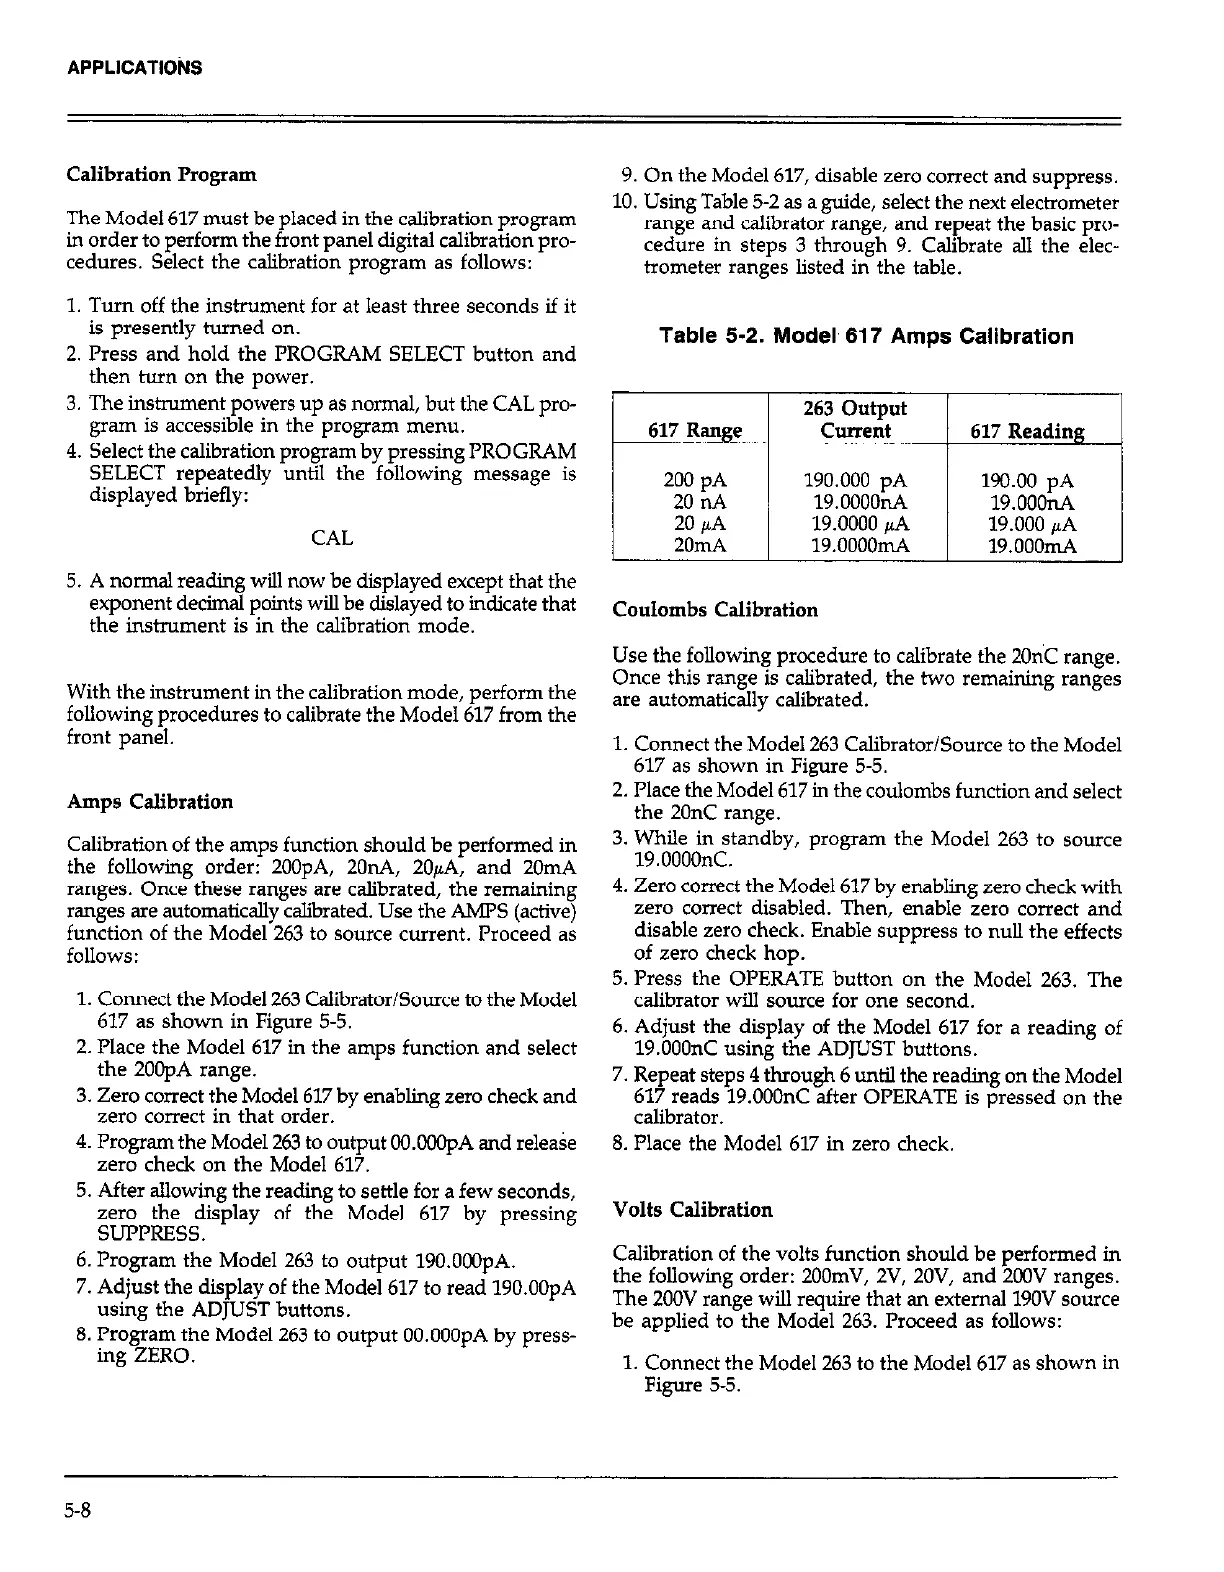
10. Using Table 5-2 as a guide, select the next electrometer
range and calibrator range, and repeat the basic pro-
cedure in steps 3 through 9. Calibrate all the elec-
trometer ranges listed in the table.
Table 5-2. Model, 617 Amps Calibration
617 Range
200 pA
20 IL4
20 PA
2omA
263 output
current
190.000 pA
19.oooonA
19.0000 fiA
19.oooomA
617 Reading
190.00 pA
19.ooonA
19.000 /LA
19.ooomA
Coulombs Calibration
Use the following procedure to calibrate the 20nC range.
Once this range is calibrated, the two remaining ranges
are automatically calibrated.
1. Connect the Model 263 Calibrator/Source to the Model
617 as shown in Figure 5-5.
2. Place the Model 617 in the coulombs function and select
the 20nC range.
3. While in standby, program the Model 263 to source
19.0000nC.
4. Zero correct the Model 617 by enabling zero check with
zero correct disabled. Then, enable zero correct and
disable zero check. Enable suppress to null the effects
of zero check hop.
5. Press the OPERATE button on the Model 263. The
calibrator will source for one second.
6. Adjust the display of the Model 617 for a reading of
19.000nC using the ADJUST buttons.
7. Repeat steps 4 through 6 until the reading on the Model
617 reads 19.000nC after OPERATE is pressed on the
calibrator.
8. Place the Model 617 in zero check.
.zezep~Ssi&ay of thz Model 617 by pressing
Volts Calibration
6. Program the Model 263 to output 190.000pA.
7. Adjust the display of the Model 617 to read 190.00pA
using the ADJUST buttons.
8. Pro&am the Model 263 to output OO.OOOpA by press-
ing ZERO.
Calibration of the volts function should be performed in
the following order: 2OOmV, 2V, 2OV, and 2oOV ranges.
The 200V range will require that an external 190V source
be applied to the Model 263. Proceed as follows:
1. Connect the Model 263 to the Model 617 as shown in
Figure 5-5.
5-8
 Loading...