EasyManua.ls Logo

Lexmark C540N Service Manual

Lexmark C540N
270 pages
To Next Page IconTo Next Page
To Previous Page IconTo Previous Page
Page #124 background imageLoading...
Page #124 background image
3-28 Service Manual
5025-2xx, 4xx
Go Back
Previous
Next
Updating printer firmware
Warning: Before performing a firmware update on the printer, contact your next level support to confirm, or
obtain the correct code. The wrong code, or wrong level of code could lead to a malfunction or
render the device inoperable.
From a flash drive
The printer firmware can be updated from a USB flash drive on models equipped with a USB Direct Interface on
the operator panel. The printer must be in a Ready state in order to perform the code update. A printer that is in
Invalid Code mode cannot be updated via the flash drive.
Note: Make sure the Enable Drive and Update Code settings are enabled. These settings are found in the
Flash Drive menu under the Settings menu in the Administrative menus.
To update the code using a USB flash drive, perform the following steps:
1. Insert the flash drive into the USB port located on the operator panel.
USB Menu: Print from USB displays.If Print from USB doesn’t display by default, use or to navigate
to Print from USB.
2. Press Select ( ).
You now have access to the directory structure of the flash drive.
3. Use or to navigate to the firmware file. The file will have a .fls extension.
4. When the file is displayed, press Select ().
Program Device: Yes displays.
5. Press Select ( ). The printer will start the update process. Various status and progress messages will
appear.
Warning: Do not turn the printer off until the update is complete. When the code update is completed,
the printer automatically performs a POR and returns to a Ready state.
Using a networked computer to update the printer firmware over a network
Using FTP
Note: The servicer should know how to use FTP before attempting to update the firmware using this method.
The printer firmware can be updated by performing the following steps:
1. POR the printer to a Ready state.
2. Go to the TCP/IP menu in the administrative menu to retrieve the IP address. Return printer to Ready
state.
3. Go to the Command Prompt on a computer attached to the network and open a FTP session to the
printer’s IP address.
Note: The new file must be available to the computer.
4. Use a PUT command to place the firmware file on the printer.
Various status and progress messages will appear. The printer will reboot. The FTP session will terminate.
5. Repeat steps 2 through 4 for any other files.
Using the Web server
1.
On a computer attached to the network, open a Web browser.
2. Enter the printer’s IP address in the address bar of the Web browser.
3. When the home page opens, click Configuration.
4. Click the Update Firmware link on the Configuration page.
5. Click the Browse button.

Table of Contents

Other manuals for Lexmark C540N

Question and Answer IconNeed help?

Do you have a question about the Lexmark C540N and is the answer not in the manual?

Lexmark C540N Specifications

General IconGeneral
Print TechnologyLaser
Print Resolution1200 x 1200 dpi
Standard Paper Capacity250 sheets
Input Capacity250 sheets
Output Trays Capacity150 sheets
ConnectivityUSB, Ethernet
Processor400 MHz
Standard Memory128 MB
Network ReadyYes
Warranty1 Year
Printer TypeLaser
Recommended Monthly Volume1500 - 3000 pages
Operating System CompatibilityWindows, Mac, Linux
Media TypeCard Stock, Envelopes, Labels, Plain Paper, Transparencies
Network10/100 Base-TX Ethernet

Summary

Lexmark C54x Printer General Information

Lexmark Printer Print Quality

Discusses component wear and checking print quality settings.

Lexmark Printer Power and Electrical Specifications

Details power requirements and typical electricity consumption.

Lexmark Printer Diagnostic Information

Lexmark Printer Diagnostic Start

Guide to locating error codes, symptoms, and service checks for troubleshooting.

Lexmark Printer POR (Power-On Reset) Sequence

Describes the sequence of events during printer startup self-test.

Lexmark Printer Symptom Tables

Lists printer symptoms and corresponding actions for diagnosis.

Lexmark Printer Error Codes and Messages

Details user status, customer attendance, and error messages with explanations.

Lexmark Printer Paper Jam Messages (2xx)

Lists paper jam error codes, descriptions, and instructions for clearing jams.

Lexmark Printer Service Error Messages

Provides a list of service error codes for printheads, fuser, and software issues.

Lexmark Printer Diagnostic Aids

Lexmark Printer Accessing Service Menus

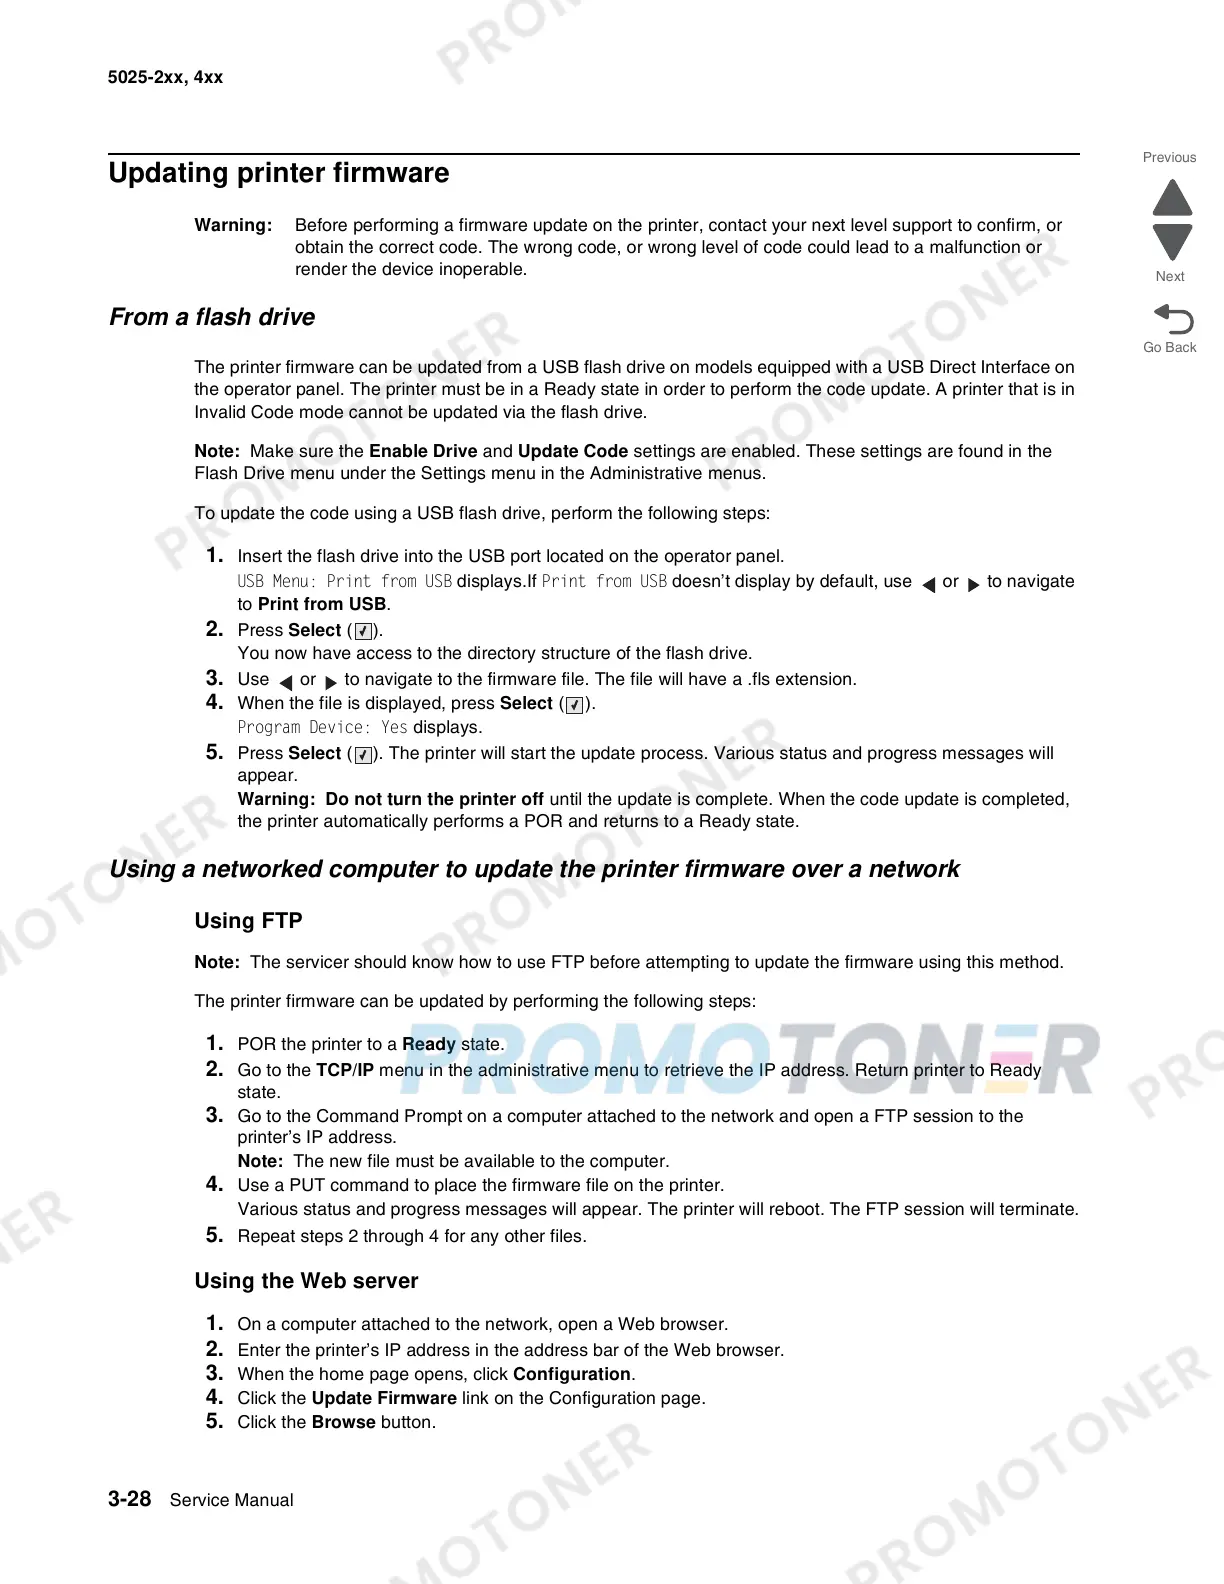
Explains how to access diagnostic and configuration menus for testing.

Lexmark Printer Diagnostics Menu (Diag Menu)

Outlines the structure and available tests within the Diagnostics Menu.

Lexmark Printer Registration

Details how to adjust print registration for proper alignment.

Lexmark Printer Alignment Procedure

Guides on aligning color planes for optimal print quality.

Lexmark Printer Transfer Roll Service Check

Provides steps to check the transfer roll for proper function.

Lexmark Printer Repair Information

Lexmark ESD-Sensitive Parts Handling

Provides essential precautions for handling electronic components safely.

Lexmark Printer Removal Procedures

General guidelines for disassembling printer components and handling FRUs.

Lexmark Printer Controller Board Removal

Steps for removing the main controller board, a critical component.

Lexmark Printer Fuser Assembly Removal

Detailed steps for removing the fuser assembly.

Lexmark Printer Image Transfer Unit (ITU) Removal

Detailed procedure for removing the image transfer unit.

Lexmark Printer Printhead Removal

Steps for removing and replacing the printhead.

Lexmark Printer Connector Locations

Lexmark Printer Controller Board Diagram

Diagram showing the layout of connectors on the controller board.

Lexmark Printer Controller Board Connectors

Detailed pinout and signal information for controller board connectors.

Related product manuals