22 ENGLISH
3. Raise the blade guard and center cover.
4. When cleaning is complete, return the center
cover and tighten the hex socket bolt by performing the
steps above in reverse.
5. Make sure to return the circular saw blade and
center cover to their original positions and tighten the
hex socket bolt.
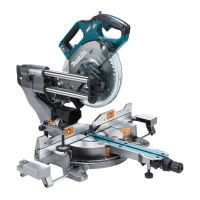
Fig.13: 1. Hex wrench 2. Hex socket bolt 3. Center
cover 4. Blade guard
WARNING: Do not remove spring holding
blade guard. If guard becomes damaged in course
of time or UV light exposure, contact a Makita ser-
vice center for replacement. DO NOT DEFEAT OR
REMOVE GUARD.
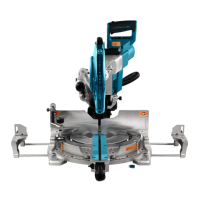
Positioning kerf board
This tool is provided with the kerf boards in the turn
base to minimize tearing on the exit side of a cut. The
blade does not contact the kerf boards. Before use,
1. Make sure to remove the battery cartridge. Then,
loosen all the screws (three each on left and right)
securing the kerf boards.
Fig.14: 1. Kerf board 2. Screw
2. Re-tighten them only to the extent that the kerf
boards can still be easily moved by hand.
3. Lower the handle fully, then pull and turn the stop-
per pin to lock the handle in the lowered position.
4. Pull and turn the stopper pin on the slide pole to
allow the carriage sliding.
Fig.15: 1. Stopper pin
5. Pull the carriage toward you fully.
6.
sides of the blade teeth.
Fig.16
Fig.17: 1. Saw blade 2. Blade teeth 3. Kerf board
4. Left bevel cut 5. Straight cut 6. Right
bevel cut
7.
8. Slide the carriage down to the middle of between
blade teeth.
9.
10. Push the carriage toward the guide fences fully
the sides of the blade teeth.
11.
12. -
per pin for handle lock and raise the handle. Then
tighten all the screws securely.
NOTICE: After setting the bevel angle, ensure
that the kerf boards are adjusted properly. Correct
support of the workpiece and minimizing workpiece
tear out.
Maintaining maximum cutting
capacity
cutting capacity for a 216 mm saw blade.
When installing a new circular saw blade, always check
the lower limit position of the circular saw blade, and if
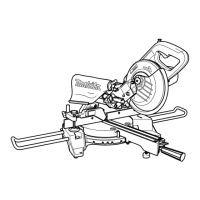
1. Remove the battery cartridge. Then, push the car-
riage toward the guide fence fully and lower the handle
completely.
Fig.18: 1.2. Guide fence
2.
the circular saw blade comes slightly below the cross
section of the guide fence and the top surface of the
turn base.
Fig.19
3. Rotate the blade by hand while holding the handle
all the way down to be sure that the circular saw blade
slightly, if necessary.
WARNING: After installing a new circular saw
blade and with the battery cartridge removed,
always be sure that the circular saw blade does
not contact any part of the lower base when the
handle is lowered completely. If a circular saw
blade makes contact with the base, it may cause
Fig.20
Stopper arm
The lower limit position of the circular saw blade can be
the stopper arm in the direction of the arrow as shown
stops at the desired position when lowering the handle
fully.
Fig.21: 1. Hex wrench 2.3. Stopper
arm
CAUTION:
when adjusting. Failure to do so may cause the
Adjusting the miter angle
CAUTION: After changing the miter angle,
always secure the turn base by returning the
releasing lever in a locked position and tightening
NOTICE: When turning the turn base, be sure to
raise the handle fully.
1. Rotate the grip counterclockwise and press down
the releasing lever into an unlocked position.
2. Hold and swing the grip from side to side to turn
the base.
3. Align the pointer with your desired angle on the
miter angle scale.

 Loading...